Installation
Adding OutfitXR to my store
Installation Steps:
Downloading the OutfitXR App: Go to the Shopify App Store. Search and select "OutfitXR". Click “Install” to start the installation. Make sure to check your theme compatibility on the app listing page or contact support for help.
Post-Installation Verification: After the app is installed, go to the 'Apps' section on your Shopify dashboard. Find 'OutfitXR' listed among your installed apps. If it's not immediately visible, look in the “Installed apps” dropdown menu.
Select ‘OutfitXR - Virtual Try On’.
Click on “Select store” to connect it to your store.
If you don't have a store yet, then proceed with the following:
Click on “Create new store”.
Select ‘Create a store to test and build’, ‘Start with test data’ and click on “Create development store”.
Hover on the test app and click on “Install app”.
Your app will be installed on my Shopify Dev Webshop.
OutftiXR installation app
Begin by visiting the Shopify Partners login page and signing in. After logging in, you will be redirected to the Homepage. From there, navigate to the 'Apps' section by clicking on ‘Apps’ in the left-hand menu. Finally, select 'OutfitXR - Virtual Try On' to proceed.
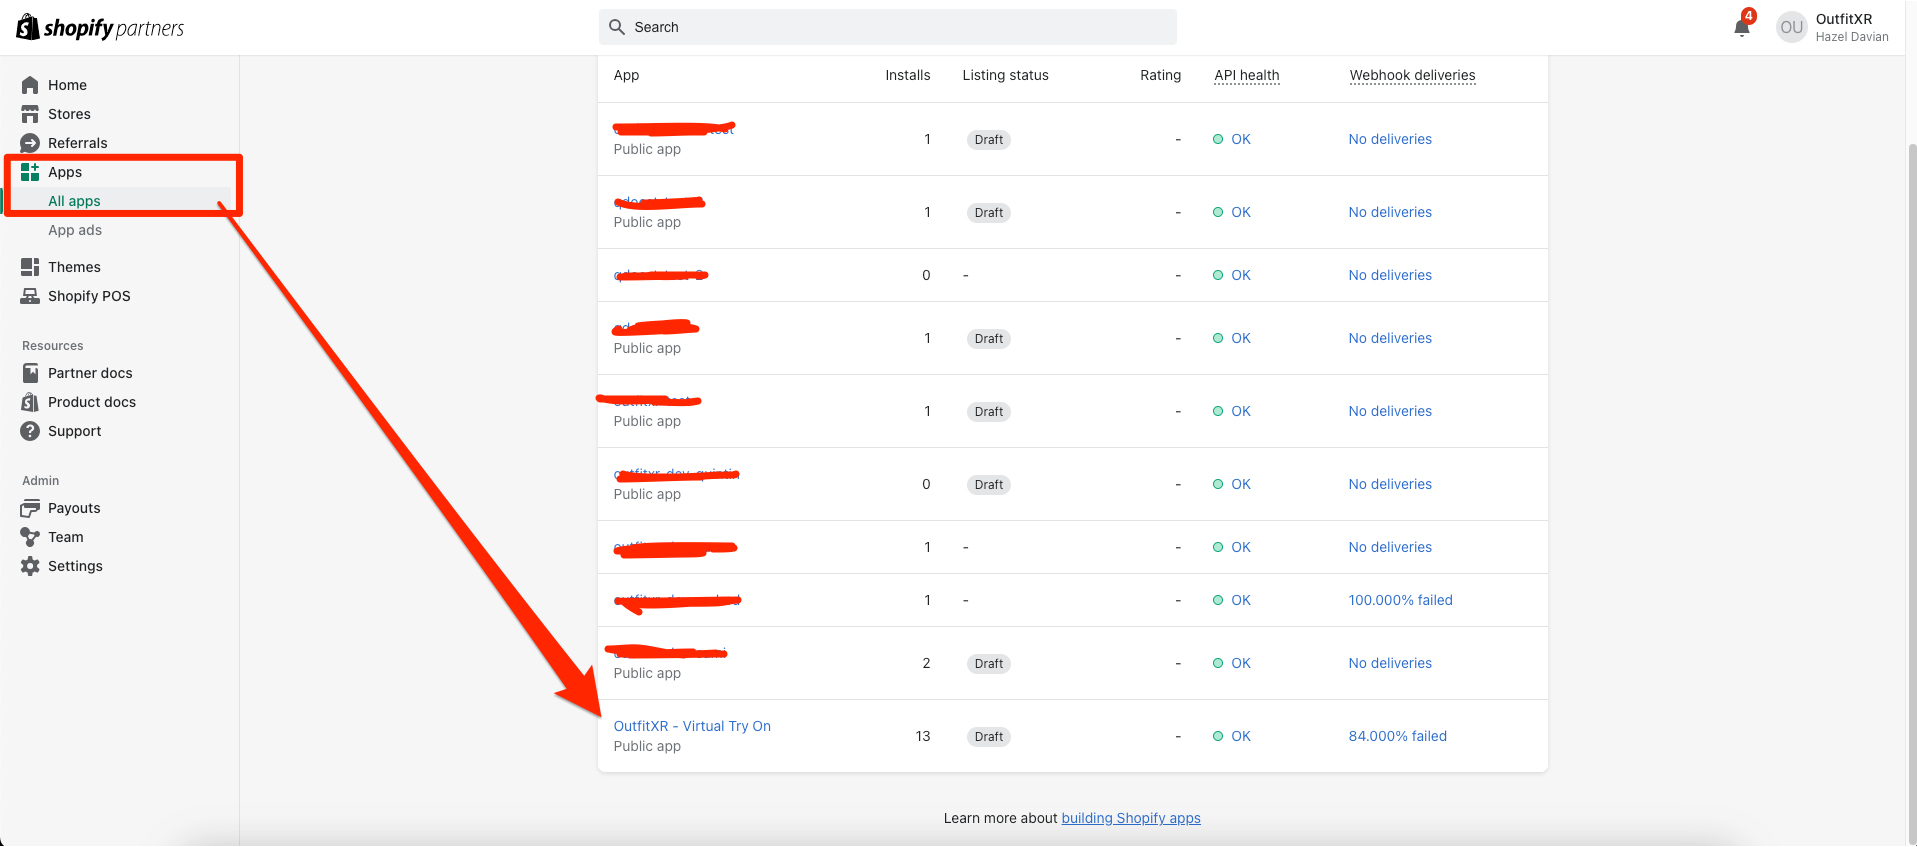
Next, select the store of your choice.

Then, install the app on your chosen store by clicking on the 'Install App' button.
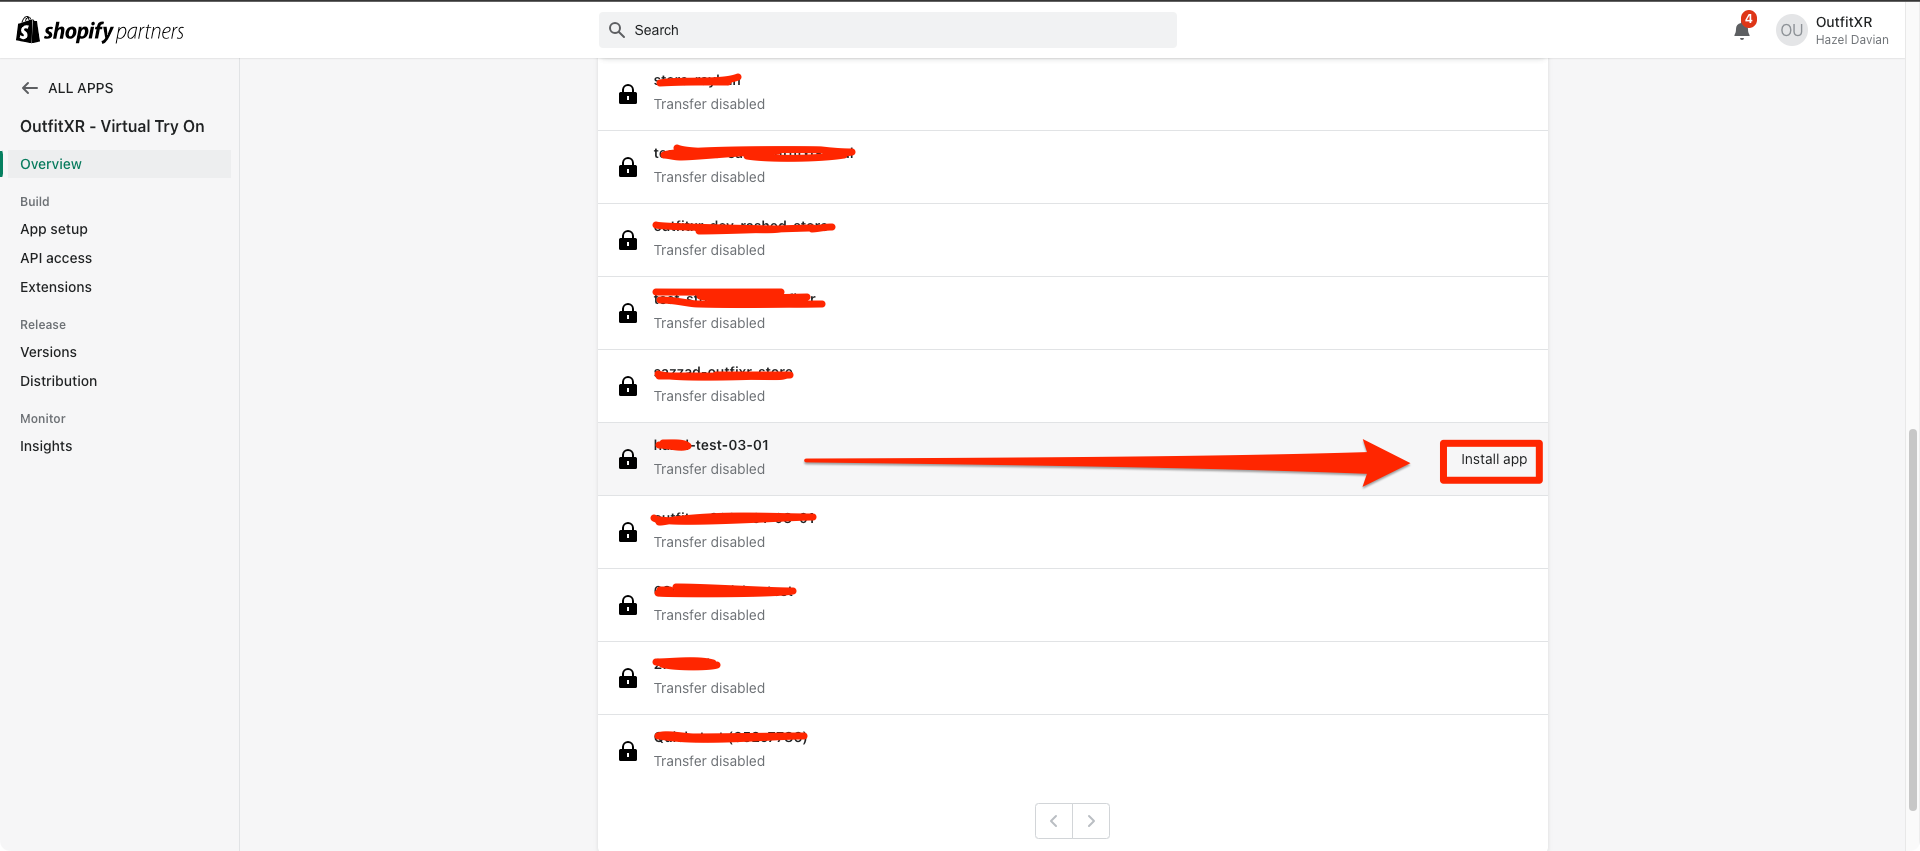
Following this, you will be redirected to the URL: Admin.shopify.com/store/…
Installing OutfitXR Theme
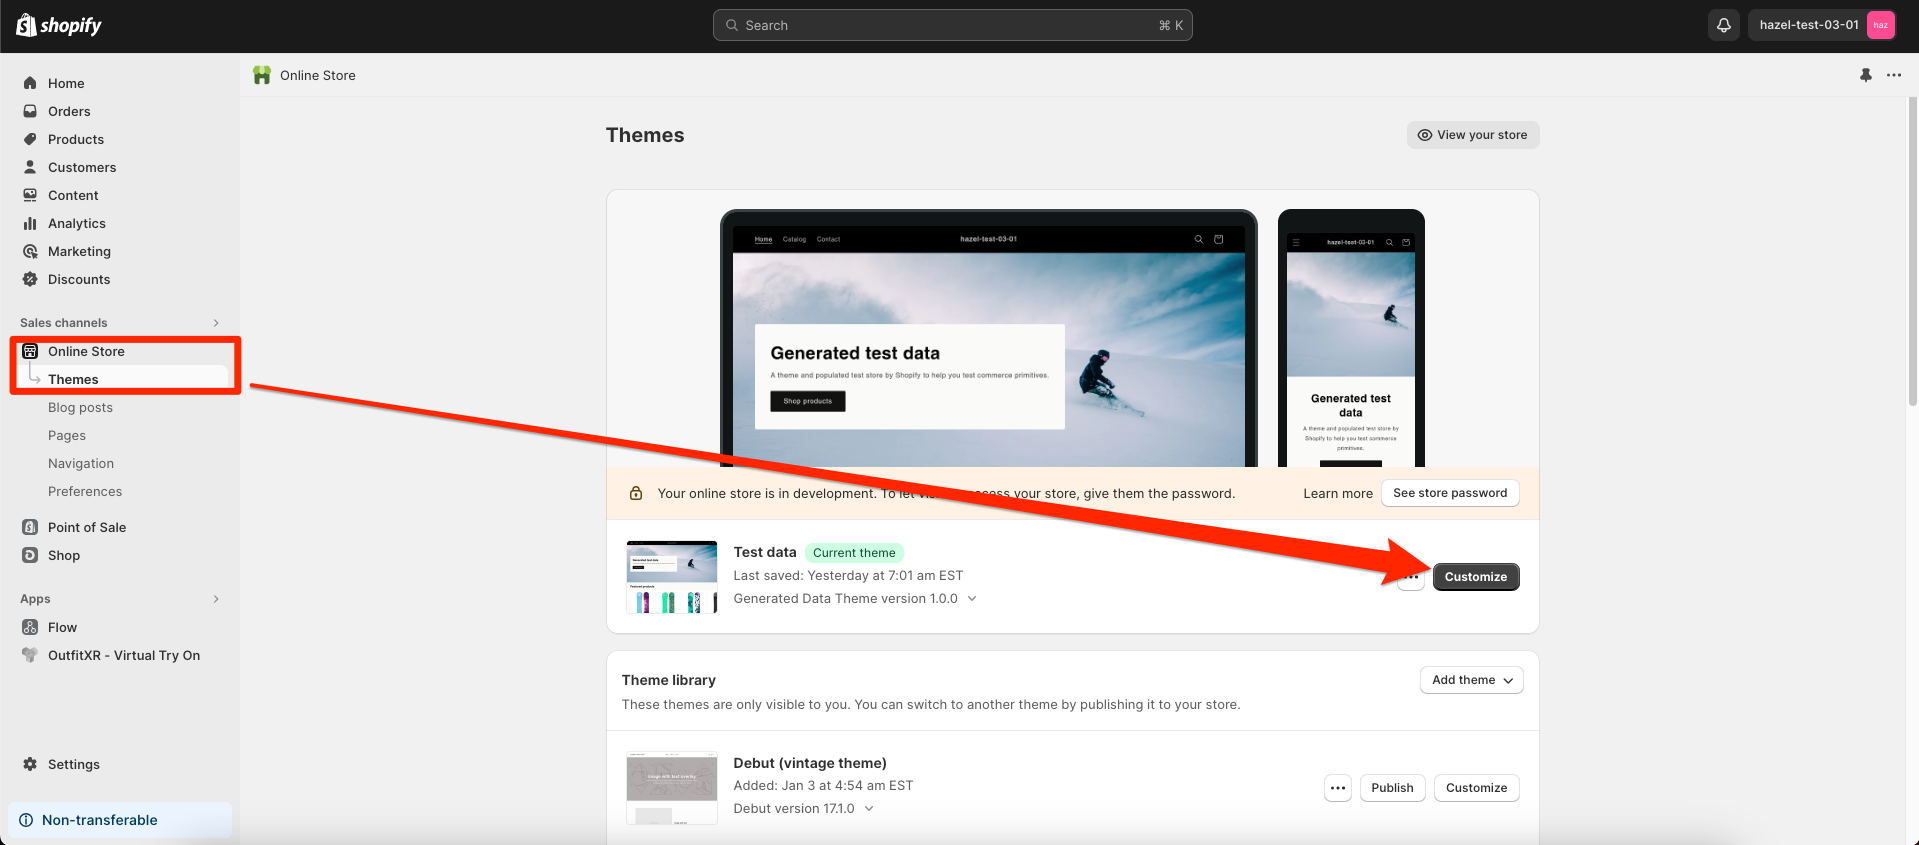
In the admin.shopify interface, navigate to 'Online Store' in the left sidebar menu and select ‘Themes’. This will take you to the Themes overview page. Here, click on ‘Customize’.
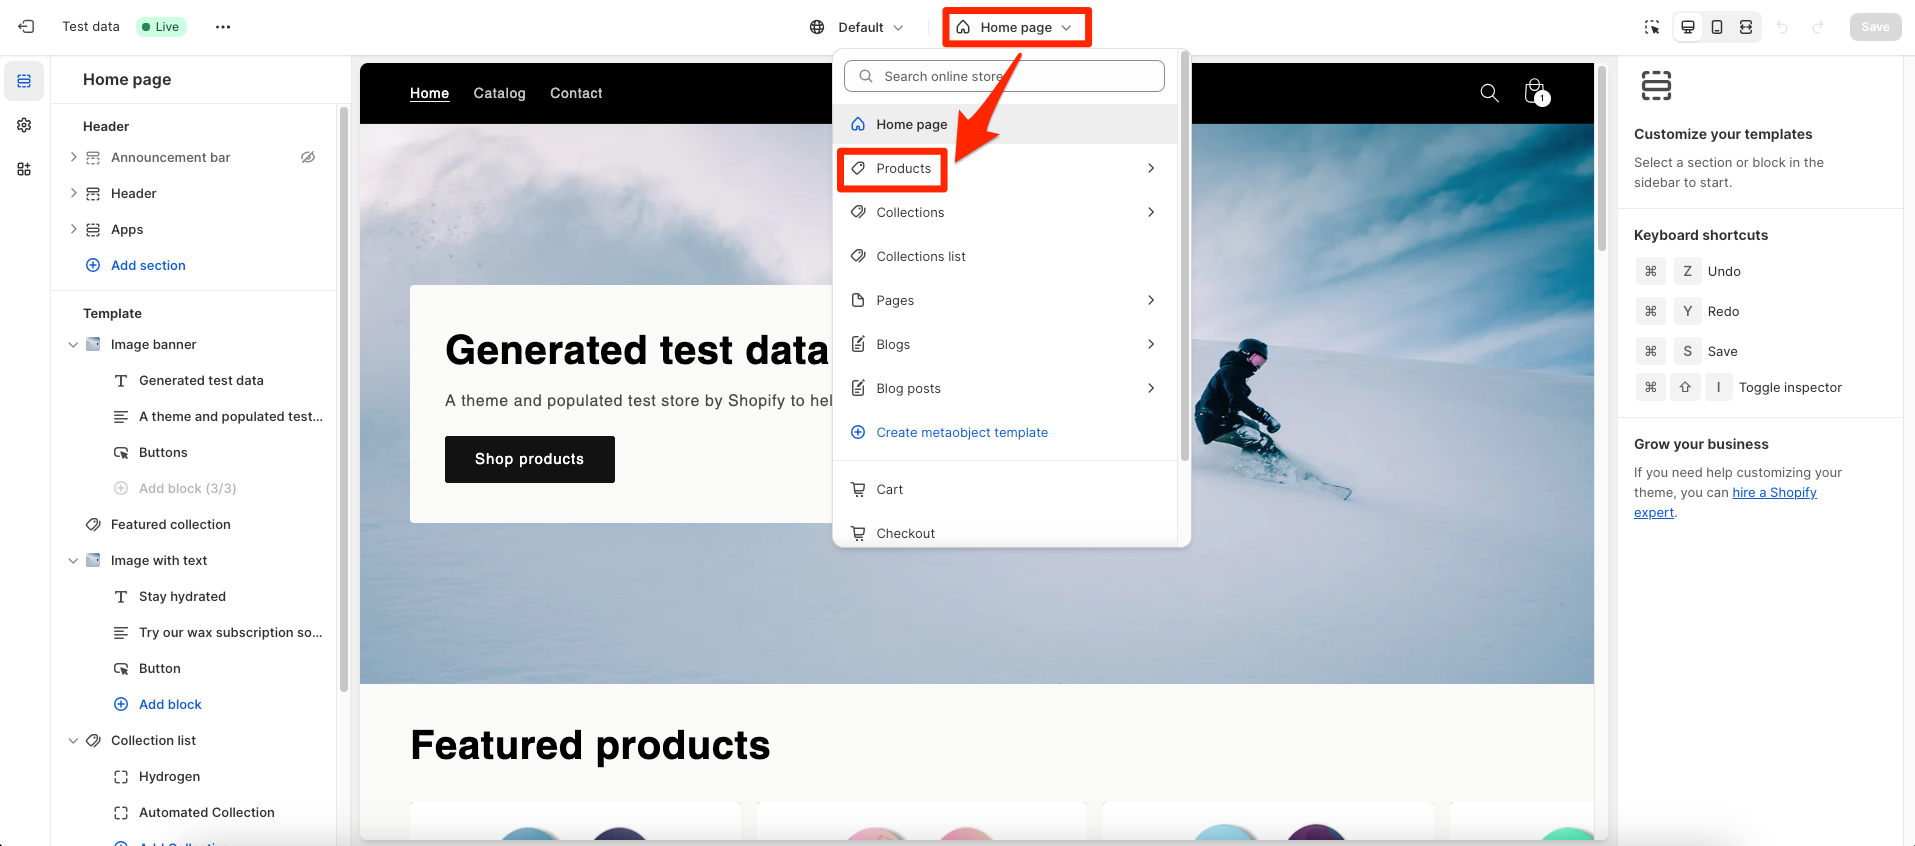
On the 'Themes' page, first click on 'Home page' located in the center, then choose 'Products' followed by 'Default product'. After that, select the product you desire.
After selecting your desired product, click on 'Add Block' in the theme previewer.
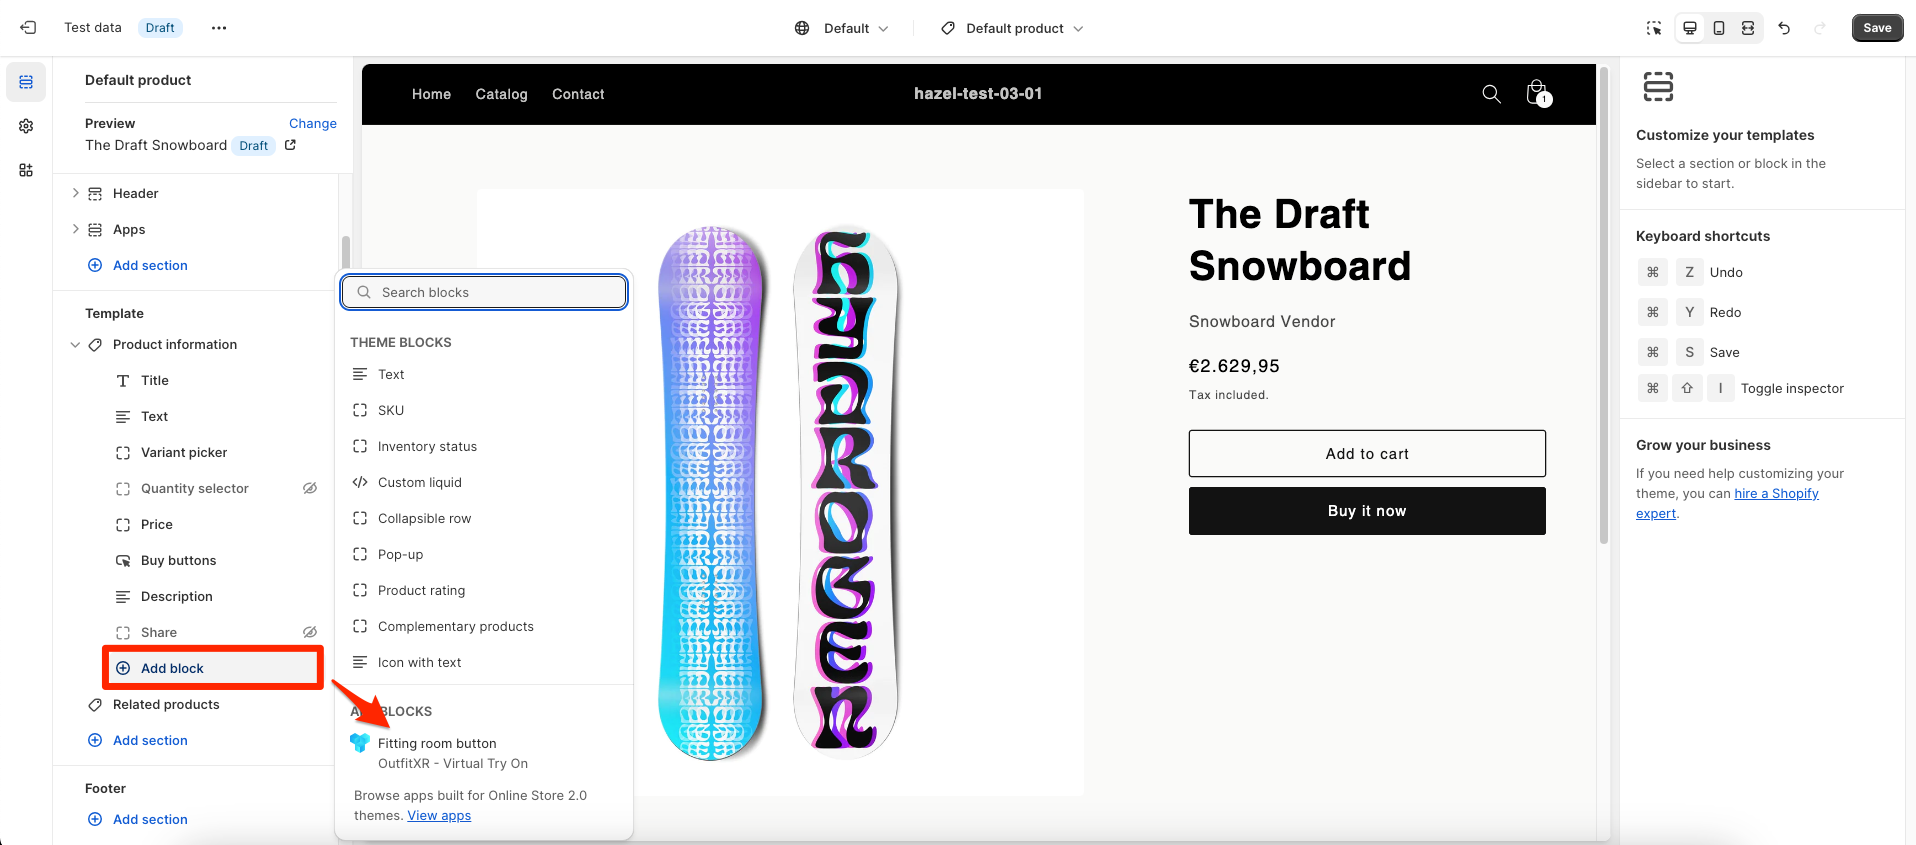
After adding the button, remember to activate it. To do this, go to the top left side menu and select 'App embeds'. Then, enable the Fitting Room button.

Trying out virtual garments in the fitting room
Click on ‘Apps’ in the left sidebar menu, then select ‘OutfitXR - Virtual Try On’. Upon selection, the OutfitXR app will be automatically installed and will appear under the ‘Apps’ section.
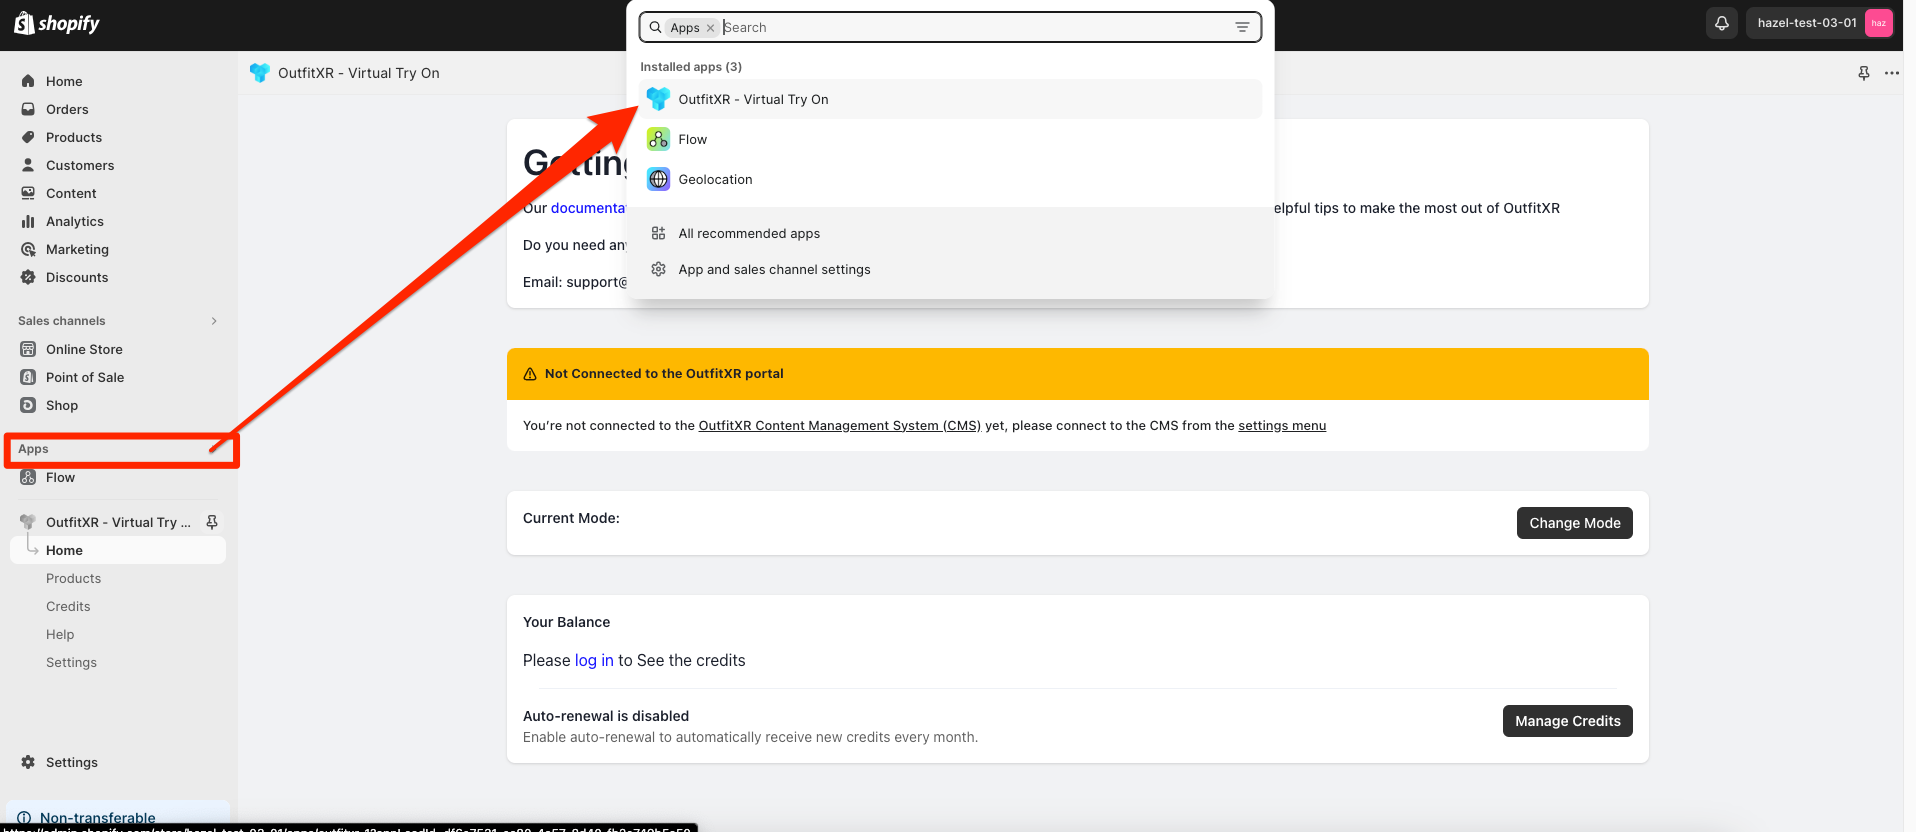
Navigate to the 'Apps' section and click on 'Apps' in the left-hand menu. Choose 'OutfitXR - Virtual Try On' from the list of available apps. Then, go to the menu and select 'Settings.' Here, find and click the 'Login' button, enter your account details, and log in to connect successfully.
Next, select 'Products' from the list displayed.
You will be taken to a page displaying a list of products. Choose a product that hasn't been synced yet and click on the 'Edit' button.
A pop-up window will appear with a field labeled 'Please select/drop a zip file to upload.' Find the zip file on your computer and drag it into this field to start the upload process.
Make sure you have atleast 1 virtual garment file available for the head product. Otherwise you won’t be able to see the view in the fitting room button.
Click on 'Refresh' to verify the upload status. You may need to click 'Refresh' several times until the status changes to 'Available.' Once this is confirmed, you can then close the window.
Now, to set up a fitting room, navigate to the 'Products' page using the menu in the top-left corner.
Locate the recently edited product in the list displayed and click on the eye icon to access it.
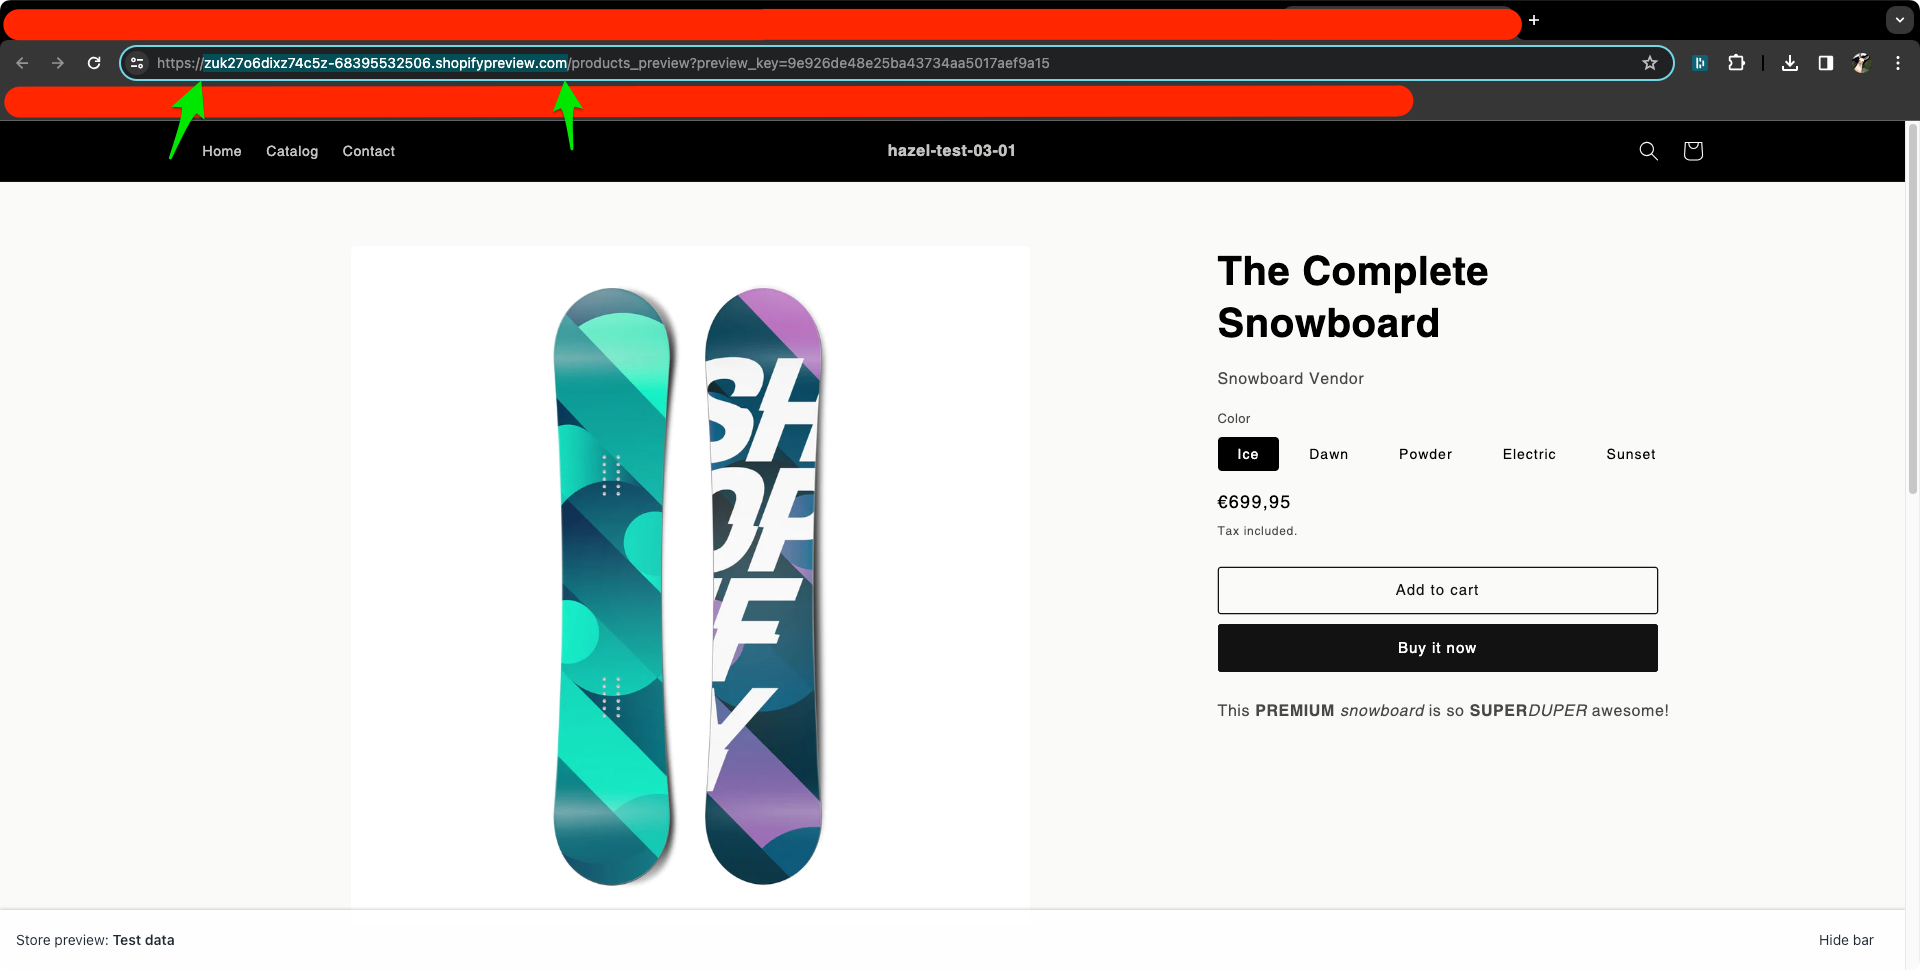
You will be redirected to the product's preview page. Proceed to copy the link from this page, ensuring you copy only the part before the slash. Also, remember to remove 'https://' from the copied link.
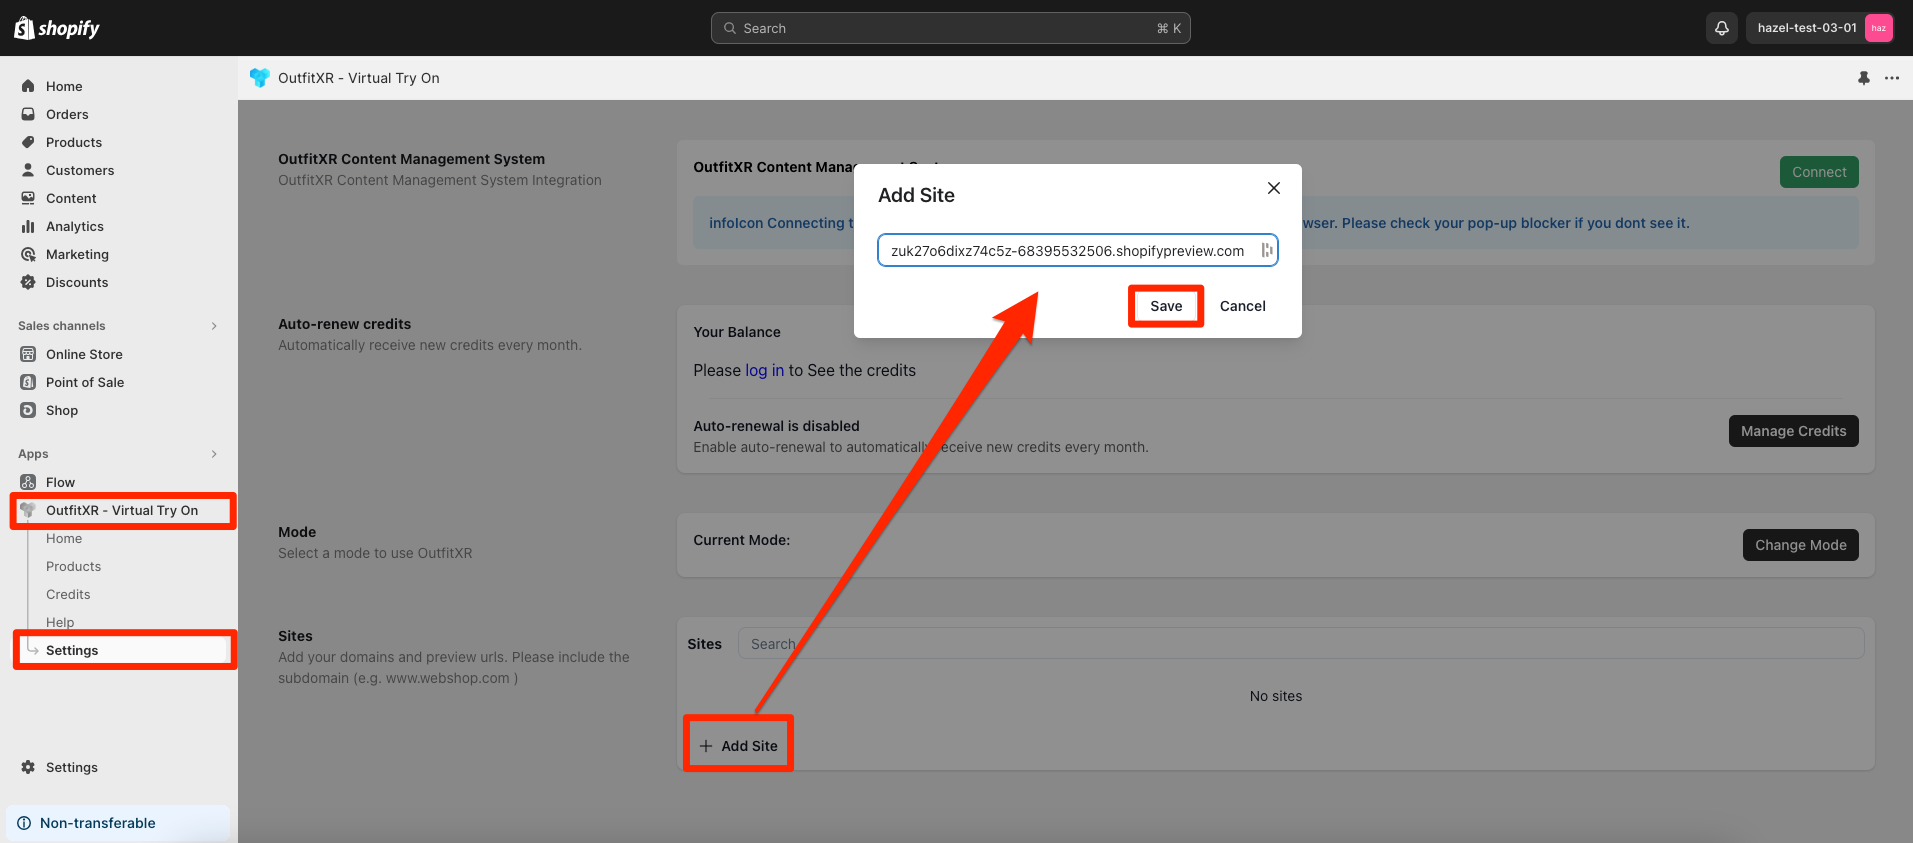
After copying the URL, return to your admin.shopify interface. Then, click on 'OutfitXR - Virtual Try On' under the ‘Apps’ section. Next, proceed to select 'Settings'.
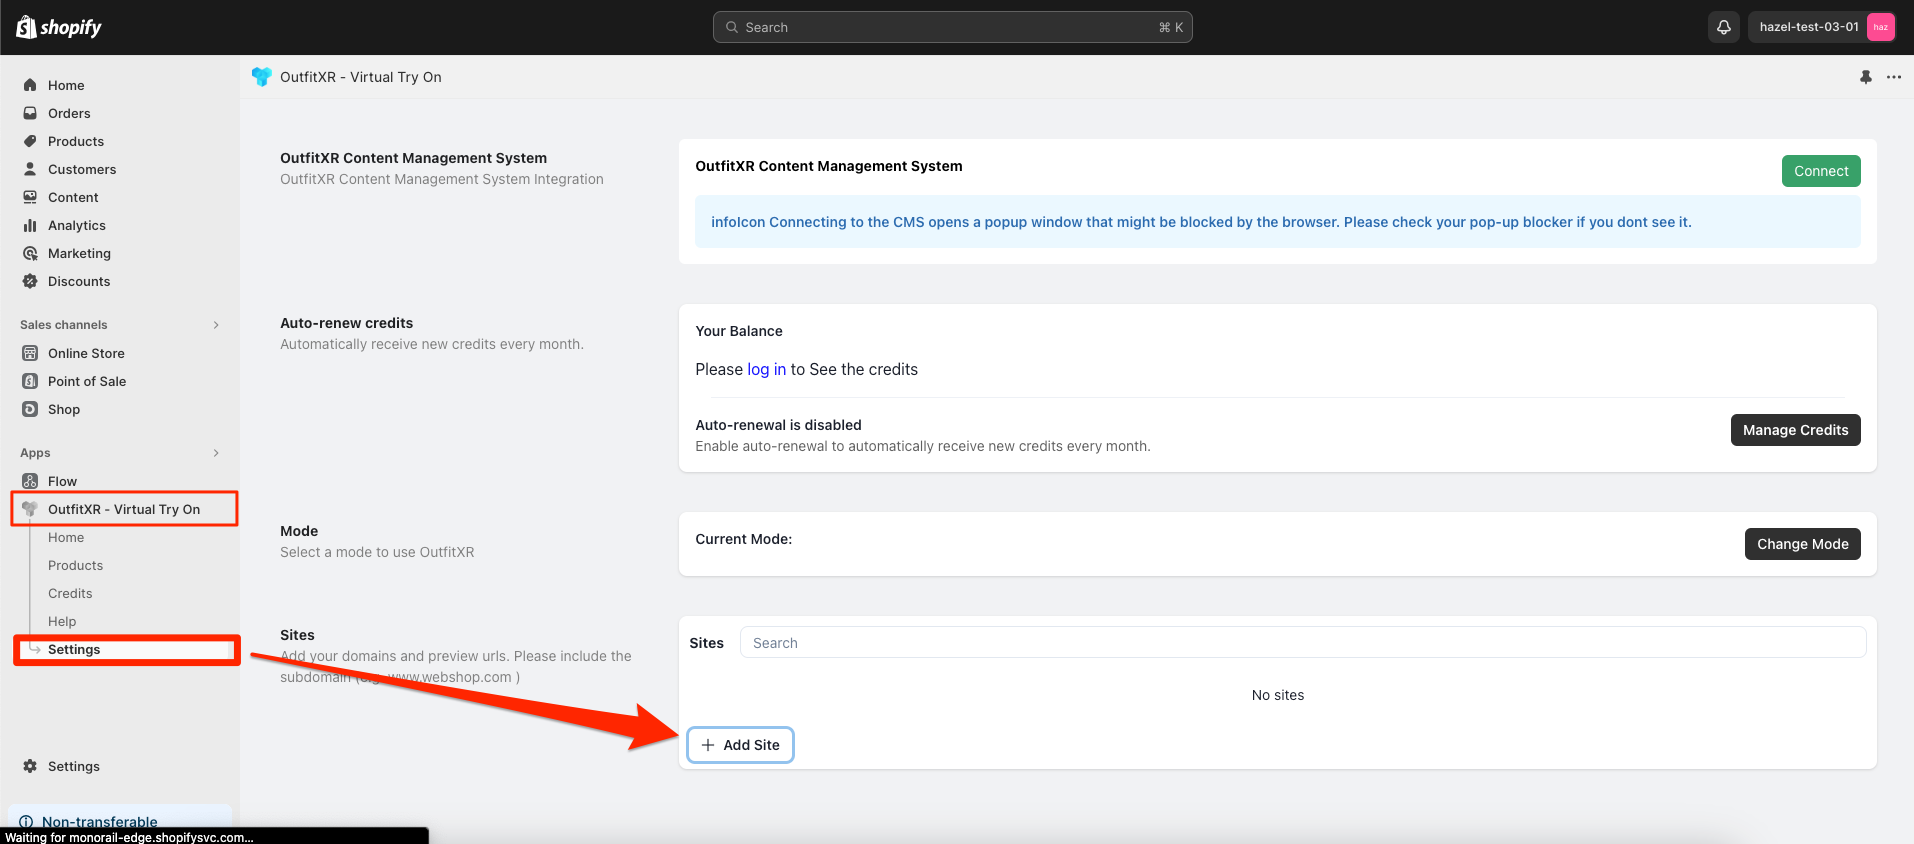
Click on '+ Add site', and a pop-up window will appear. In this window, enter the URL you just copied. Then, click 'Save'.
Return to the 'Products' section. Then, click on the Eye icon for the product whose URL link you just copied.
After opening the product, you will find a 'View in Fitting Room' button on the right side of the page. Click on it, and then select 'Book a new.
Choose an avatar and click the 'Create Fitting Room' button.
You will be redirected to the Fitting Room automatically. Please wait for your personal fitting room to load before testing the garment.
When the fitting room is displayed, choose an avatar, and then try on clothing garments on the selected avatar.
In the displayed fitting room, you can view a simulation of the garment on the avatar.
Utilize the 'Heat Map' option to visualize how garments of various sizes fit on the avatar. This will help you identify whether the garments are too loose or too tight on your selected avatar.
Explore other customization options to adjust the fitting room and avatar as needed.
