How to create a digital T-Shirt with a print
https://www.youtube.com/watch?v=MFfS21gZdhA
TShirt_Export.zip
TShirt_Print.zprj.zip
Measure your garment and add specifications in outfitxr.io
Begin with, obtaining precise measurements of the T-shirt.
Follow this scheme to take the correct measurements for a T-shirt. Here is essential to consider:
Front Length: measure from the highest point of the shoulder to the bottom edge line of the t-shirt.
Front Length 2: the lowest point of the neck circumference to the bottom edge line of the t-shirt.
Back Length: the lowest point of the neck circumference, may consider the midpoint of the t-shirt, to the bottom edge.
Chest Width
Waist Width
Hem Width
Shoulder Width
Shoulders Length: width across both shoulders
Sleeve Length above the arm and length from under the arm.
Armhole Depth: the top of the shoulder seam to the underarm point.
Sleeve Width
Side Length: the underarm points to the hem.
Neck Circumference
Neck Width
Creating T-Shirt Garment in Marvelous Designer
Open Marvelous Designer and create a new project. Go to File then New, and save your project in a desired folder.
Choose a default avatar or import your own avatar if you have one in the left panel of the window.
Double-click and then click 'OK'. The avatar is now displayed on the left side in the 3D view, accompanied by a 2D silhouette on the right.
Make sure that you have an overview of both 3D window and 2D Pattern Window. Use the mouse scroll wheel for navigation in both areas—press it to move and rotate. To zoom in, simply scroll the wheel, and for 3D space rotation, utilise the right mouse button.
Start drawing in the 2D Pattern Window. Select the “Polygon” tool and start drawing along the avatar shape. Click to create vertices, connecting them to form the desired polygon.
When creating a garment in Marvelous Designer, start with the first half of the shape and complete the process by double-clicking." Adjust the pattern points and lines by clicking the Z key, or go to the Edit Pattern in 2D View, to shape the T-shirt's neckline, sleeves, and according to the sizes you already have. Adjust line dimensions by clicking on the line and then using the right mouse button to access 'Change Length’.
And then select the pattern and copy, right click paste with command Symmetric Pattern. Select the middle line and right click merge.
And further, you can proceed with editing this shape. For beginners, it can be quite complicated to understand some patterns and draw everything from scratch.
That's why in Marvelous Designer, there are already default garments that you can import into your project, and then adjust them as needed. So, we will start modeling the T-shirt again, but through a much easier method. Don't forget to have the garment sizes open.
In the left panel, navigate to the Garment section and select the simplest T-shirt from the list. Double-click on it.
Select all shapes, and in the 3D view, right-click. Choose 'Reset 2D Arrangement.
Now navigate to Edit Sewing and select 'Edit Sewing' from the menu. Try to delete existing stitches by choosing the segments that already have a bold color.
We'll do them later; it's important for you to understand how the stitches are joined.
In the 2D view, go to Edit Pattern, or press the Z key to edit patterns and lines. Select the middle lines of the front and back shapes, then right-click and choose 'Merge'; we don't need these lines.
The next step is to arrange the back shape and sleeves around the Avatar in the 3D view. Use the Select and Move command, where you can move and rotate shapes.
Ensure the white side of the surface is facing outward. Holding and dragging the green ring allows rotation around the axis of the green arrow. Pressing the 'Shift' key while dragging ensures the surface aligns straight when the rotation is nearly accurate.
You can also navigate to the Avatar in the tools at the top of the 3D window and select 'Show Arrangement Points. This allows you to arrange the shapes more accurately around the Avatar.
Select a shape in the 3D view, then drag and drop it onto the desired arrangement points of the Avatar for precise positioning. Repeat this process for all shapes.
Deselect arrangement points.
In the 2D view, make sure they cover the torso area. Press Shift+Z for a quick overview of the size lines in your design. Select the "Transform Pattern" command and choose all shapes to arrange and cover the torso area.
Now it's time to adjust the patterns according to the measurements we have. Select the "Edit Pattern" tool and choose the desired line, then adjust it as needed. Select the line, right-click, and choose "Change Length" from the menu.
Refine curved lines for the neckline and sleeve easily using the 'Edit Curvature' tool or by pressing the 'C' key for quick adjustments.
Select the lines and move them if needed. Choose "Edit Curvature" to edit curvatures or "Edit Curvature Points" for adding or adjusting points. Check all measurements. For internal measurements, you need guidelines; you can create these using the 'Internal Lines' tool. Create these internal lines, then adjust the measurements according to your real T-shirt measurements.
Don't forget about the sleeves. Choose 'Edit Pattern' again and adjust all measurements.
Select the line, then right-click and choose "Change Line" from the menu. Fill in the length line according to your measurements. Change the direction if needed, then click OK.
Repeat the steps for all your measurements. Move points and lines if needed. Make sure that you save your project periodically.
Continue to refine and improve the shape, paying attention to sizes and the garment pattern. Sometimes, you need to go back to certain dimensions because changing one line can affect others.
Use also Ctrl+Z, to go back if it’s needed. Save periodically your project. When you are confident that your garment is complete, it's time for the seaming process.
In the 3D Window navigate to the Segment Sewing. Begin by selecting one segment, then choose a second segment to get an overview of the sewing connections.
Ensure that the seam lines are straight but not in an X shape.
Consider the logical connections between garment patterns; where the T-shirt would have seams for example shoulders, sides, sleeves with back and front garment.
Now you can simulate the fitting on the avatar and to see how the T-shirt drapes on the avatar, by clicking the Space bar.
Adjust the garment on the avatar by selecting and dragging points.
To create sewing edge lines for the T-Shirt, right-click and choose 'Offset as Internal Line.' In the popup window, input the necessary size.
Click OK. Select the Internal Line, right-click then Cut & Sew.
Repeat the same process for the Back Shape and the sleeve shapes. Let's repeat the same procedure for the neckline of the T-shirt. In the 3D window, simulate the fitting of the T-Shirt garment on the avatar by pressing the SpaceBar.
Apply textures and materials to the T-shirt by navigating to the fabric in the left panel, selecting a desired fabric, and then adjusting it in the right panel. You can edit the texture in the Property Editor.
Apply the fabric texture to all shapes, and then delete unused fabrics.
In the Property Editor, add a Normal Map and adjust the color of the fabric.
Save the project by pressing Ctrl+S. Next, we will further work on the texture of the T-shirt; we will add a print.
Select the shape that needs the print. Now, go to the top panel, choose 'Materials,' then 'Graphics,' and finally 'Graphic (2D Pattern)'.
In the opened window, locate your print or the image you want to add. Then, drag and click the mouse to indicate on the shape where the print should be placed. Adjust the print on the shape by resizing it, moving it, and placing it in the desired location.
Repeat the same process for the back shape of the T-shirt. Your T-shirt with the print is now finalised. Prepare to export this.
Change the 2D View Window to UV Editor.
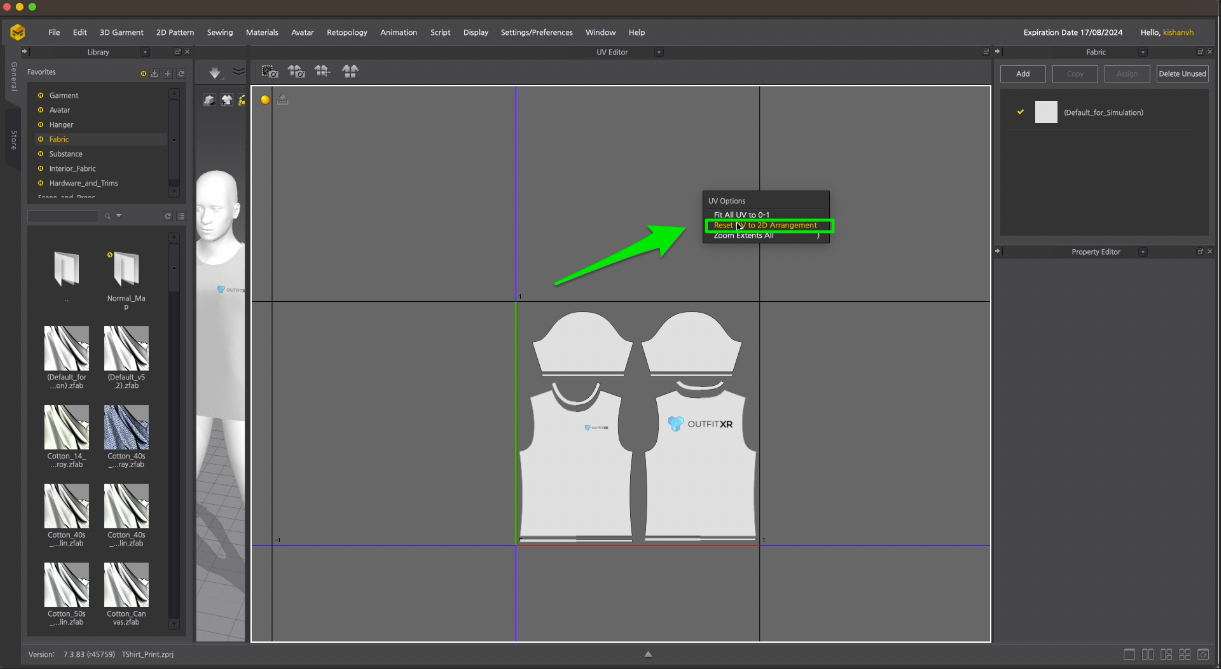
Arrange all shapes in a square layout, one next to the other. To ensure that the patterns are proportionally sized, it's correct to right-click and choose 'Reset UV to 2D Arrangement. Again Arrange all shapes in a square layout, one next to the other.
Make sure that each pattern is clearly visible and does not overlap with another pattern.
Select all patterns, right-click and choose “Fit UV to 0-1”, then click OK.
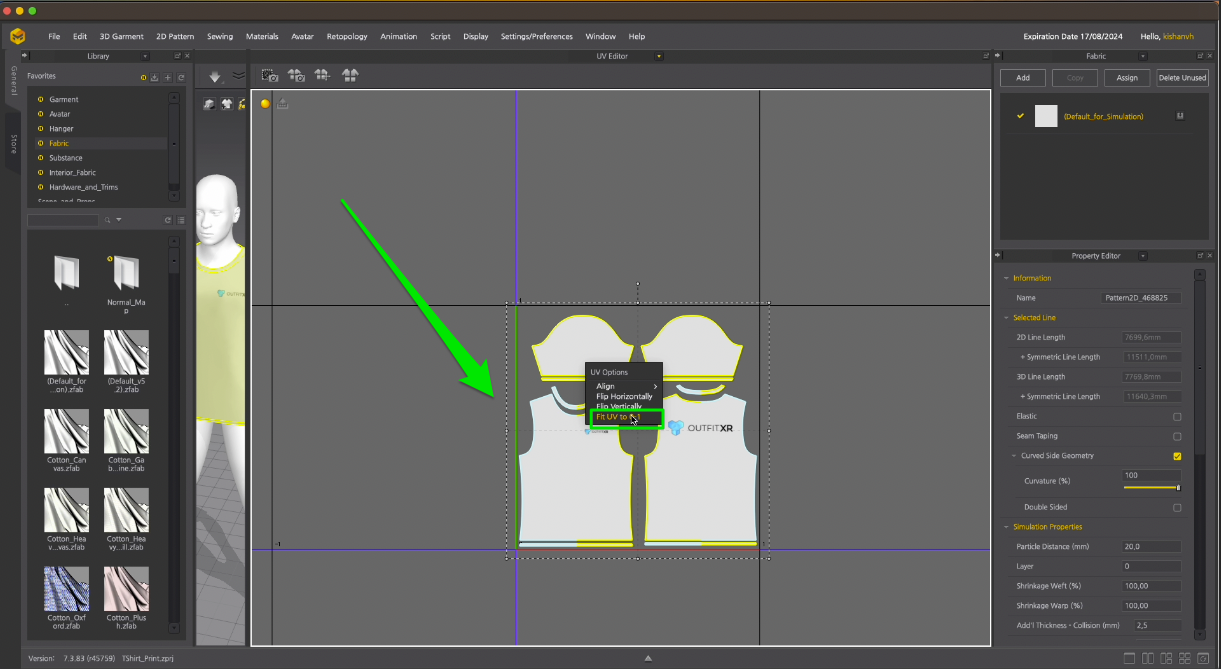
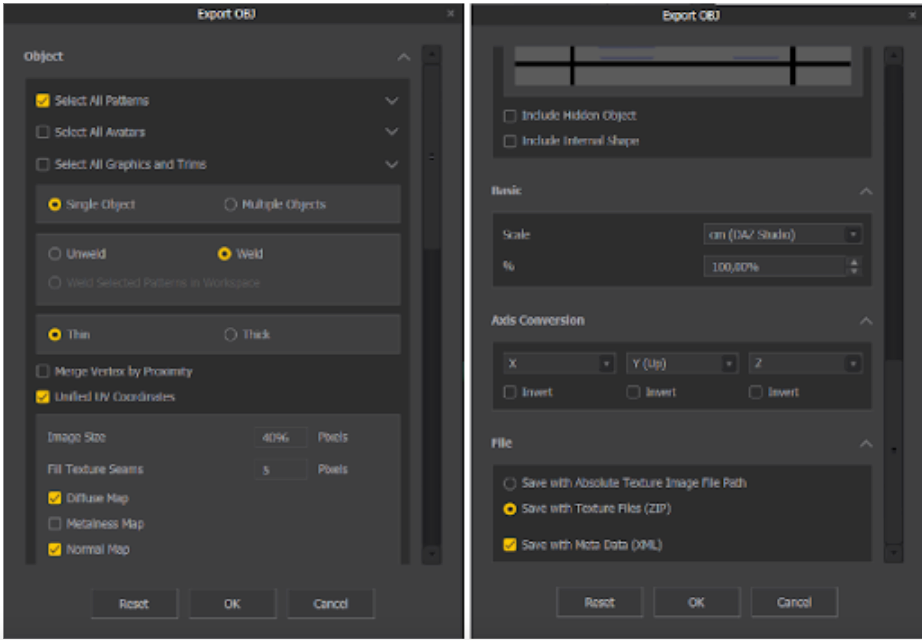
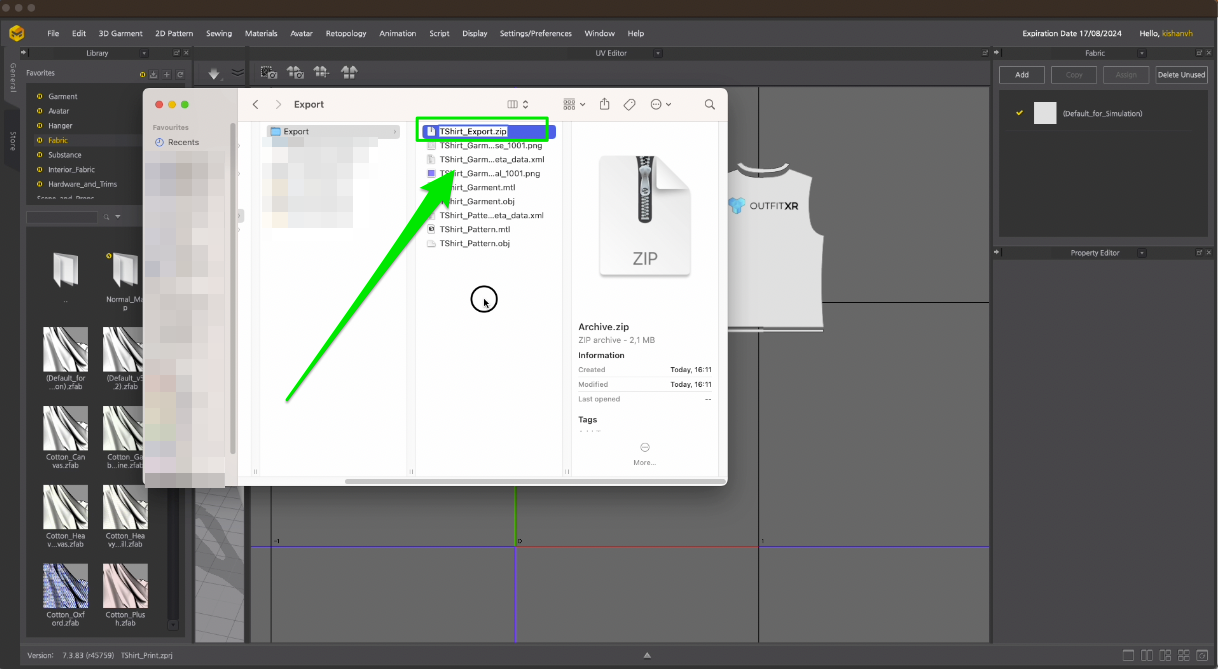
Go to the File, Export, OBJ and choose the right Path. Choose a folder where you will save your export and name it. The name should contain the name of the garment, and the word “Garment”. That's really important. And click Save.
In the popup window choose the same settings. Click Ok.
In the UV Editor window right-click and choose “Reset UV to 2D Arrangement” and again export it. Go to the File Export, OBJ and choose again the same folder.
Name the fail. Make sure that the name contains the word “Pattern”. Press Save.
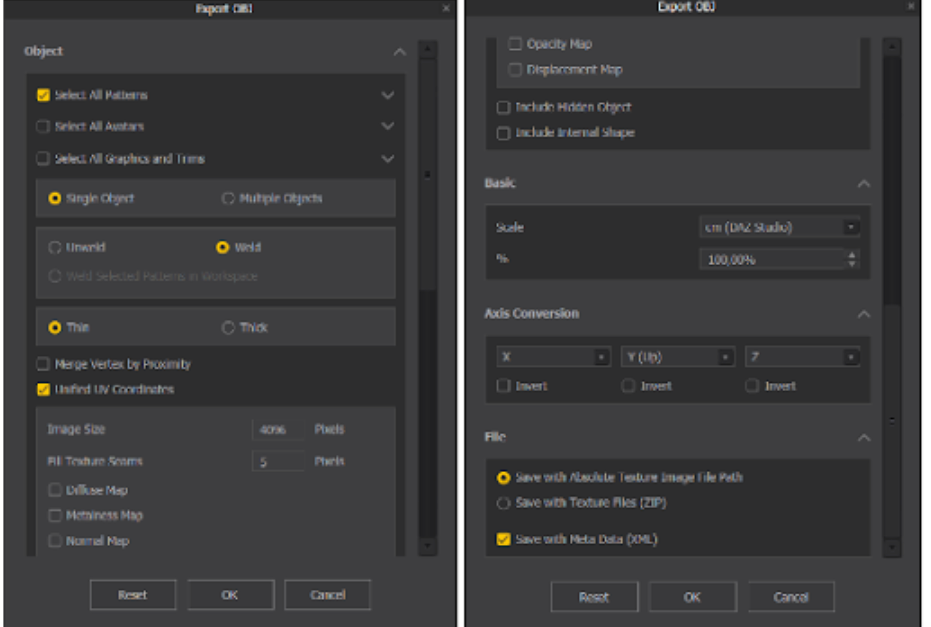
Export with the following settings. Press OK.
Now, open File Explorer and locate the folder where you exported the files.
Unzip Tshirt_Garment folder.
Select all files Cut and place the content of this folder together with other files. Zip all files in one folder. Name it. Now this folder is ready to import to outfitXR.
Test your garment in Shopify Fitting Room
Let's set up a Fitting Room on Shopify.
Navigate to the Shopify Partners login page, and log in. Once logged in, you'll be directed to the Homepage.
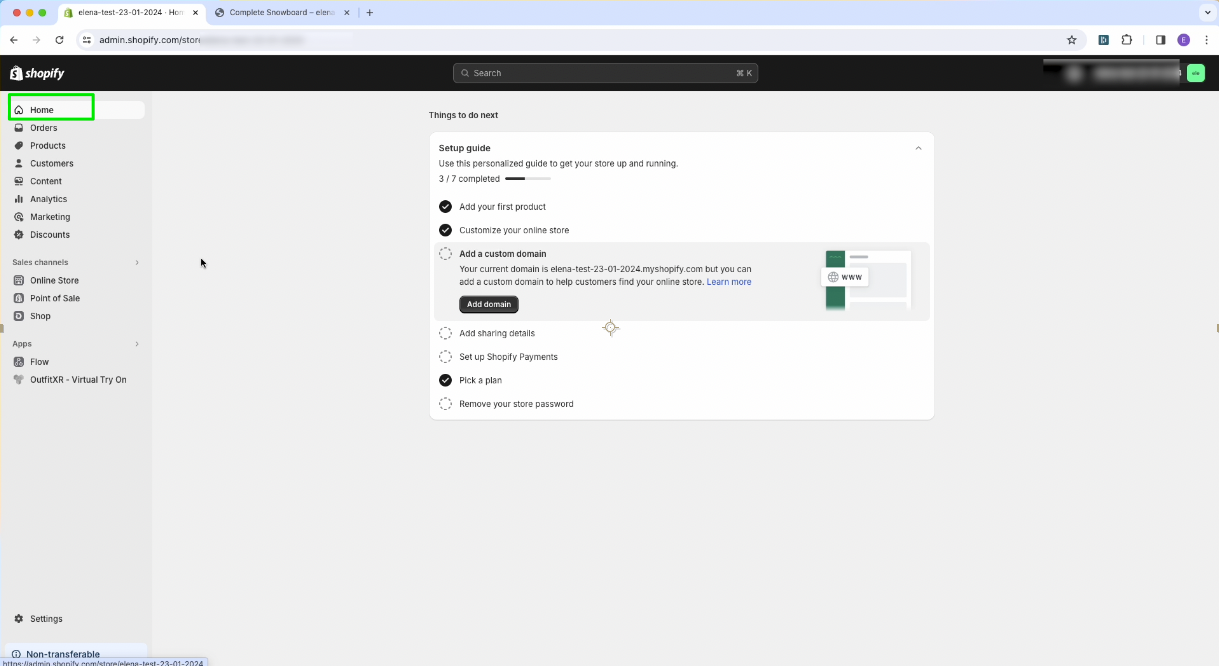
Access the Apps section and click on 'Apps' in the left-hand menu. Select 'OutfitXR - Virtual Try On' from the list of apps.
Navigate to the settings and verify if you are connected. Click on the "Connect" or "Reconnect" button.
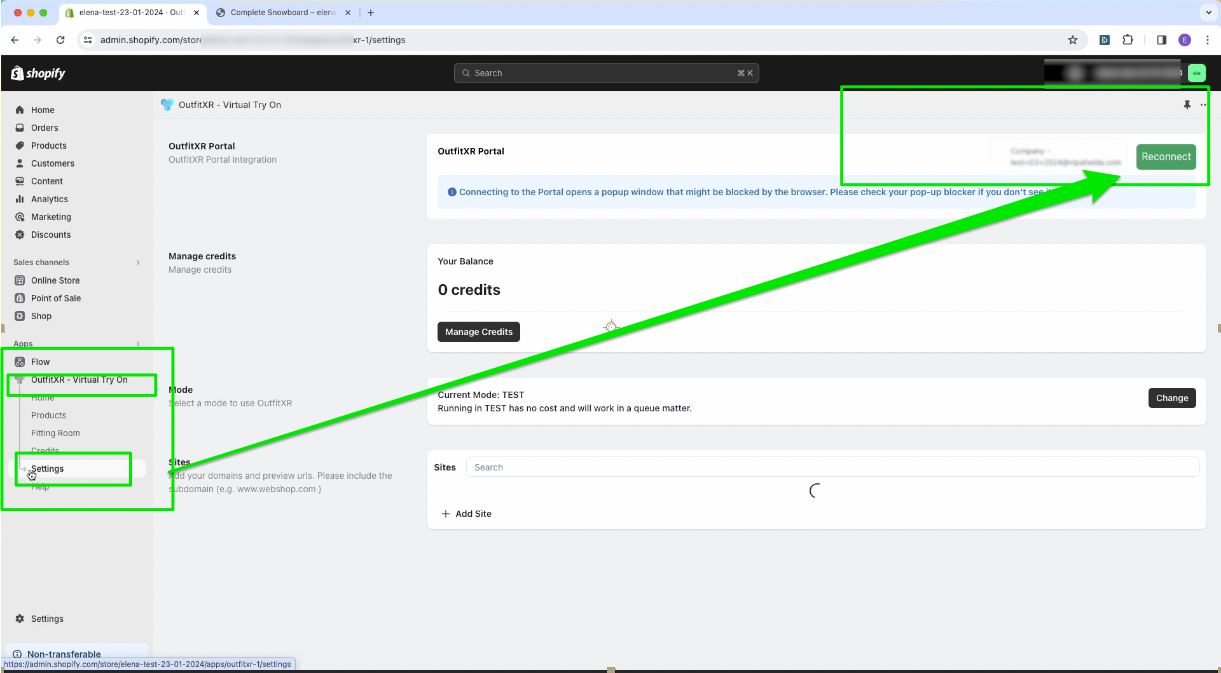
Introduce your account details and click log in. Now, you're directed to your own store.
Continue by choosing 'Products' from the displayed list of the app. You will be directed to a page with a list of products.
Select a product from the list that is not yet synced, and click on the 'Edit' button."
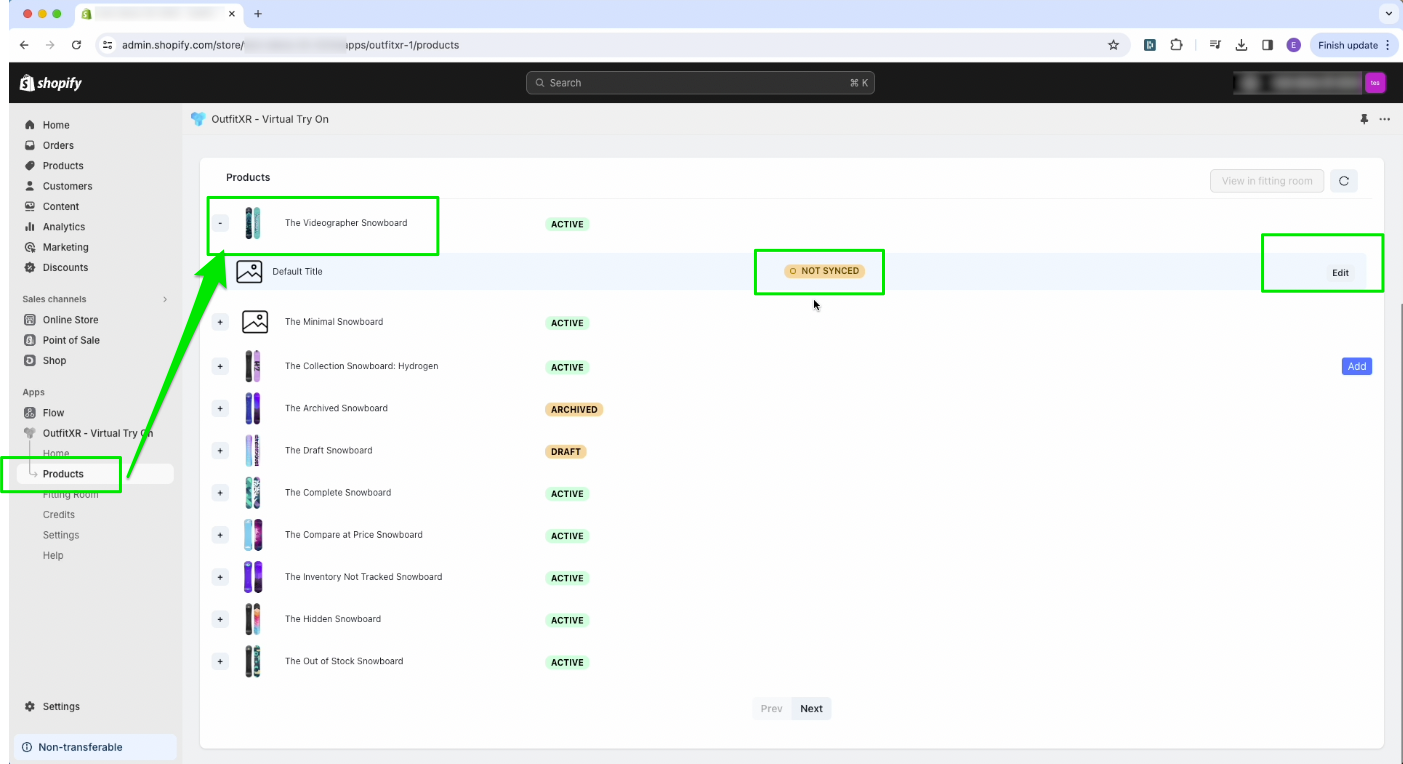
Within the pop-up window, navigate to the Properties section and make a change for your preferred gender. Make sure the change is confirmed.
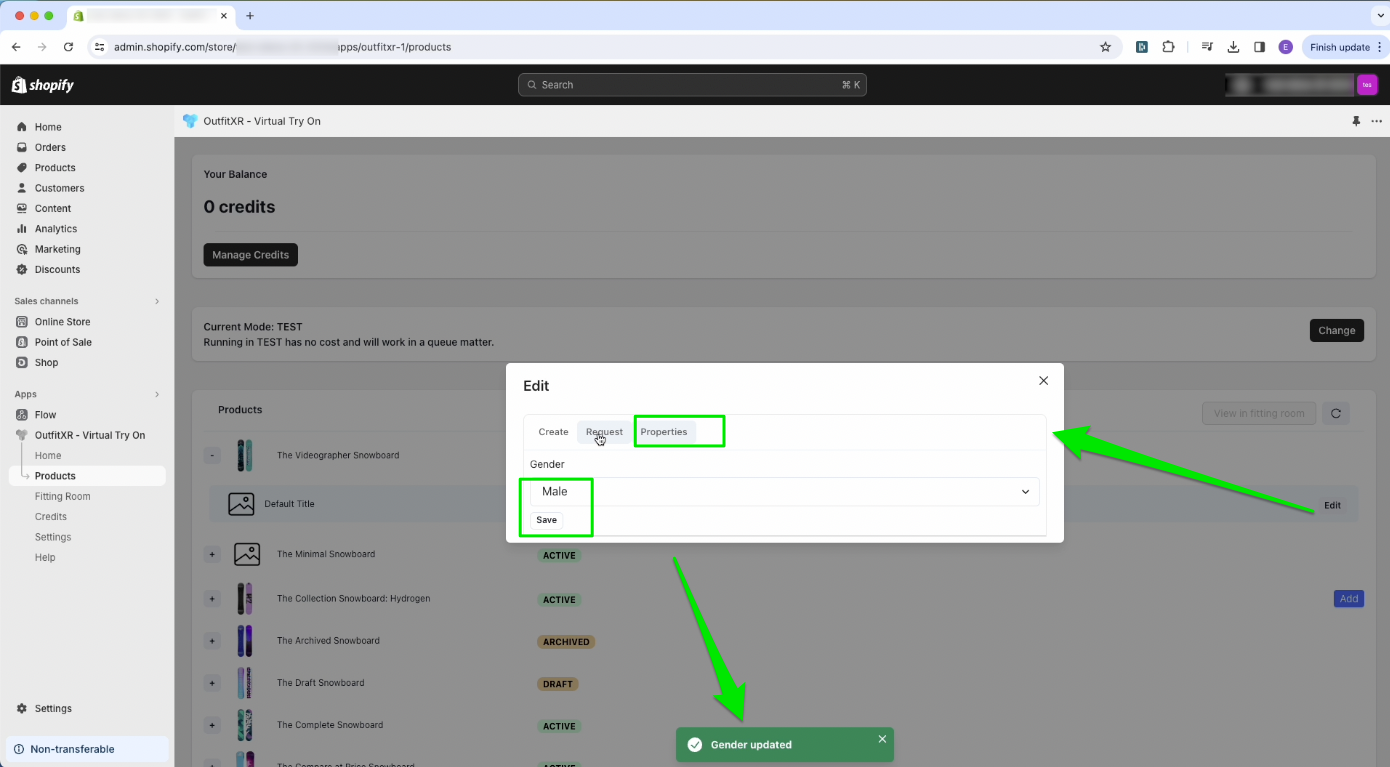
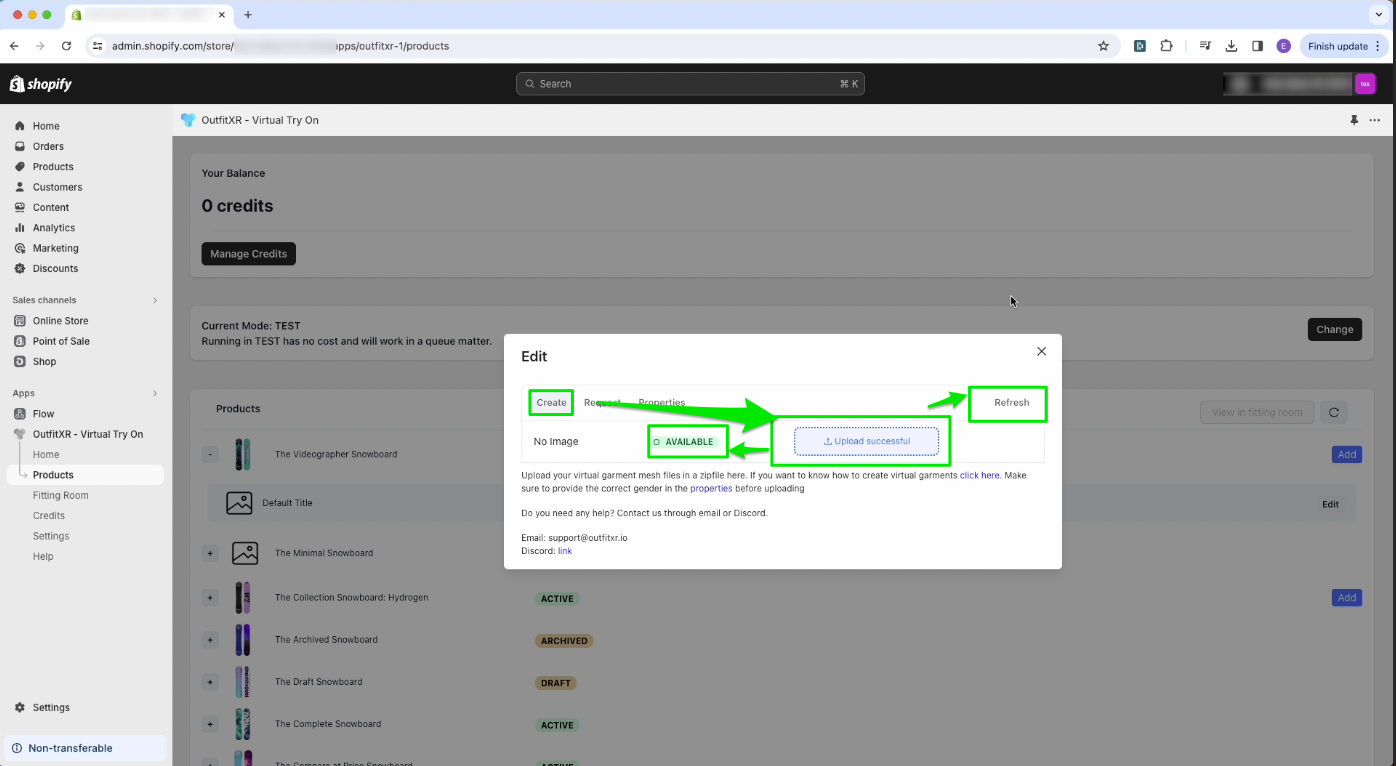
Return to the Create section, locate the zip file on your computer and drag it into the field labeled “upload” to upload it.
Click on 'Refresh' to check the upload status. You can click 'Refresh' a few times; make sure the status now shows 'Available.' Once confirmed, you can close the window.
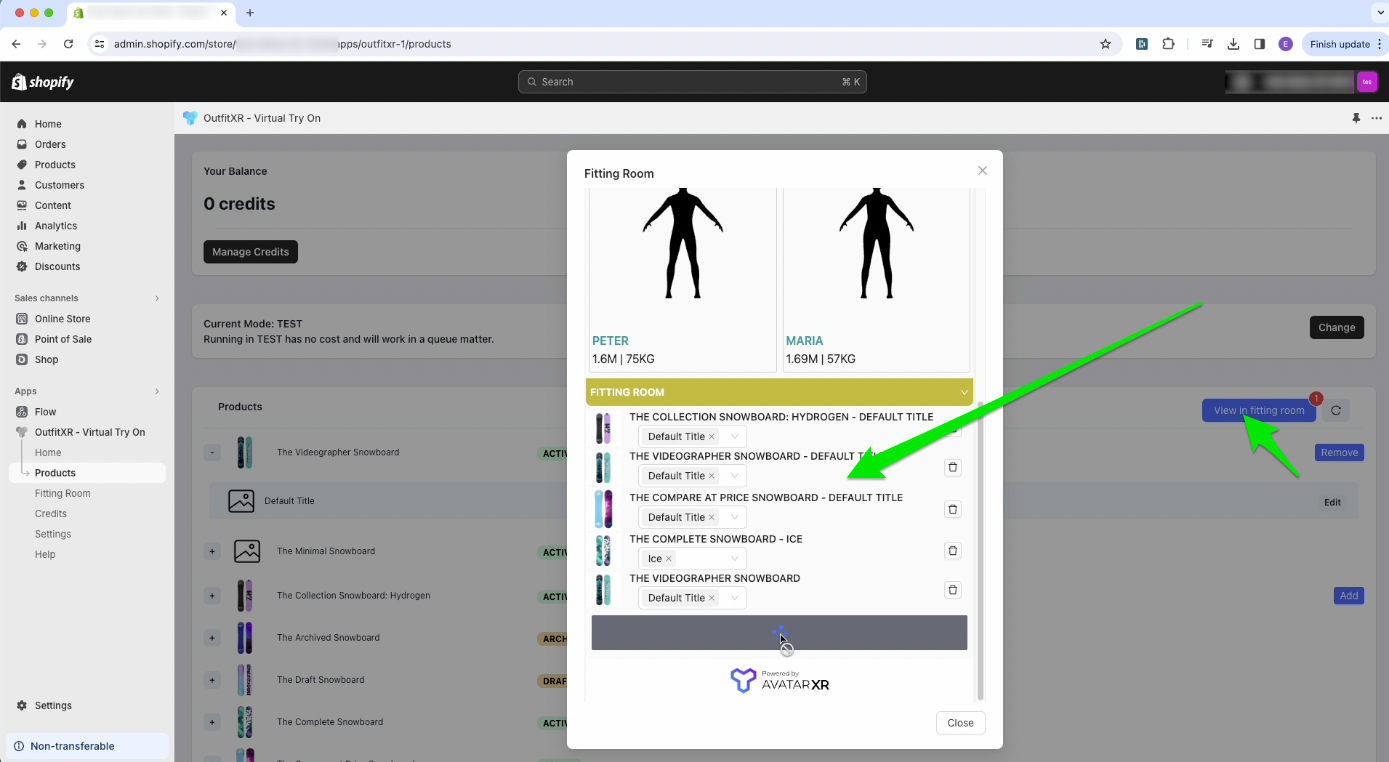
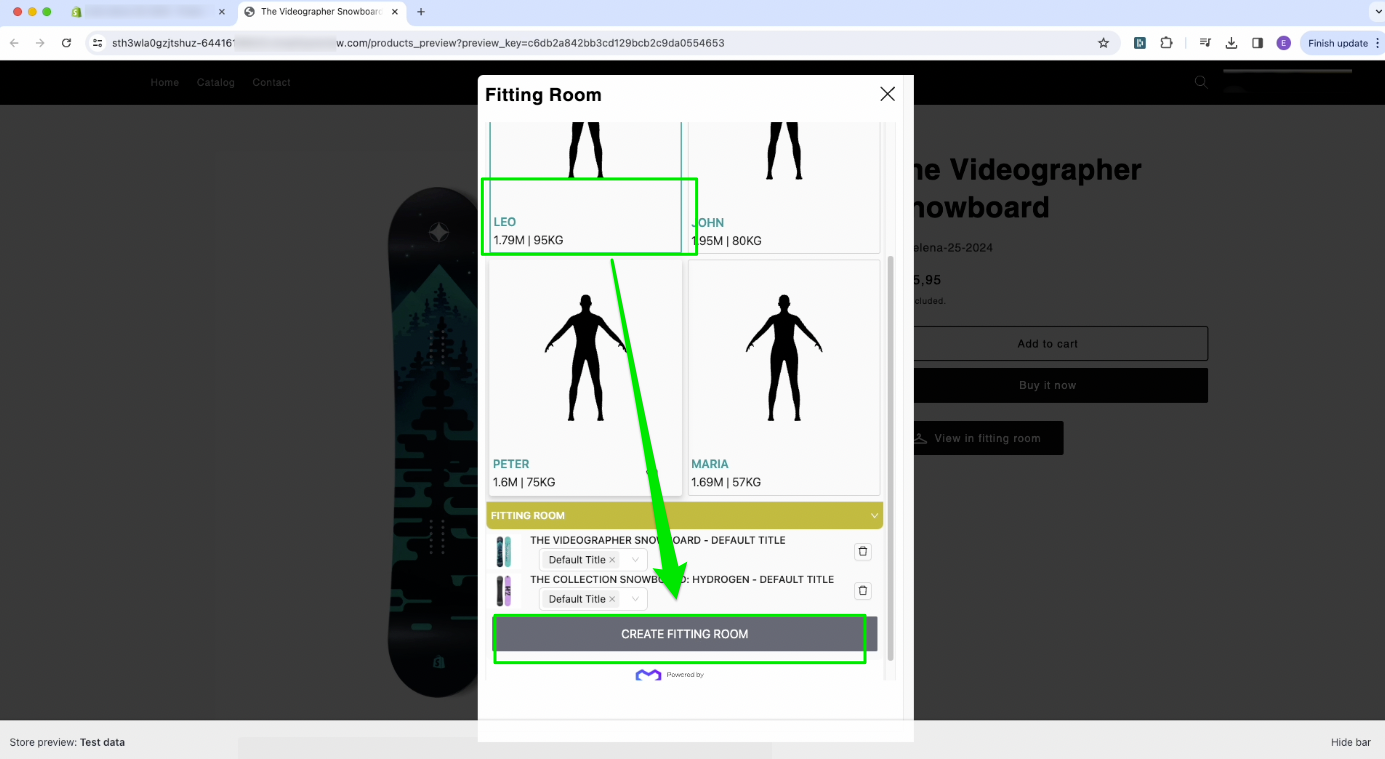
Let's initiate a Fitting Room session. You can create a Fitting Room session directly from the current page by clicking the 'Add' button.Then access 'View in Fitting Room'. In the popup window, choose an avatar and click the 'Create Fitting Room' button. And you can continue.
Another method is to access the 'Products' page from the top-left menu. Search for the recently edited product in the displayed list and click on the eye icon to access it.
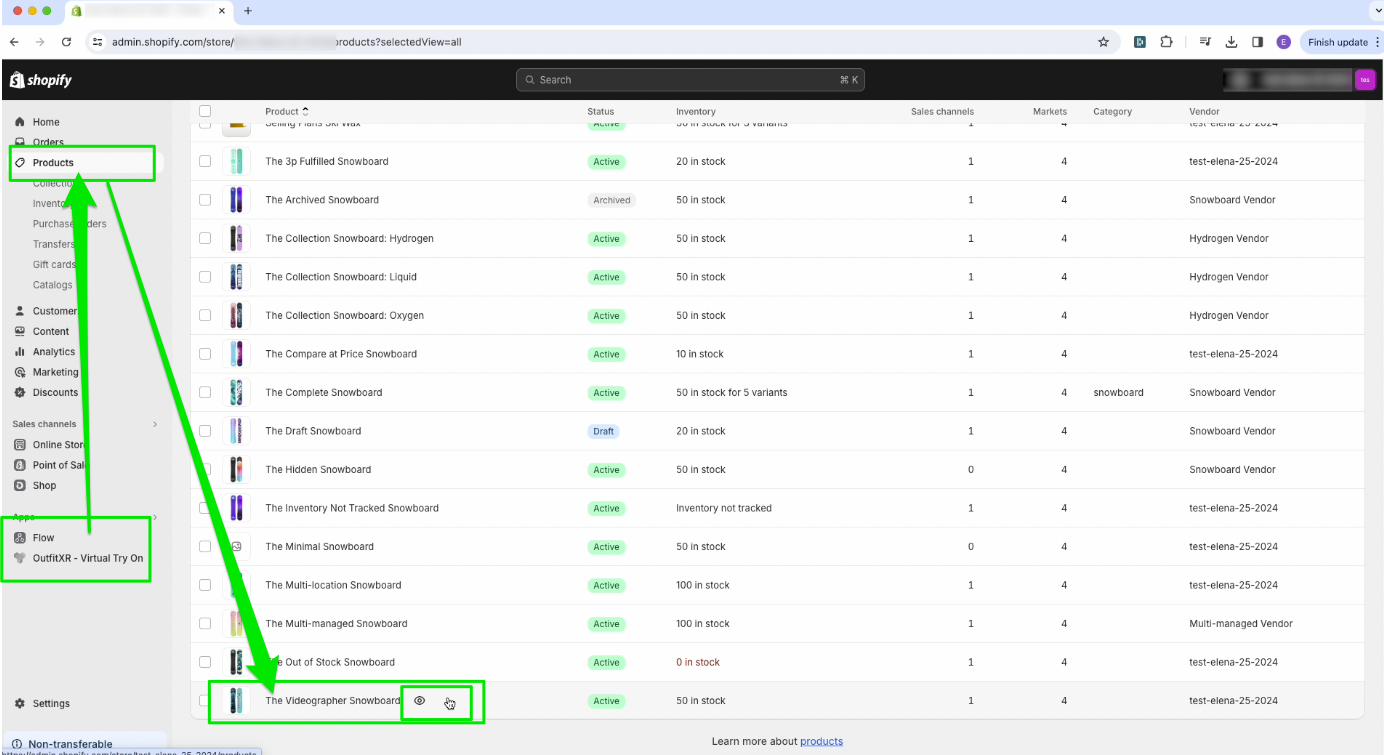
After the product has opened, you will see a 'View in Fitting Room' button on the right side of its page. Click on it.
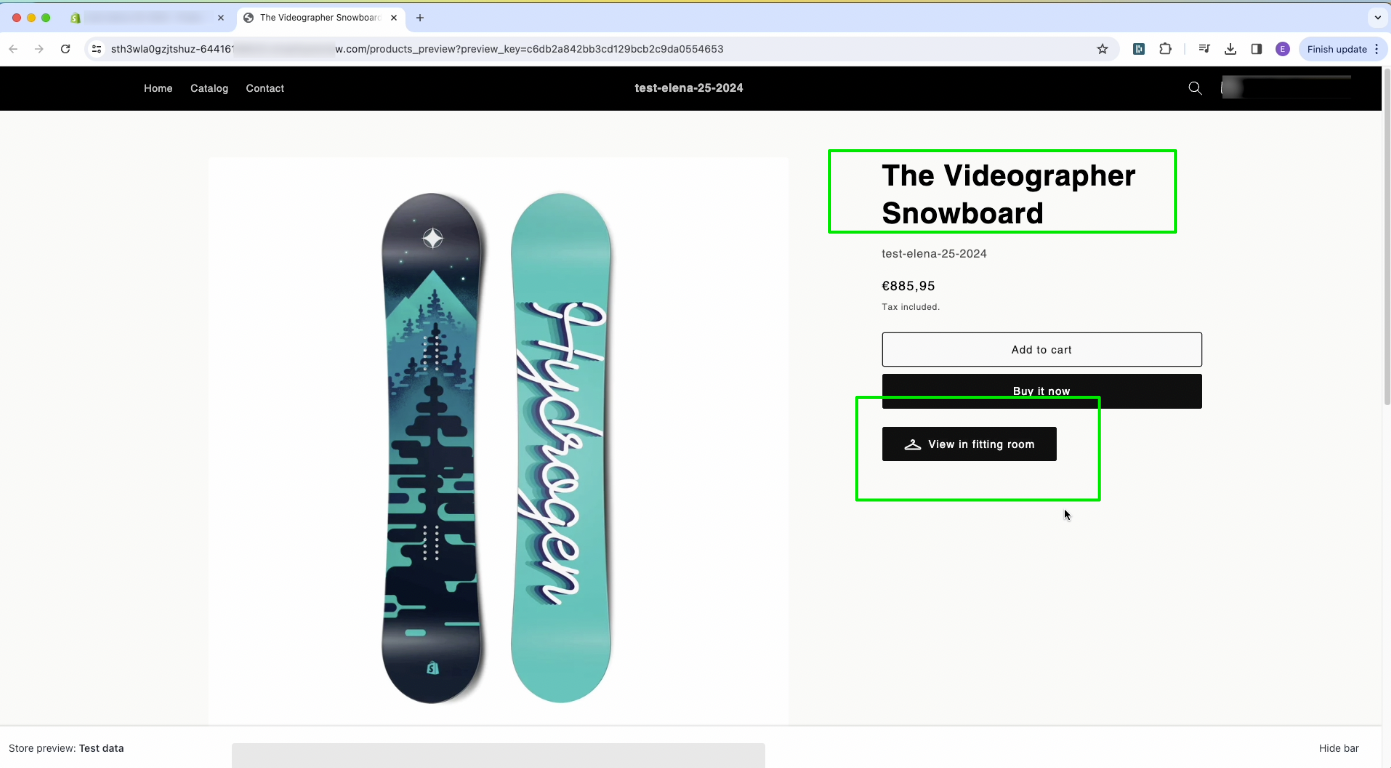
And then Click on 'Book a new.' Now, select an avatar and click the 'Create Fitting Room' button.
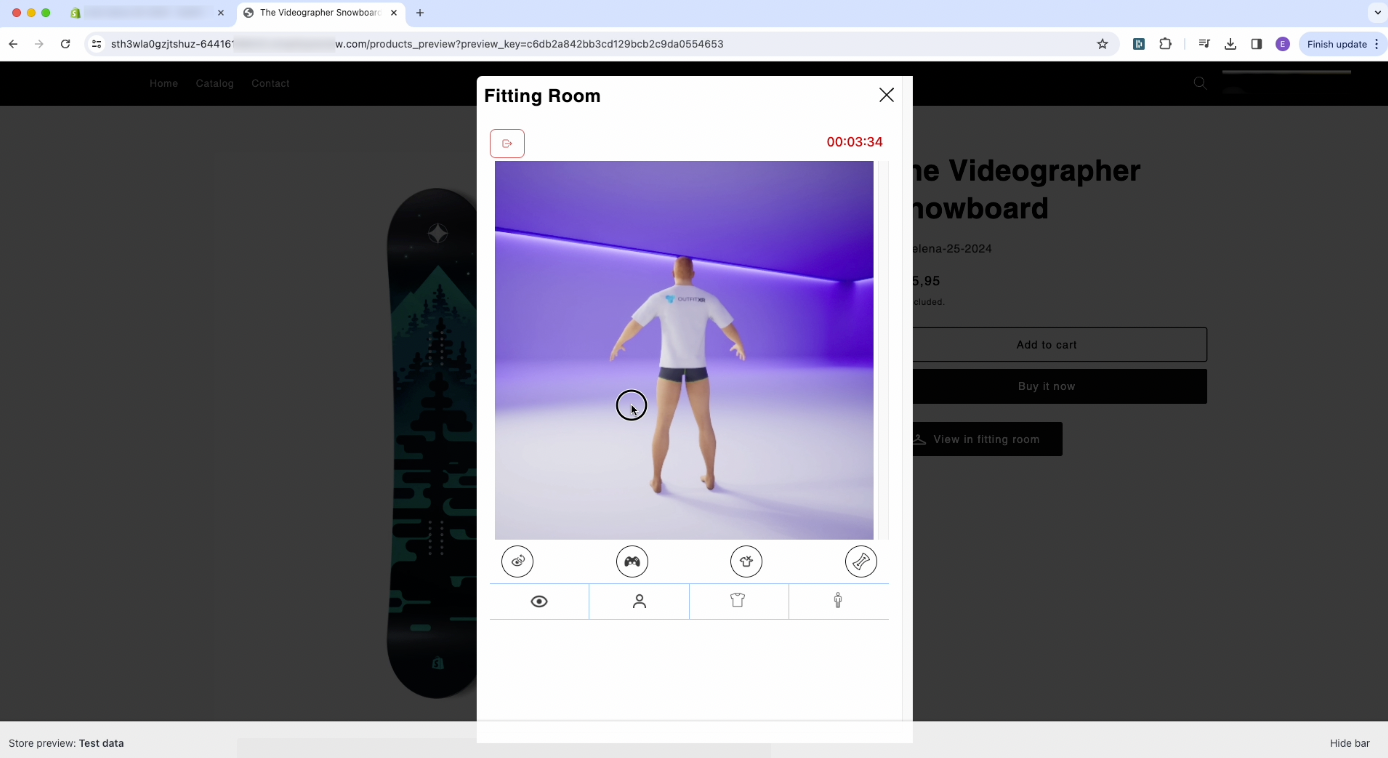
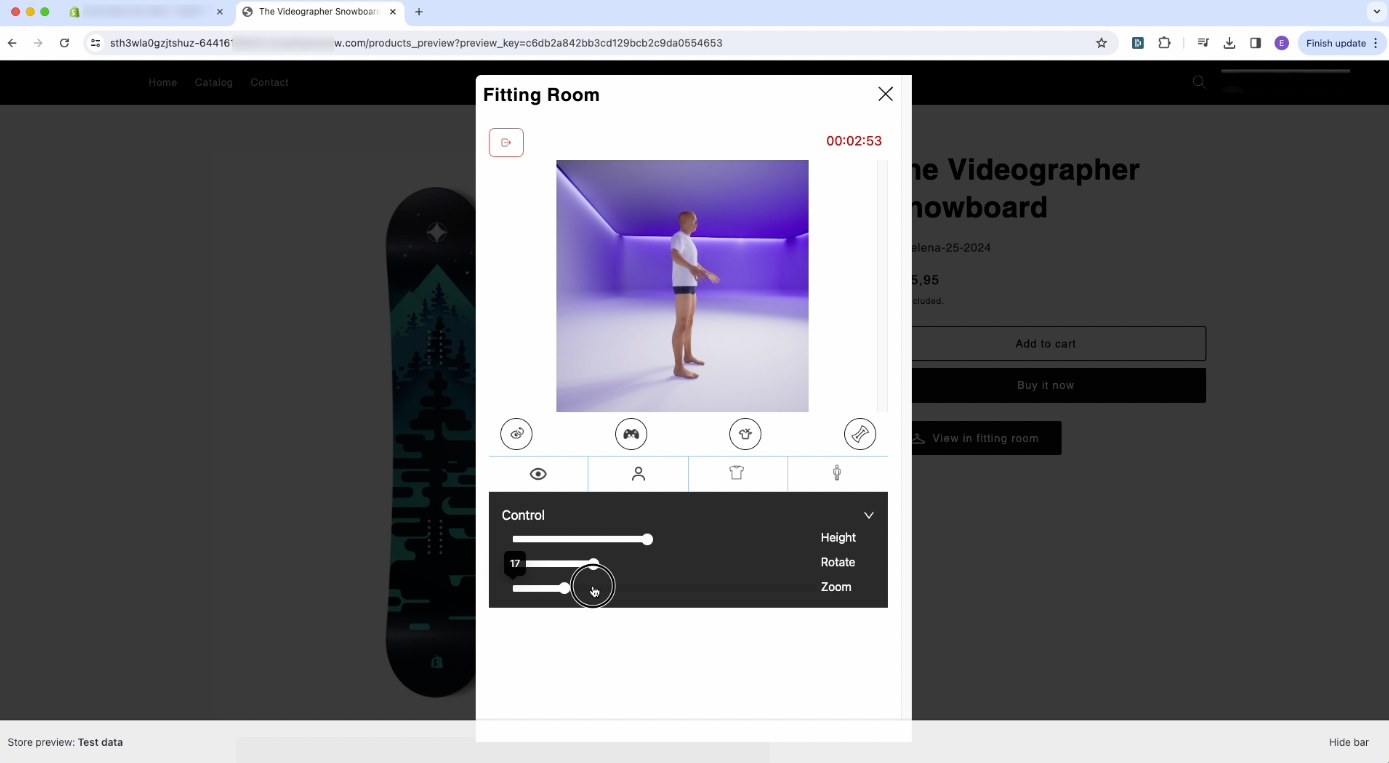
You will be automatically redirected to the Fitting Room. Wait until your personal fitting room loads to test the garment. Once the fitting room is displayed, you have the option to select an avatar and then proceed to try on clothing garments on that chosen avatar. In the displayed fitting room you can see the simulation of the garment on the avatar.
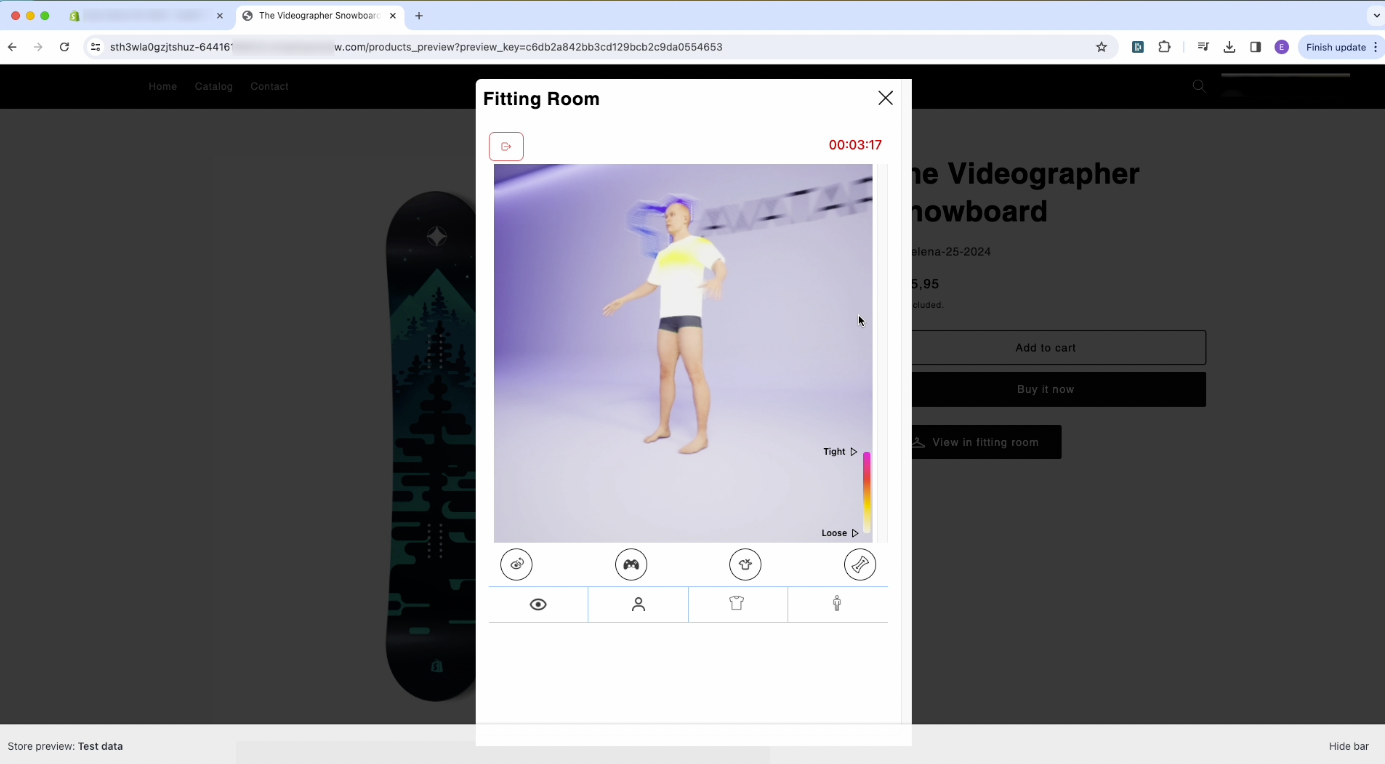
Use the 'Heat Map' option to visualise how garments of different sizes fit on the avatar. This allows you to observe whether the garments are either too loose or too tight on your selected avatar.
Here, you have the option to choose different poses for the avatar. You even have the option to see how the garment fits on the avatar while it moves.
In the Fitting Room, you can implement various functionalities, such as zooming in or out. Additionally, you have the option to reset the view to return to the initial overview.
You can manage other controls, including adjusting the height, rotating the view, and zooming for a more personalized experience.
Congratulations! You have reached the end of the tutorial. Now you know how to create a digital garment and test it in a Fitting Room.
