How to create a digital T-Shirt
Measure your T-shirt Garment
First of all , it’s crucial to obtain accurate measurements of critical areas of the T-Shirt.
You have to consider:
Front Length: measure from the highest point of the shoulder to the bottom edge line of the t-shirt.
Front Length 2: the lowest point of the neck circumference to the bottom edge line of the t-shirt.
Back Length: the lowest point of the neck circumference, may consider the midpoint of the t-shirt, to the bottom edge.
Chest Width.
Waist Width.
Hem Width.
Shoulder Width.
Shoulders Length: width across both shoulders.
Sleeve Length.
Armhole Depth: the top of the shoulder seam to the underarm point.
Sleeve Width.
Side Length: the underarm point to the hem.
Neck Circumference.
Neck Width.
These measurements will serve as a foundation for digitalizing the T-shirt Garment and creating an accurate digital pattern.
Next, we will create specifications for this garment in outfitxr.io.
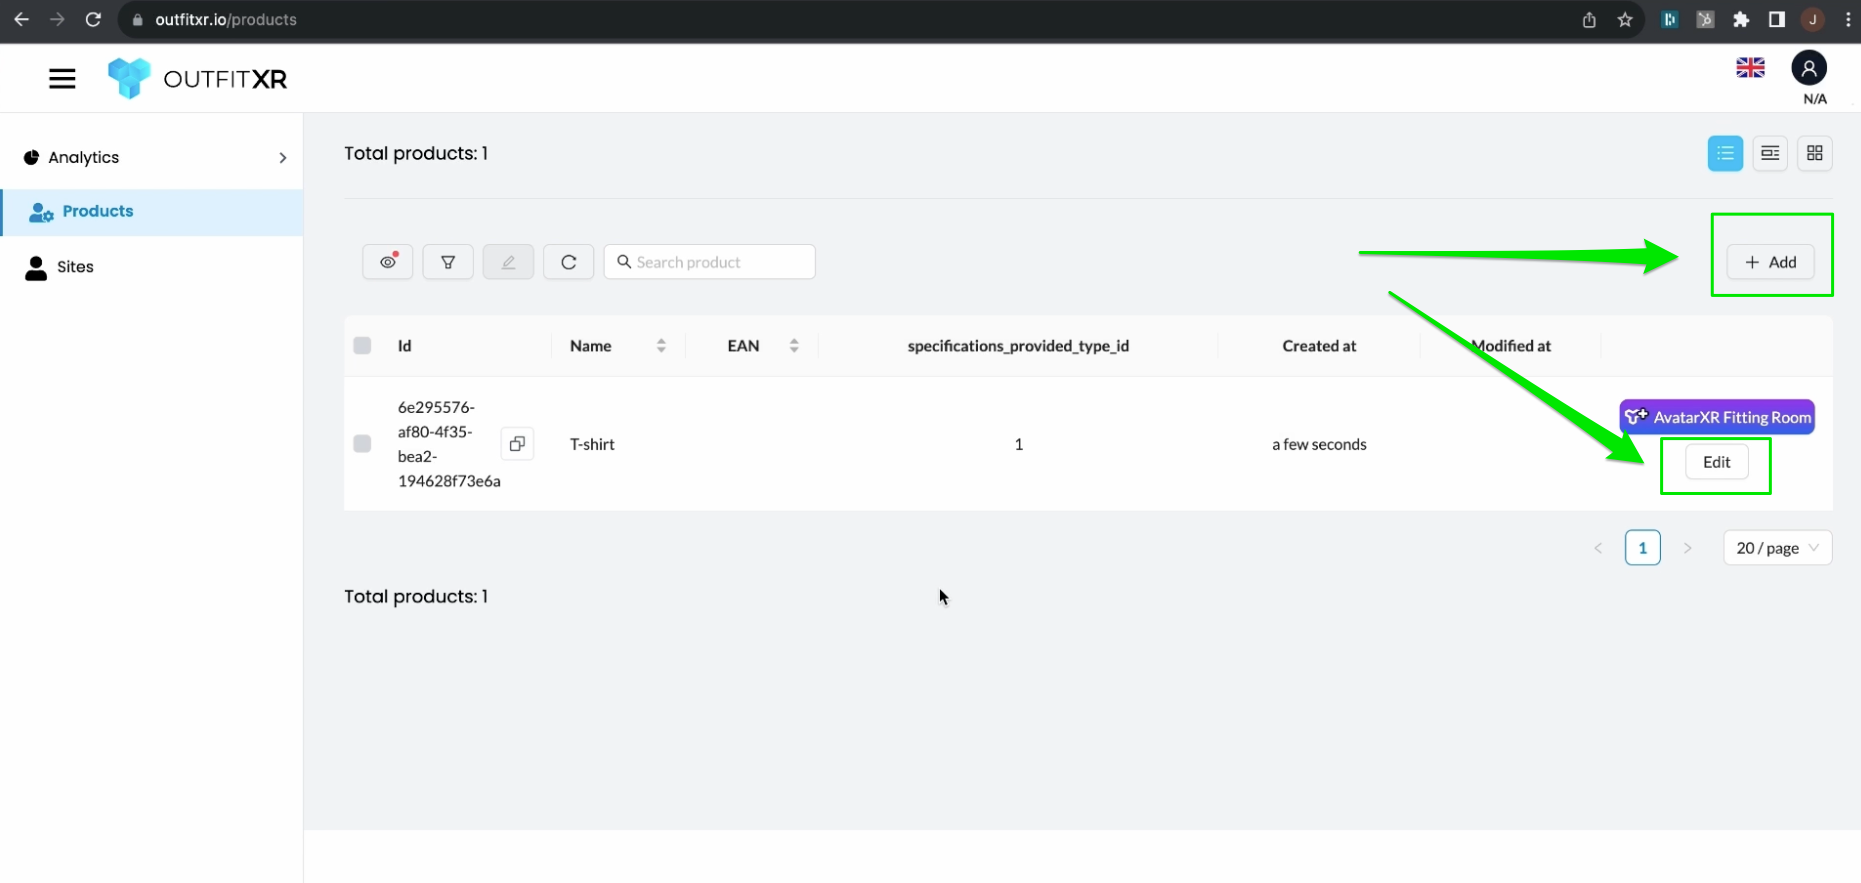
Log in to your account and navigate to the menu on the left. Click on "Products". If no products are added, click "Add" to add a product. Enter the product name and click "Save." If nothing is visible, refresh the page.
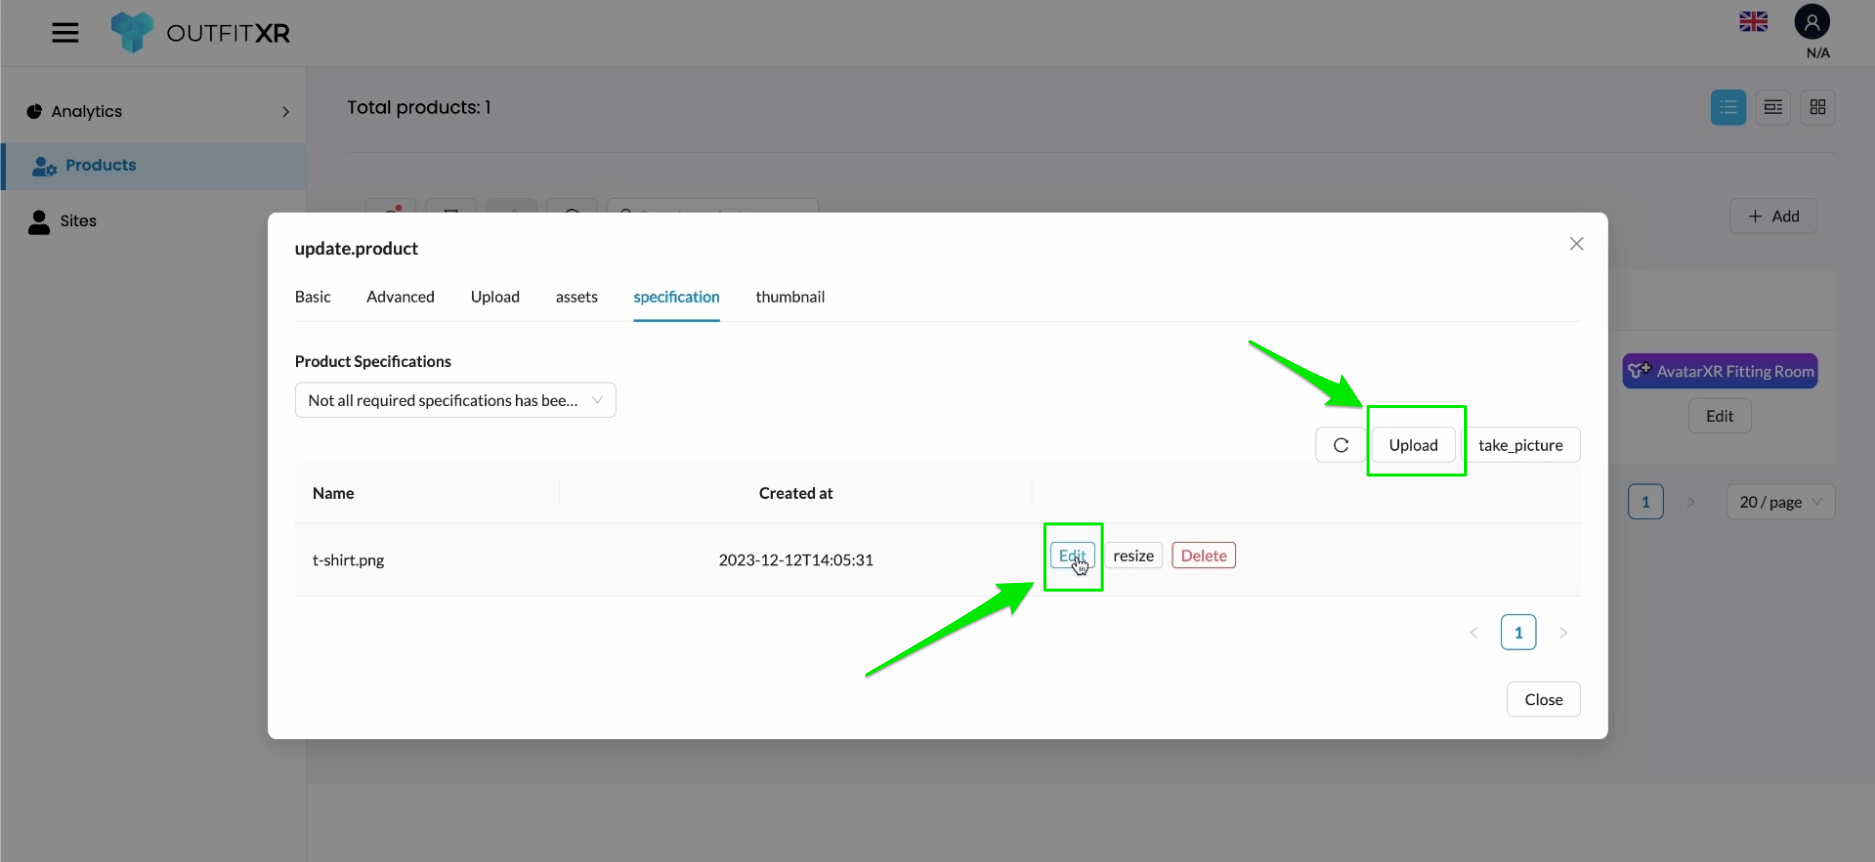
Click on "Edit" and go to the "Specification" tab.
Capture pictures of the t-shirt on a flat surface with a clean background and sufficient lighting, both from the front and back.
Click "Upload" to add the images. Go to "Edit" to view the uploaded images.
For measurements (chest width, hem width, waist width, shoulder width, and neck width), draw lines on the images. Right-click on the line to manually set measurements and click "Save".
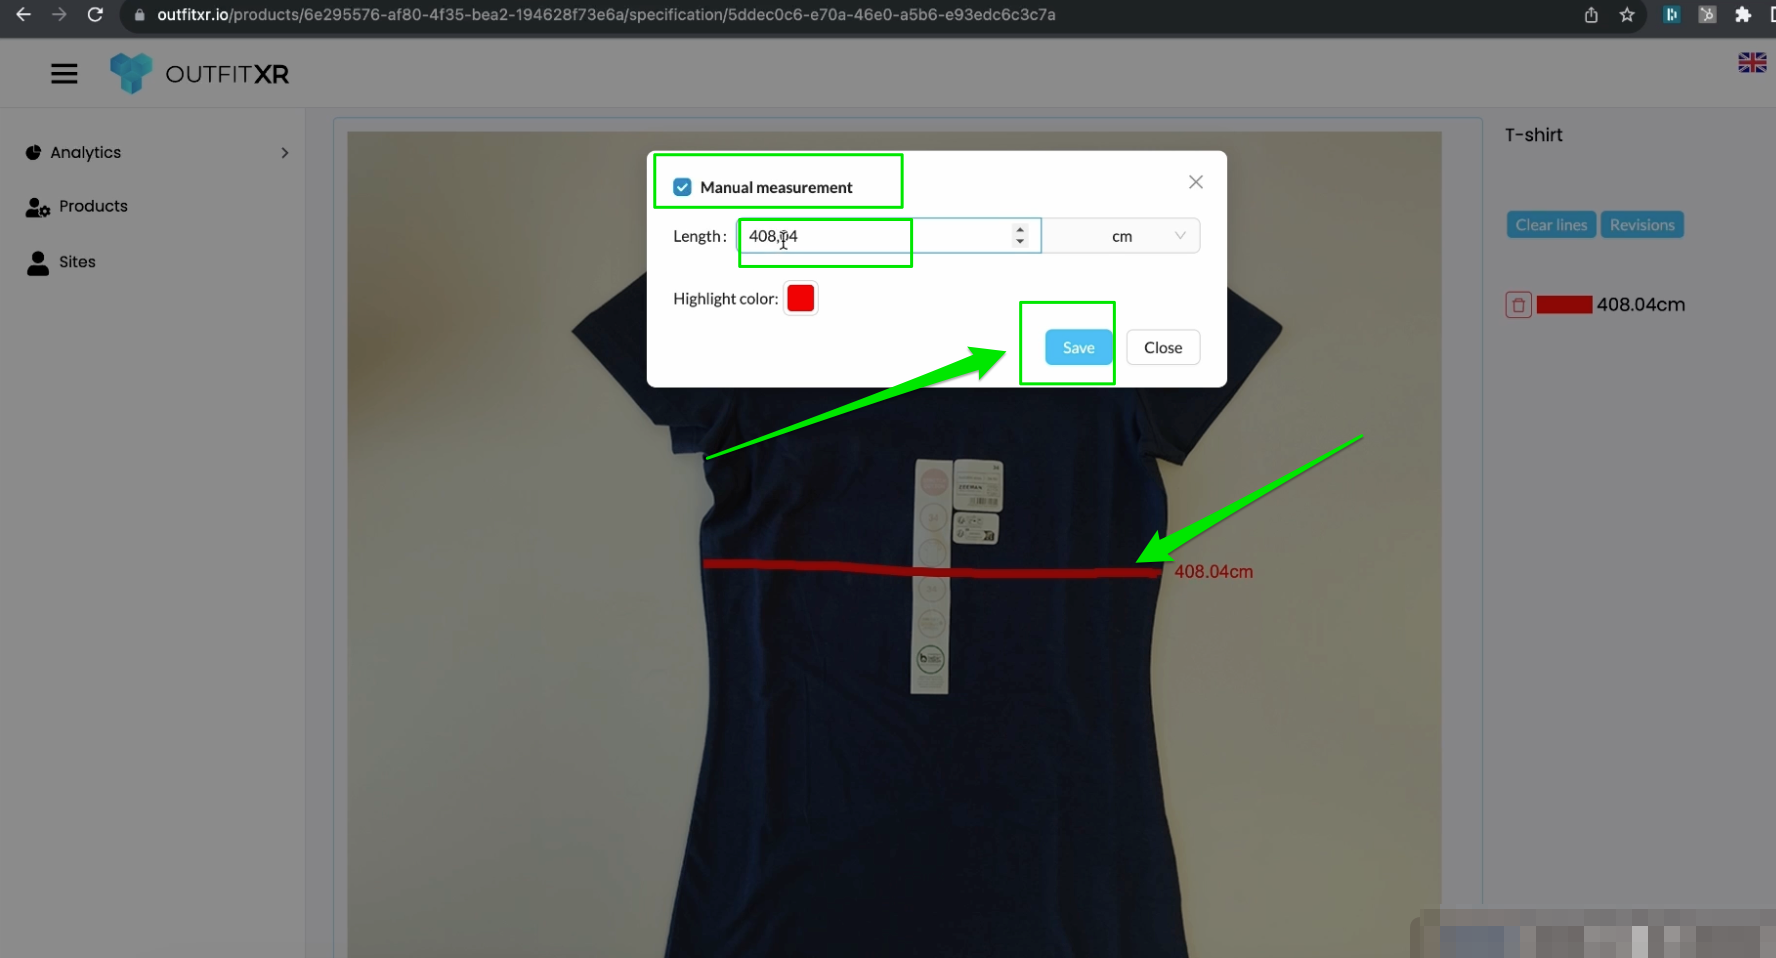
Repeat the process for other measurements. If unsatisfied, delete lines by right-clicking and selecting "Delete”.
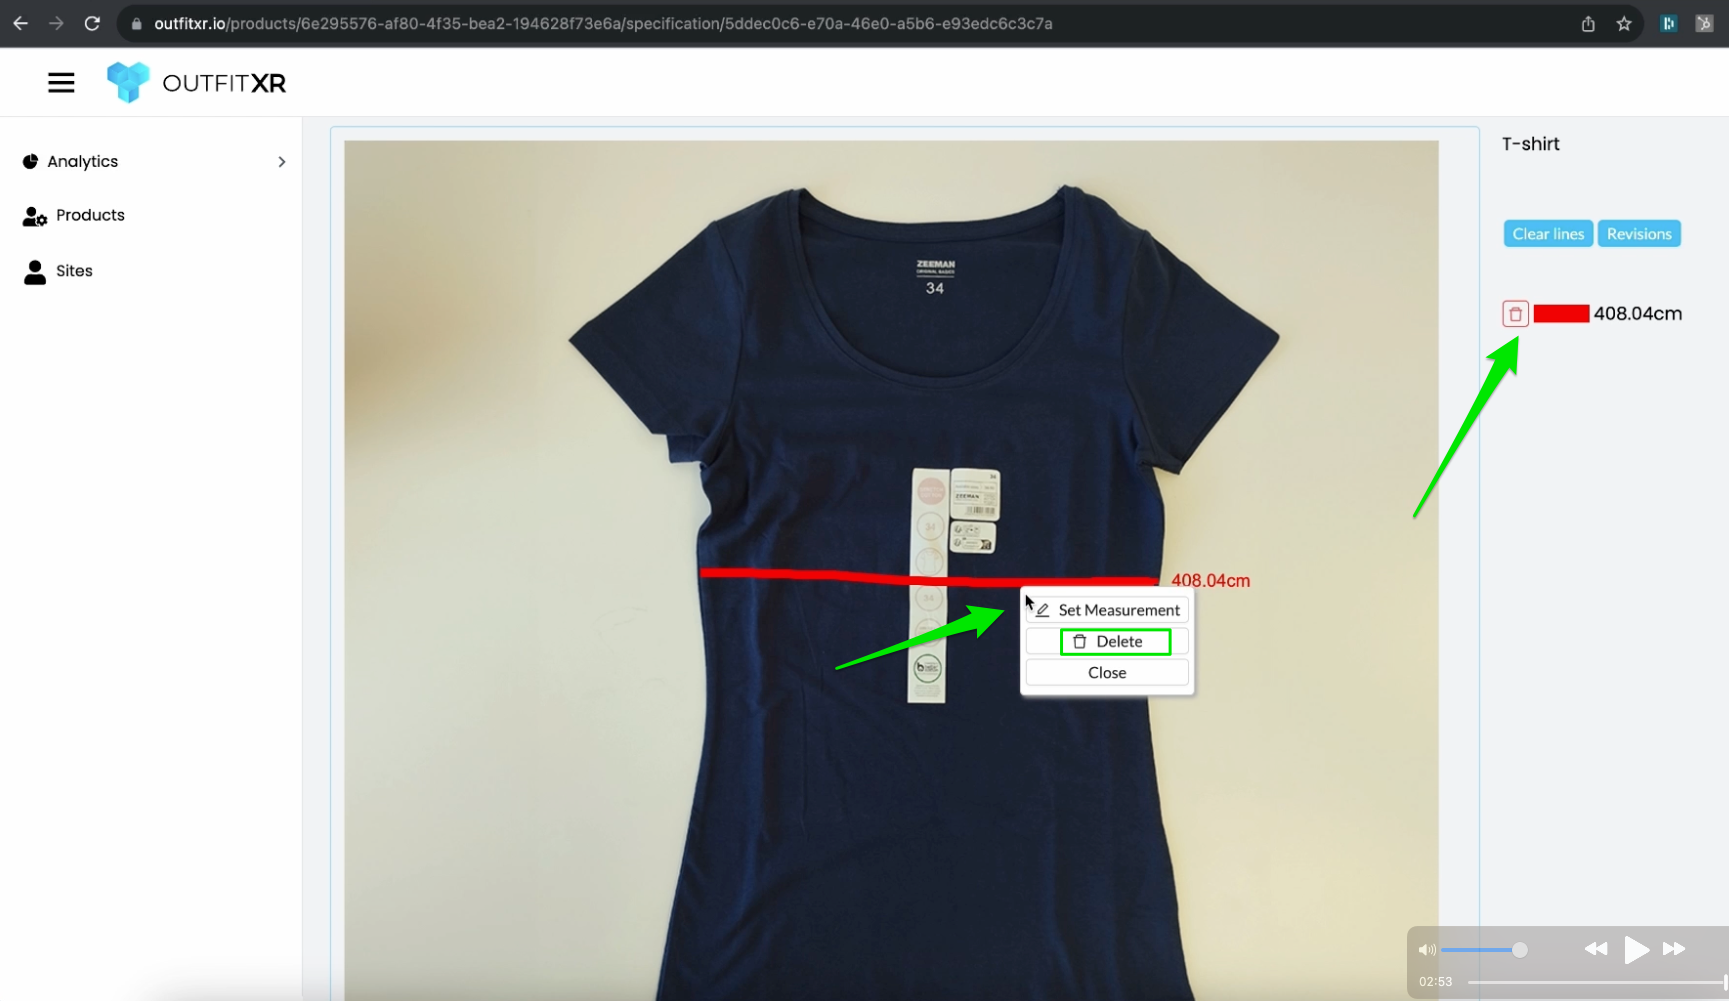
You have successfully learned how to measure t-shirts and add them to OutfitXR.
For a more in-depth understanding of how to add specifications on outfitxr.io, explore our additional tutorials: “How to create specification for t-shirt” or “How to create specification for pants”.
Creating T-Shirt Garment in Marvelous Designer
Set Up Your Project
Open Marvelous Designer and create a new project. File => New or by clicking Ctrl+N.
Choose a default avatar or import your own avatar if you have one.
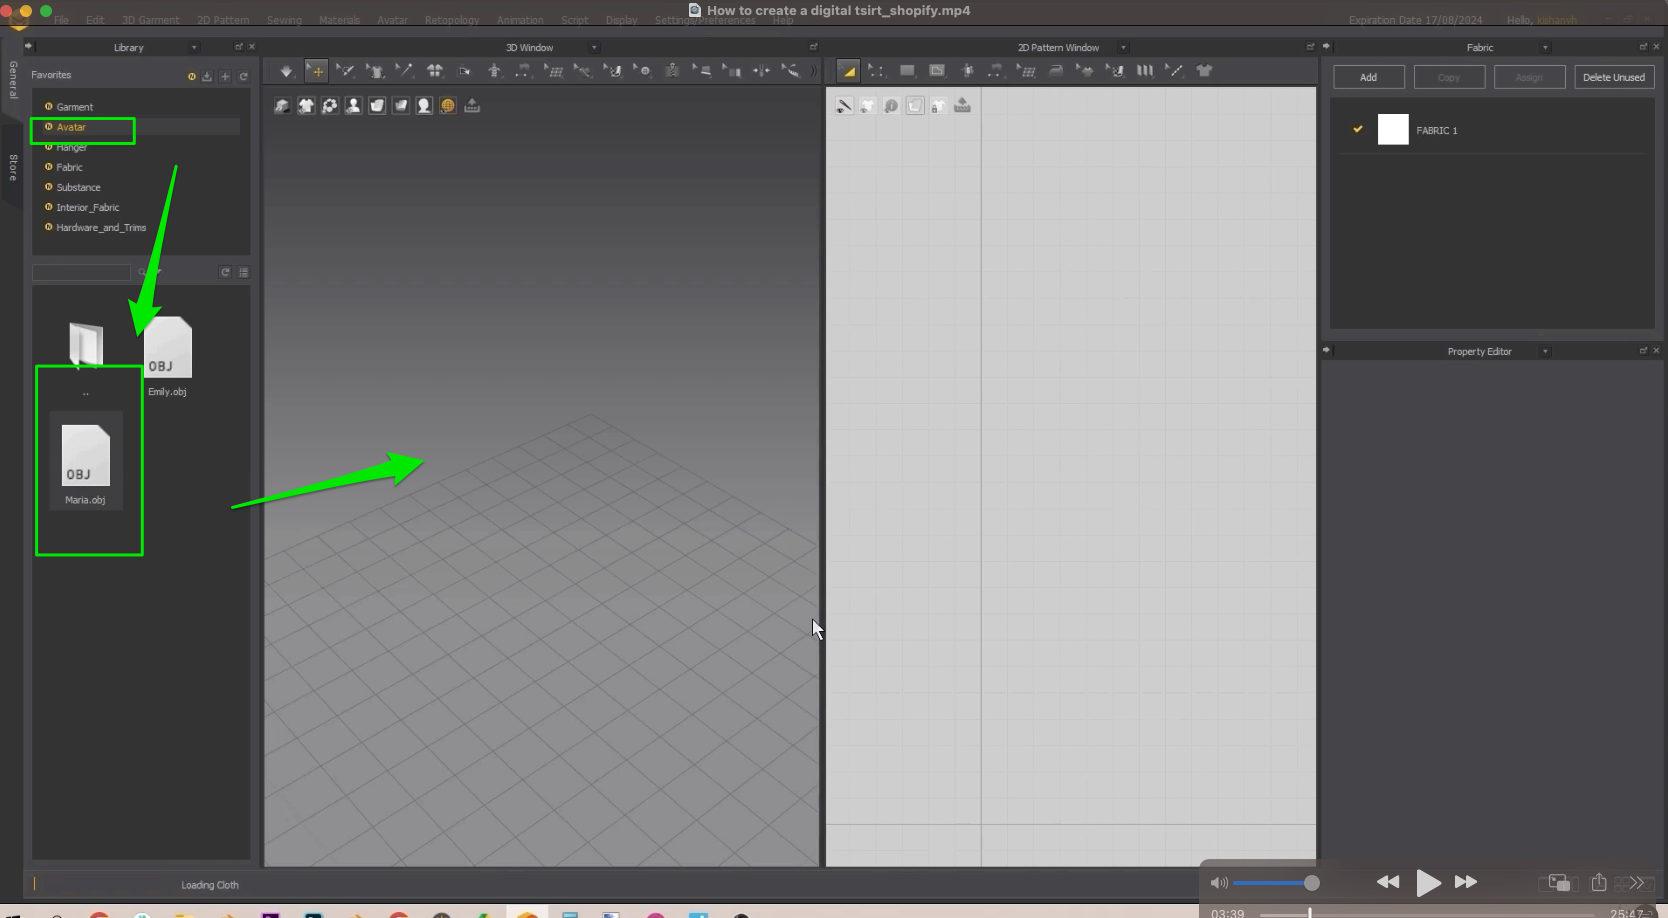
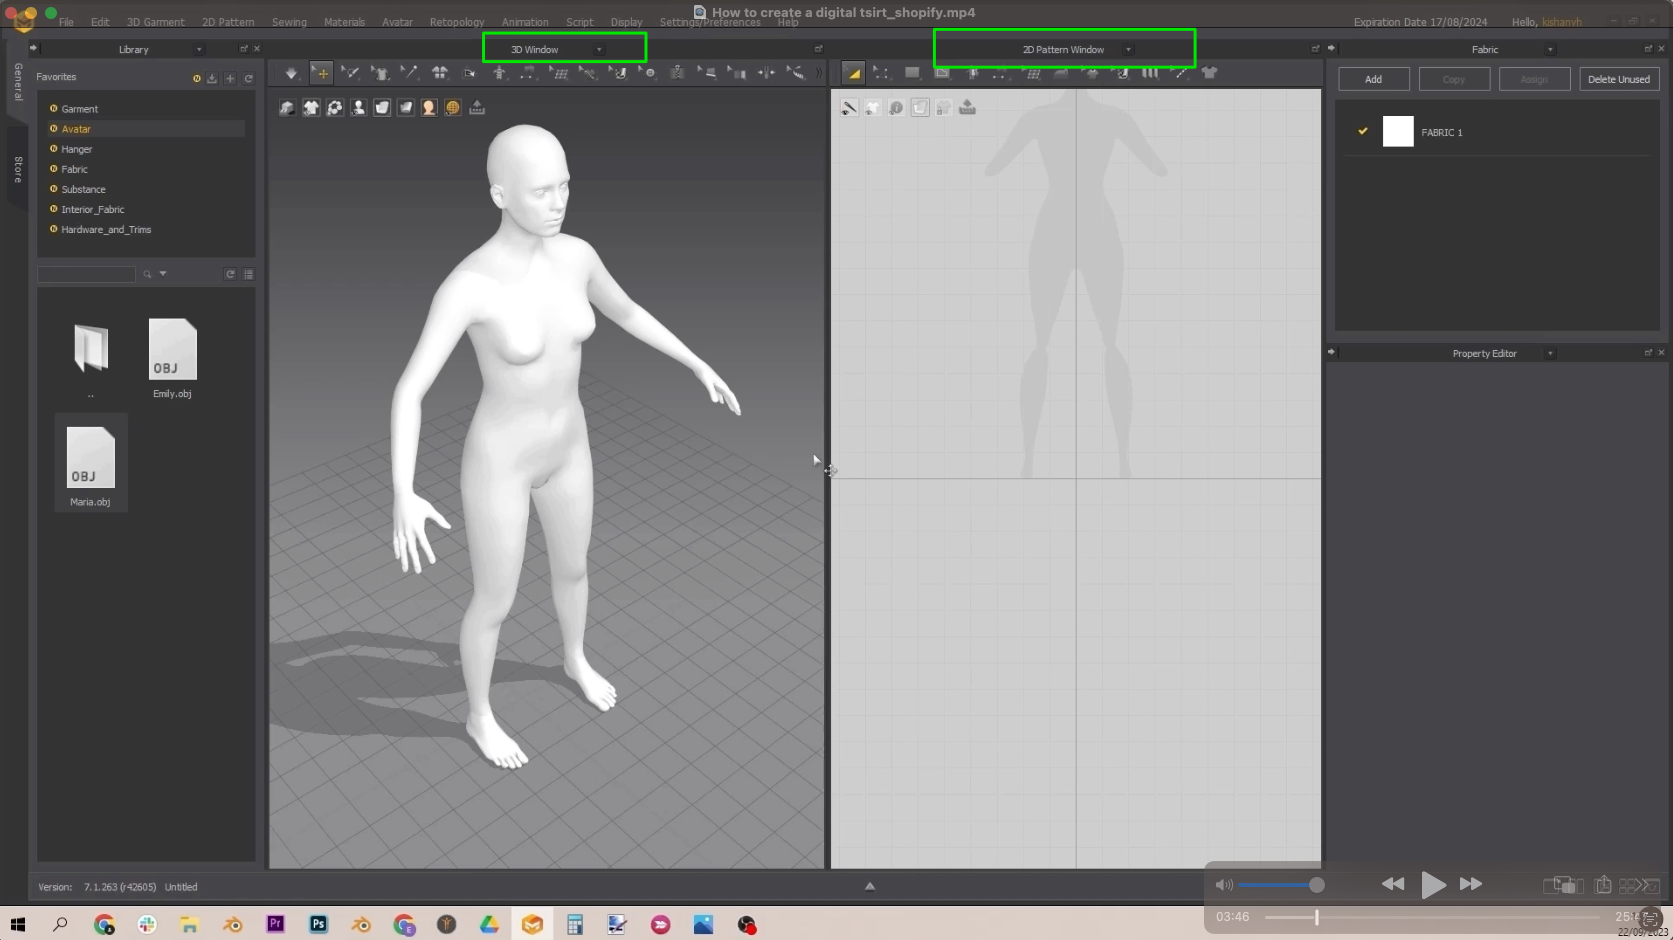
Make sure that you have an overview of both 3D window and 2D Pattern Window.
The avatar is now displayed on the left side in the 3D view, accompanied by a 2D silhouette on the right. Use the mouse scroll wheel for navigation in both areas—press it to move and rotate. To zoom in, simply scroll the wheel, and for 3D space rotation, utilize the right mouse button.
Create the T-shirt Pattern
In the 2D pattern view, select the "Polygon" tool. Draw the T-shirt's front, back and sleeves pattern pieces by clicking and dragging on the avatar. If you're having difficulty understanding a clothing pattern, try Googling examples like 't-shirt pattern' or 'jeans pattern' to get a better idea of what you need to draw.
Begin with drawing half of the pattern.
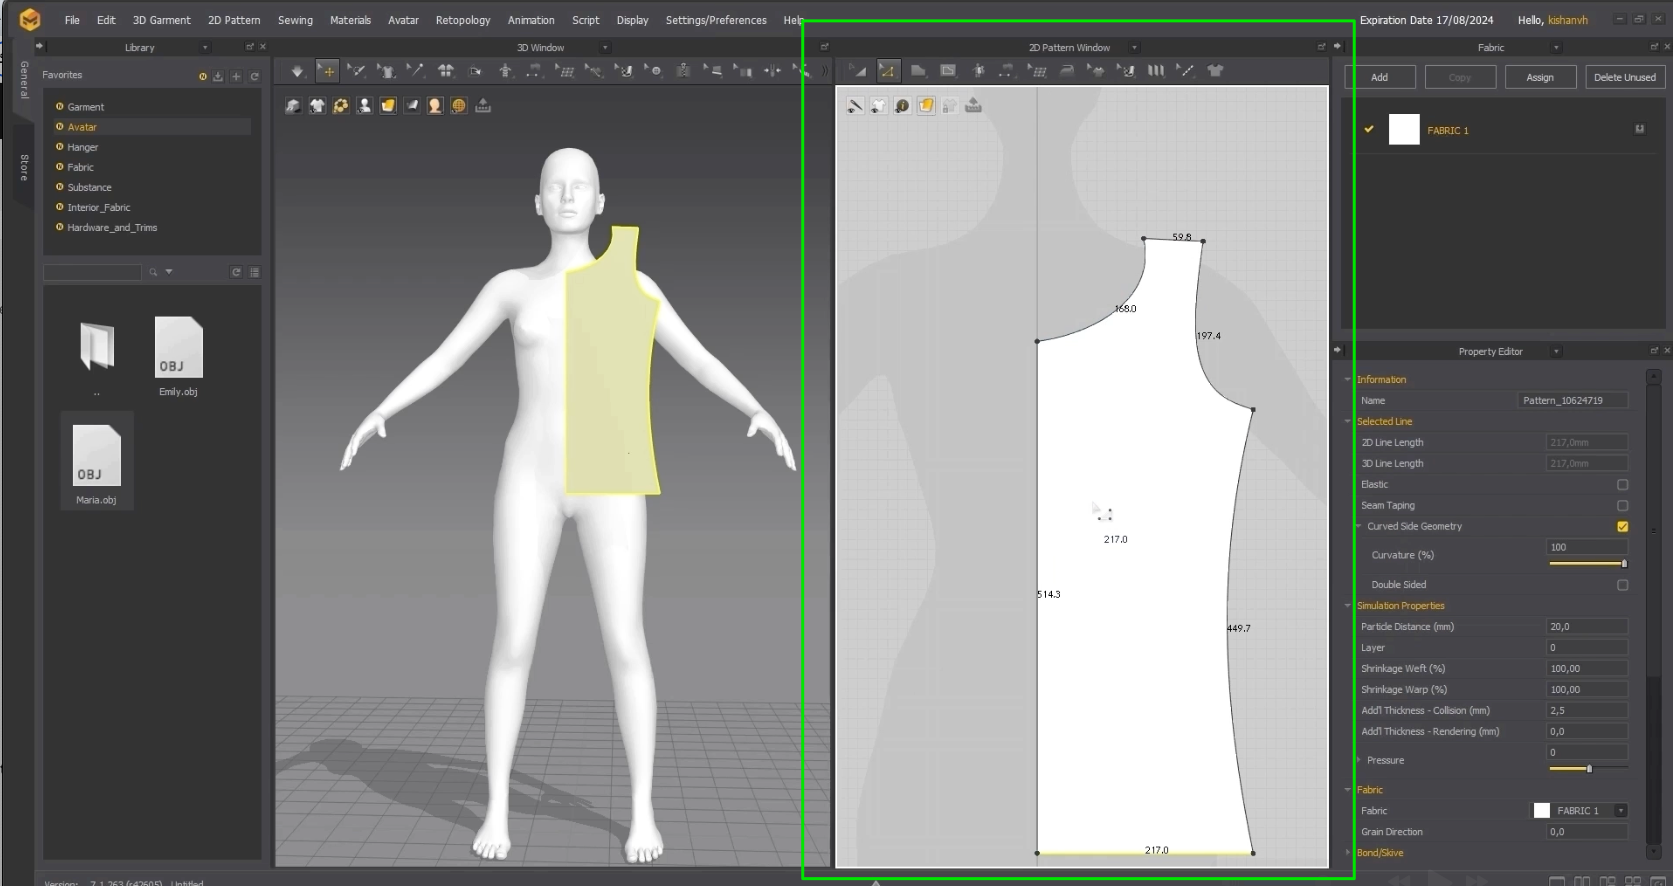
Select the pattern and copy, right click paste with command Symmetric Pattern.
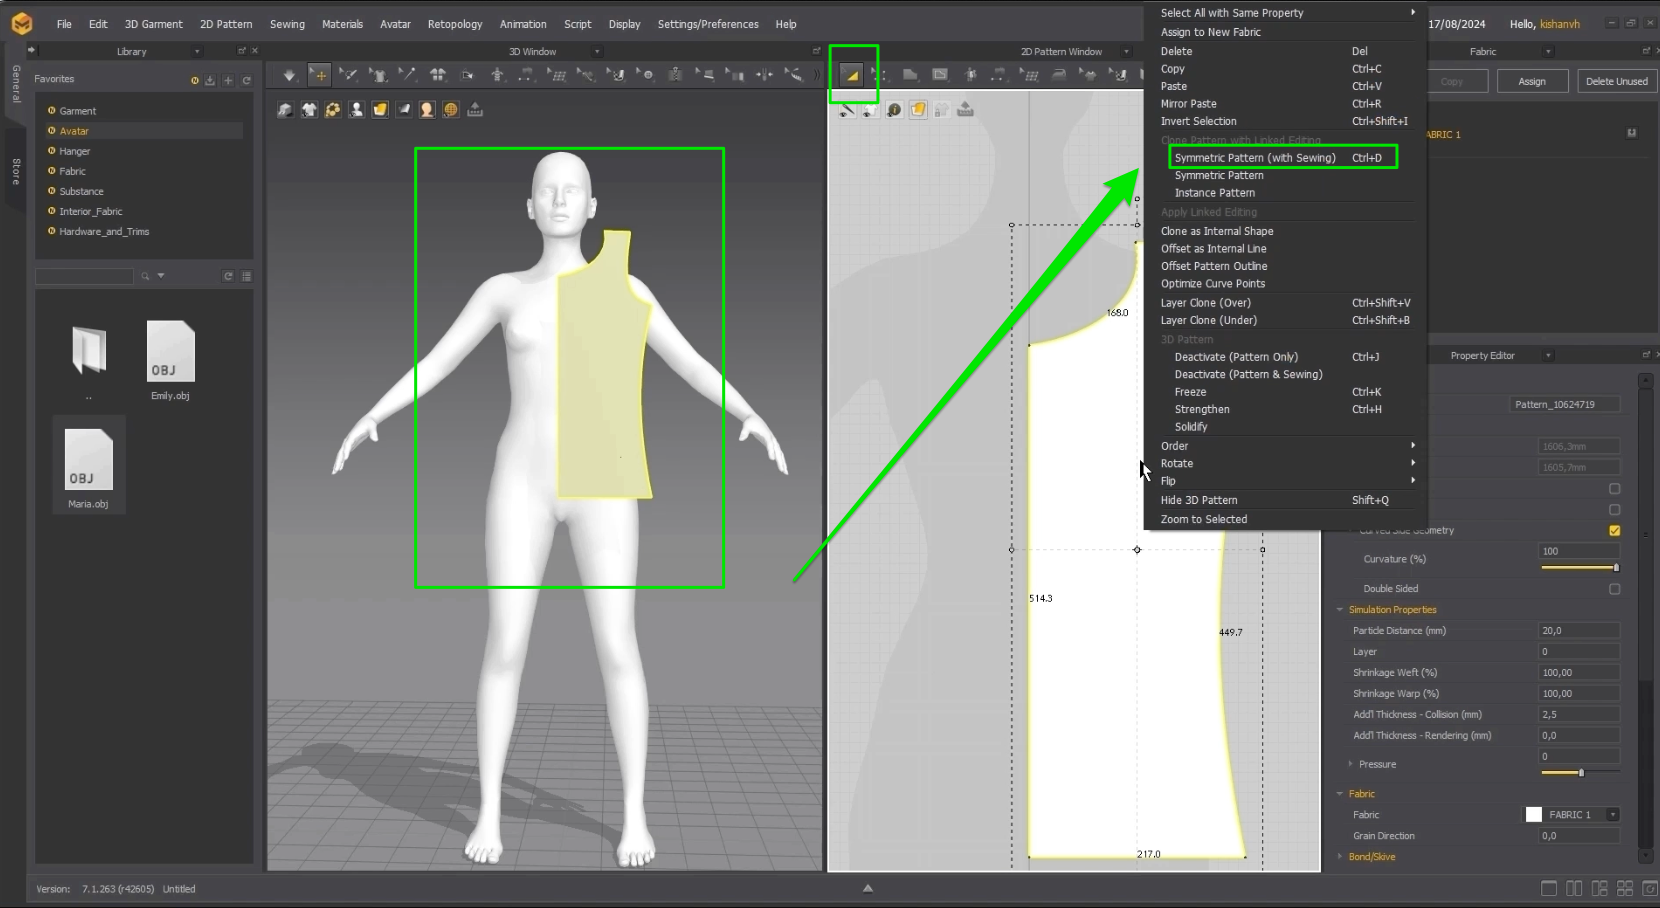
Then select the middle line and right click merge.
For the Sleeve, draw first the half and then select the middle line of the shape =>Right Click and then Unfold.
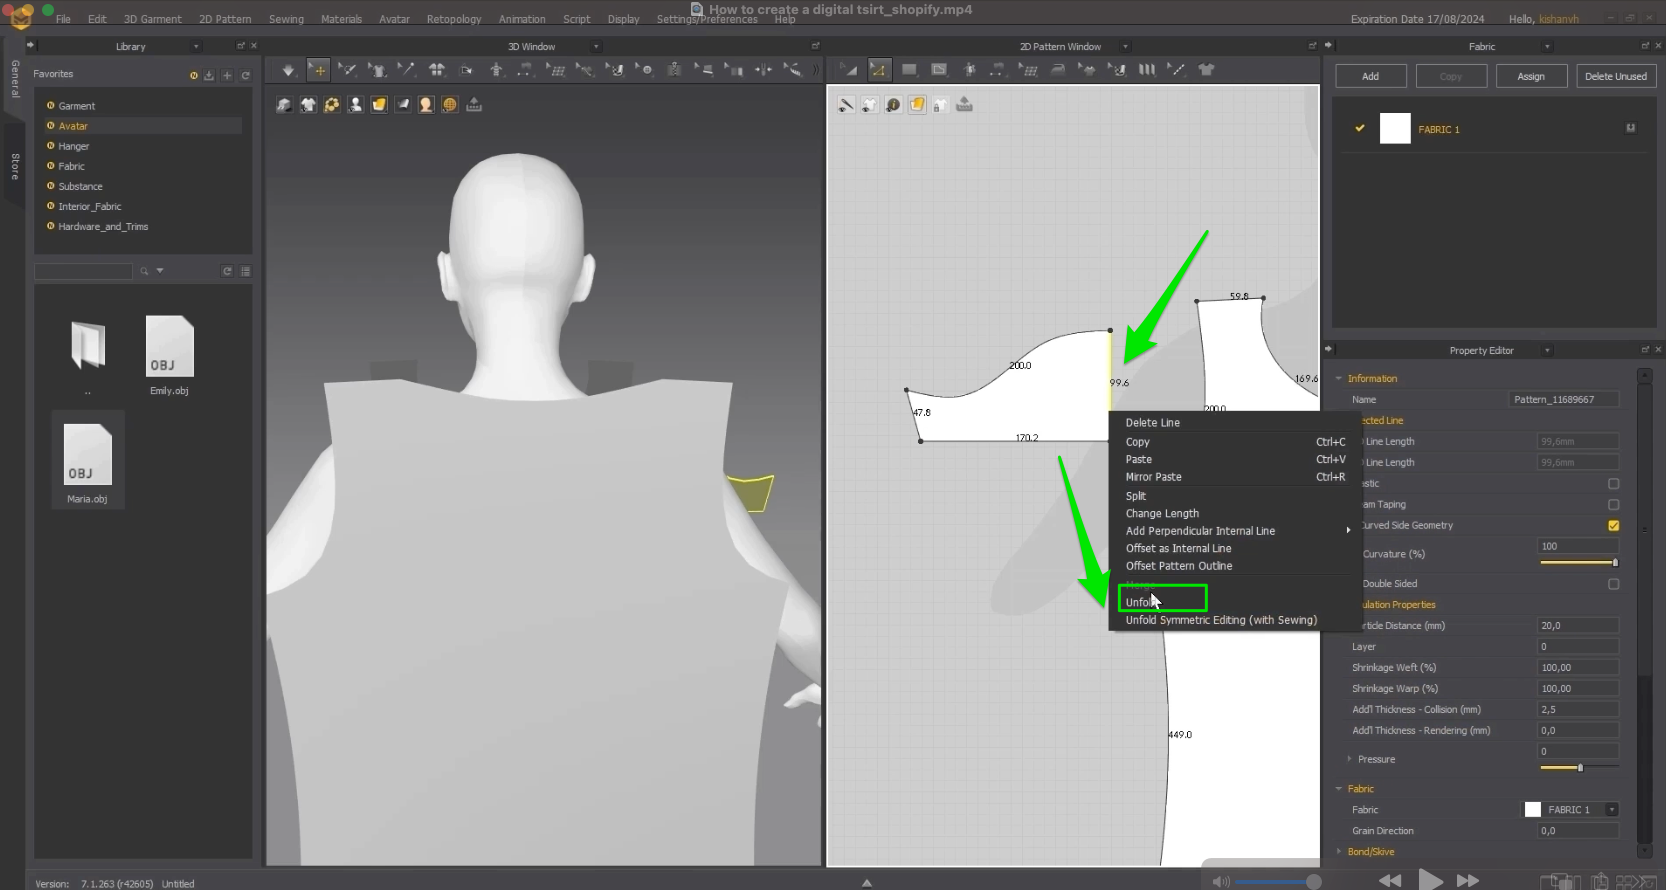
Ensure they cover the torso area. Press Shift+Z for a quick overview of the size lines in your design. To create the back side of the second sleeve, you can copy the shape by pressing A to select the desired shape and then the CTRl+C and Ctrl+V. Adjust the pattern points and lines by clicking the Z key, or go to the Edit Pattern in 2D View, to shape the T-shirt's neckline, sleeves, and according to the sizes you already have.
Adjust line dimensions by clicking on the line and then using the right mouse button to access 'Change Length’. For the length inside the garment draw inlines using Internal Polygon Line or click G key.
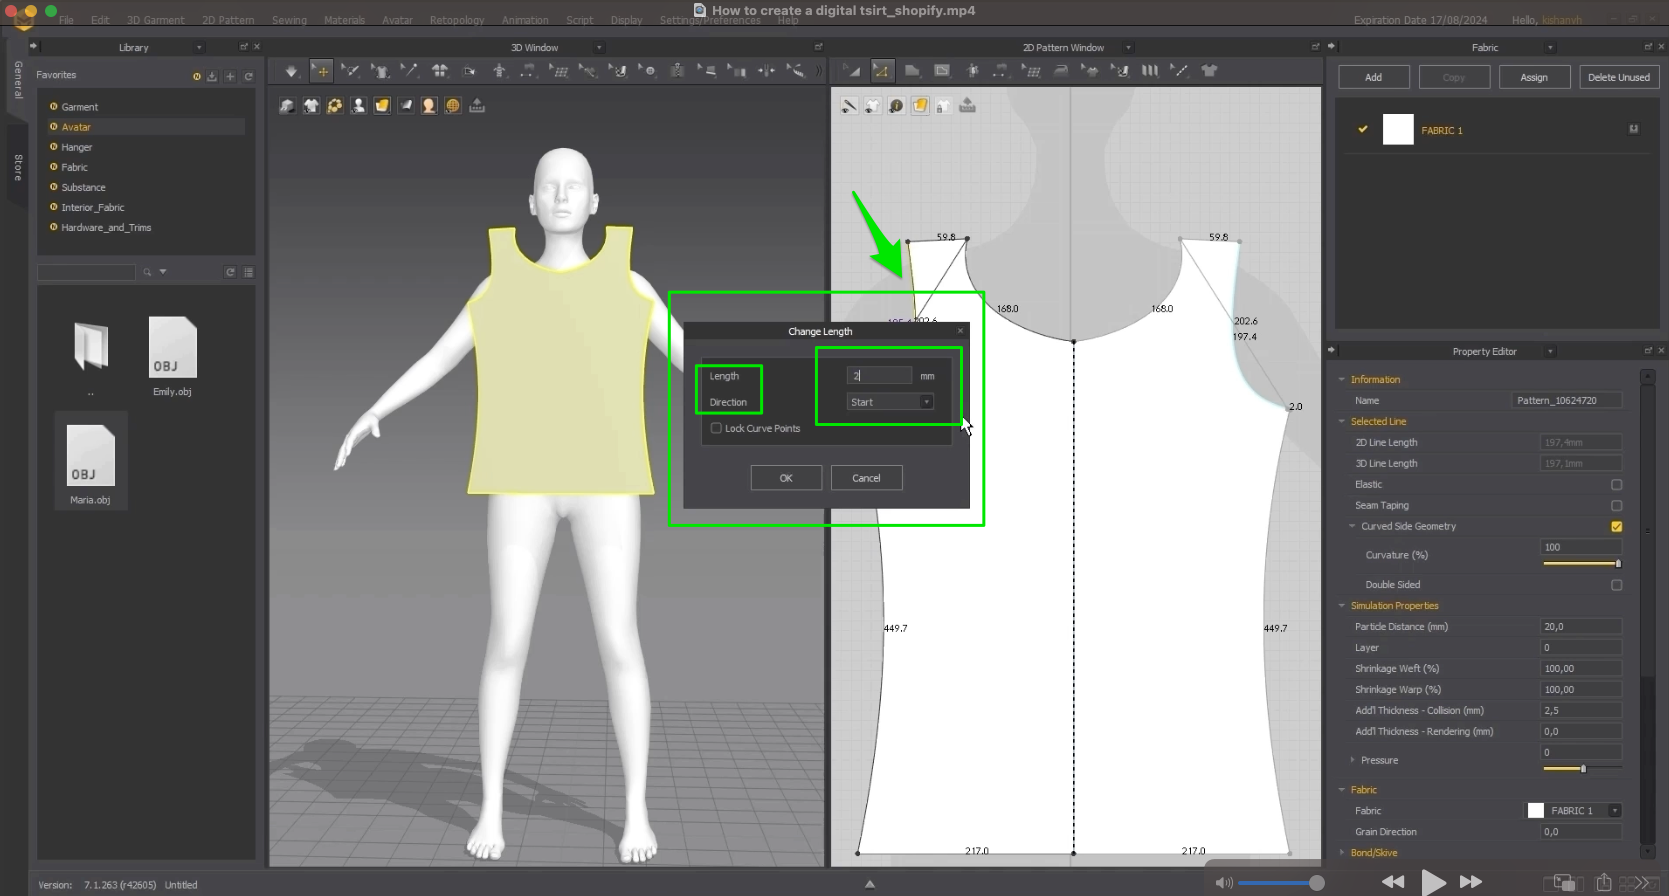
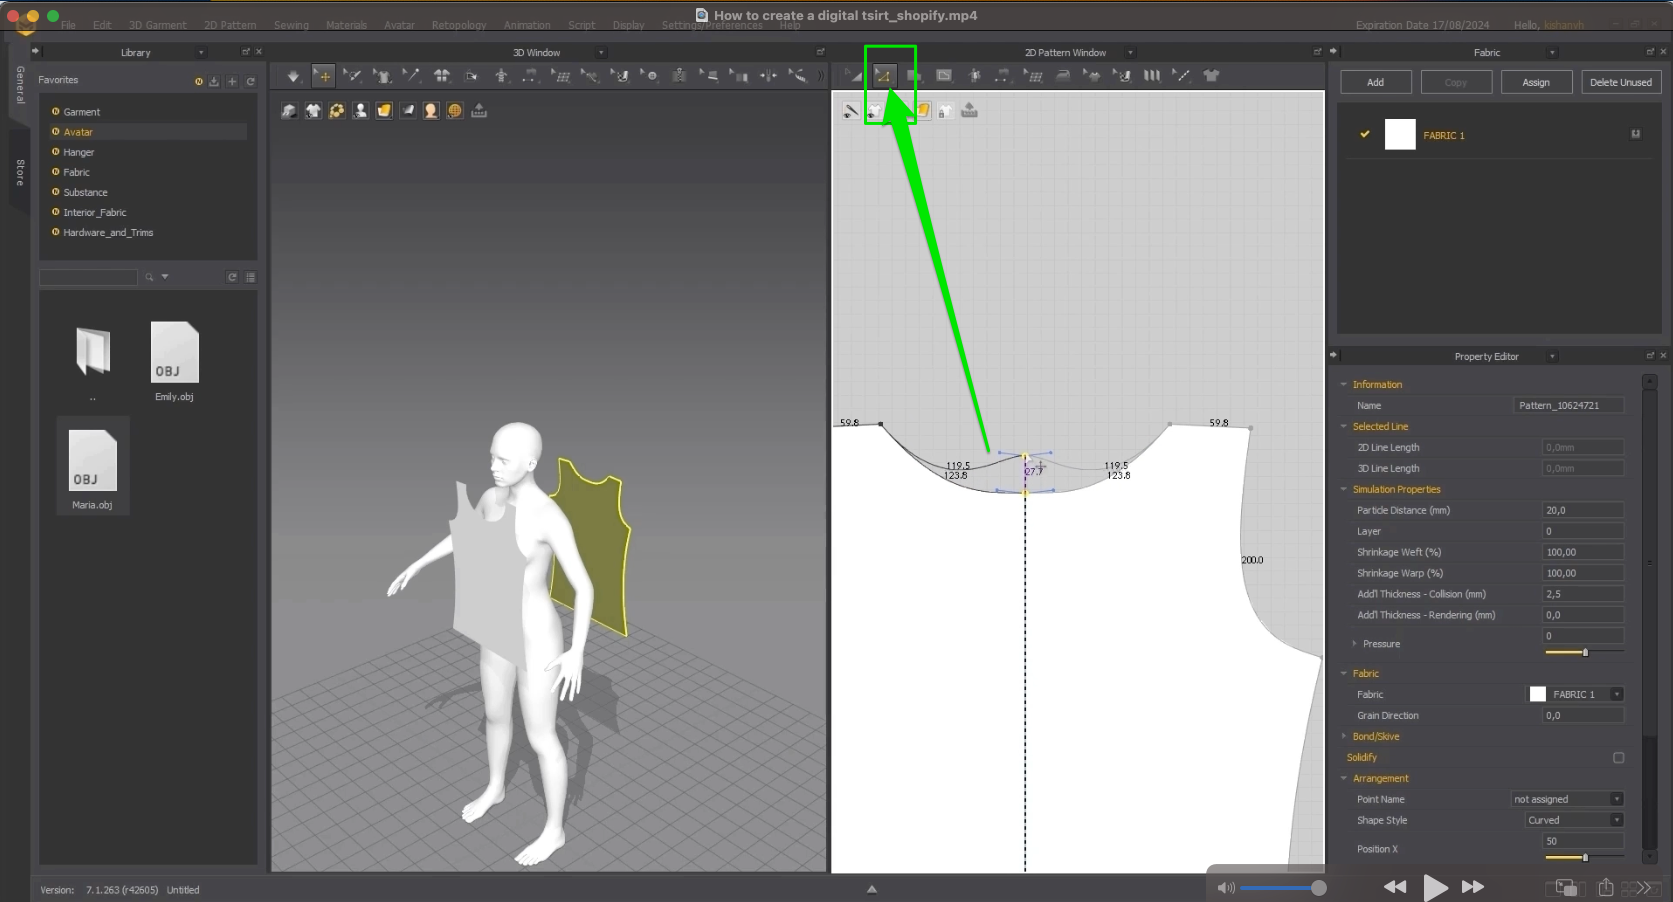
Refine curve lines for neckline and sleeve openings easily using the 'Edit Curvature' tool or by pressing the 'C' key for quick adjustments.
Add points later by pressing the 'X' key. For precise positioning, right-click to set the point's exact location.
Add Seams
When you are confident that your garment is complete, it's time for the seaming process. Now you have this overview in your 3D Windows.
In this step, arrange the back shape and sleeves according to the provided screenshot.Use Select and Move command. Here you can move and rotate shapes.
Ensure the white side of the surface is facing outward. Holding and dragging the green ring allows rotation around the axis of the green arrow. Pressing the 'Shift' key while dragging ensures the surface aligns straight when the rotation is nearly accurate.
By clicking and holding the right mouse in the 3D view you can manage the view.
Now navigate to the Edit Sewing and choose from the menu Segment sewing.
Select the Segments that you want to sew, where the T-shirt would have seams (e.g., shoulders, sides, sleeves with back and front garment).
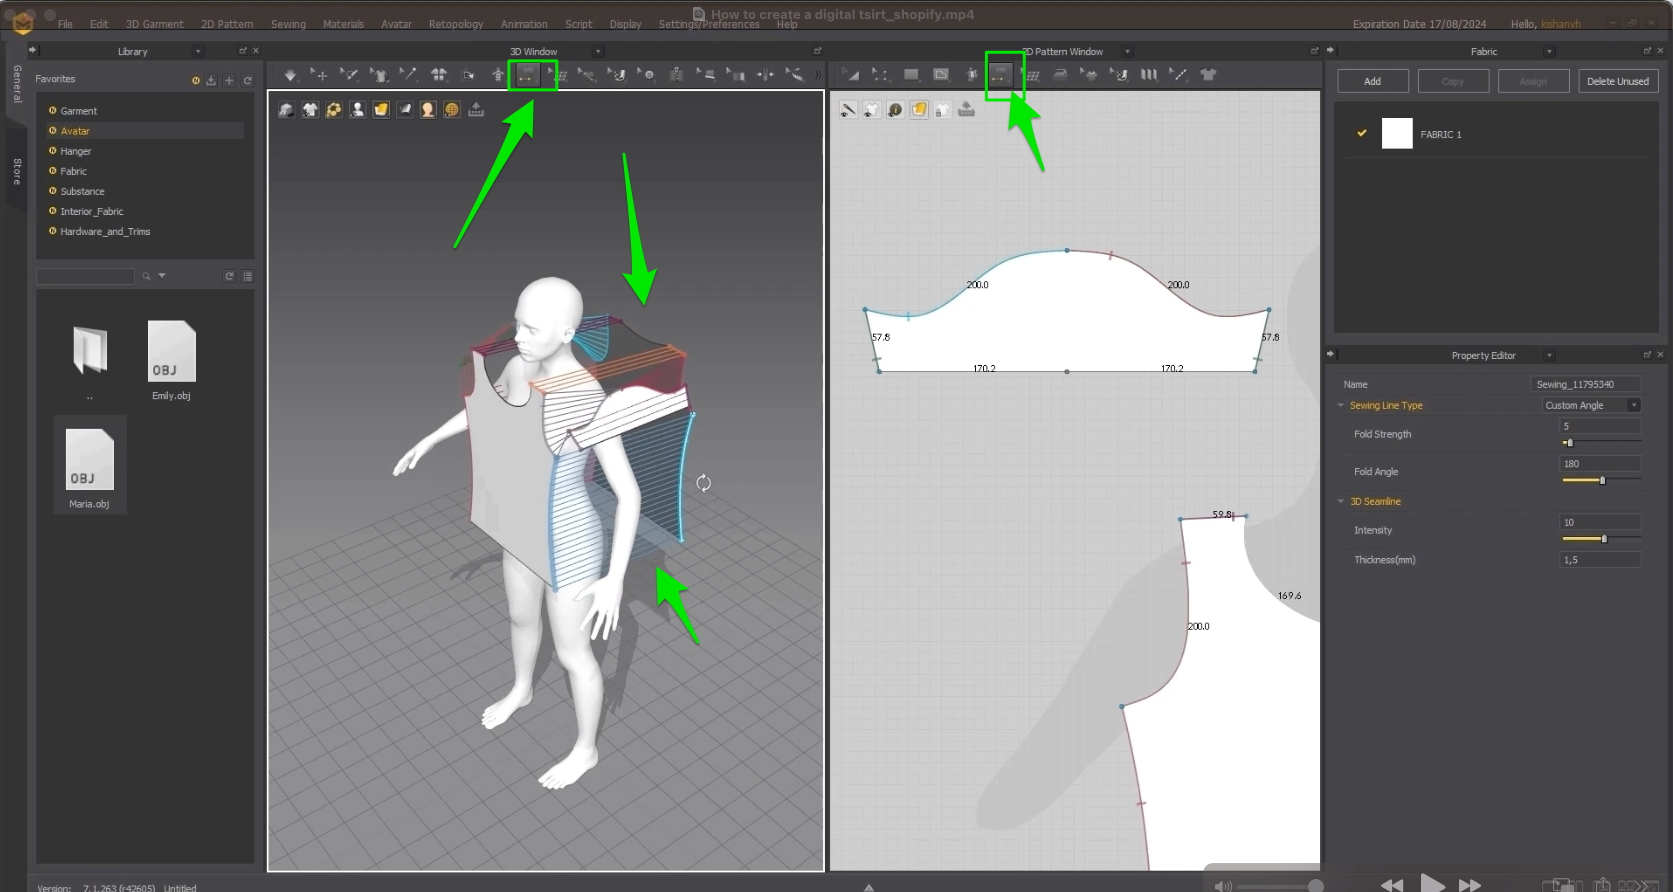
Ensure that the seam lines are straight but not in an X shape.
Now you can simulate the fitting on the avatar and to see how the T-shirt drapes on the avatar, by clicking the Space Bar.
In the 2D view Remove the intern lines by selecting them clicking on Z key then right mouse and Delete Line
Texture
Apply textures and materials to the T-shirt by navigating to the fabric overview in the left panel. Choose your desired texture from the available options, an drag to the garment into 2D Window or 3D Window.
Also you can adjust the color and texture parameters in the right panel.
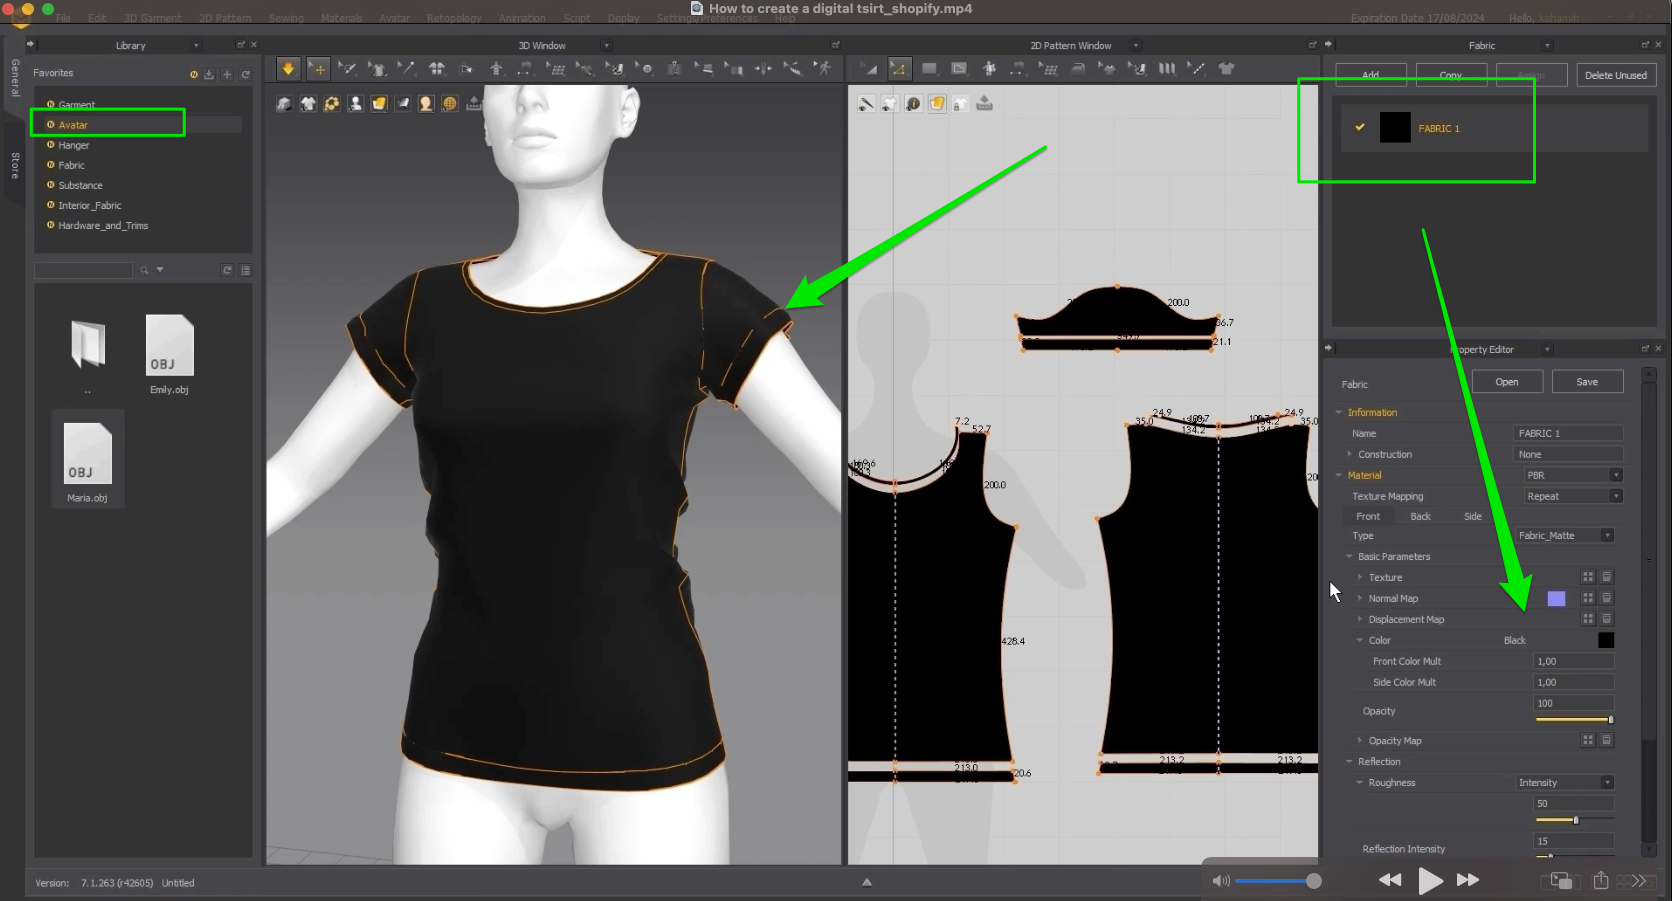
Once satisfied with the design, go to the Export section.
Exporting T-shirt Garment
To export the project from Marvelous Designer, you will require three OBJ files: the Avatar OBJ, the Garment OBJ file and the Patterns OBJ file.
Exporting the Garment OBJ file:
In the UV Editor select all UVs:
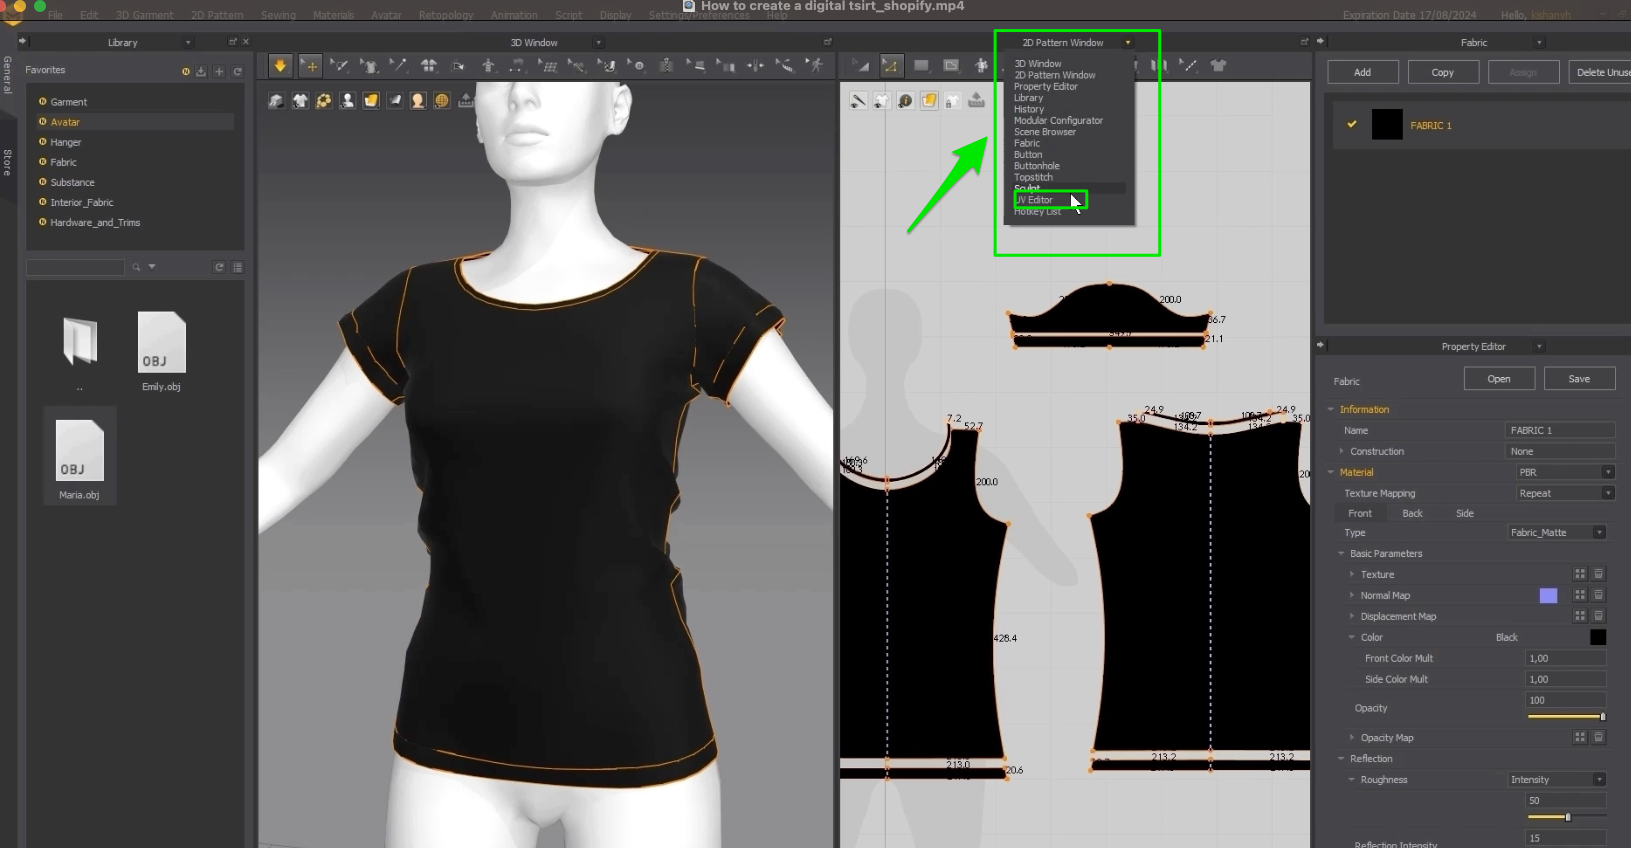
Right click and select “Fit UV to 0-1”.
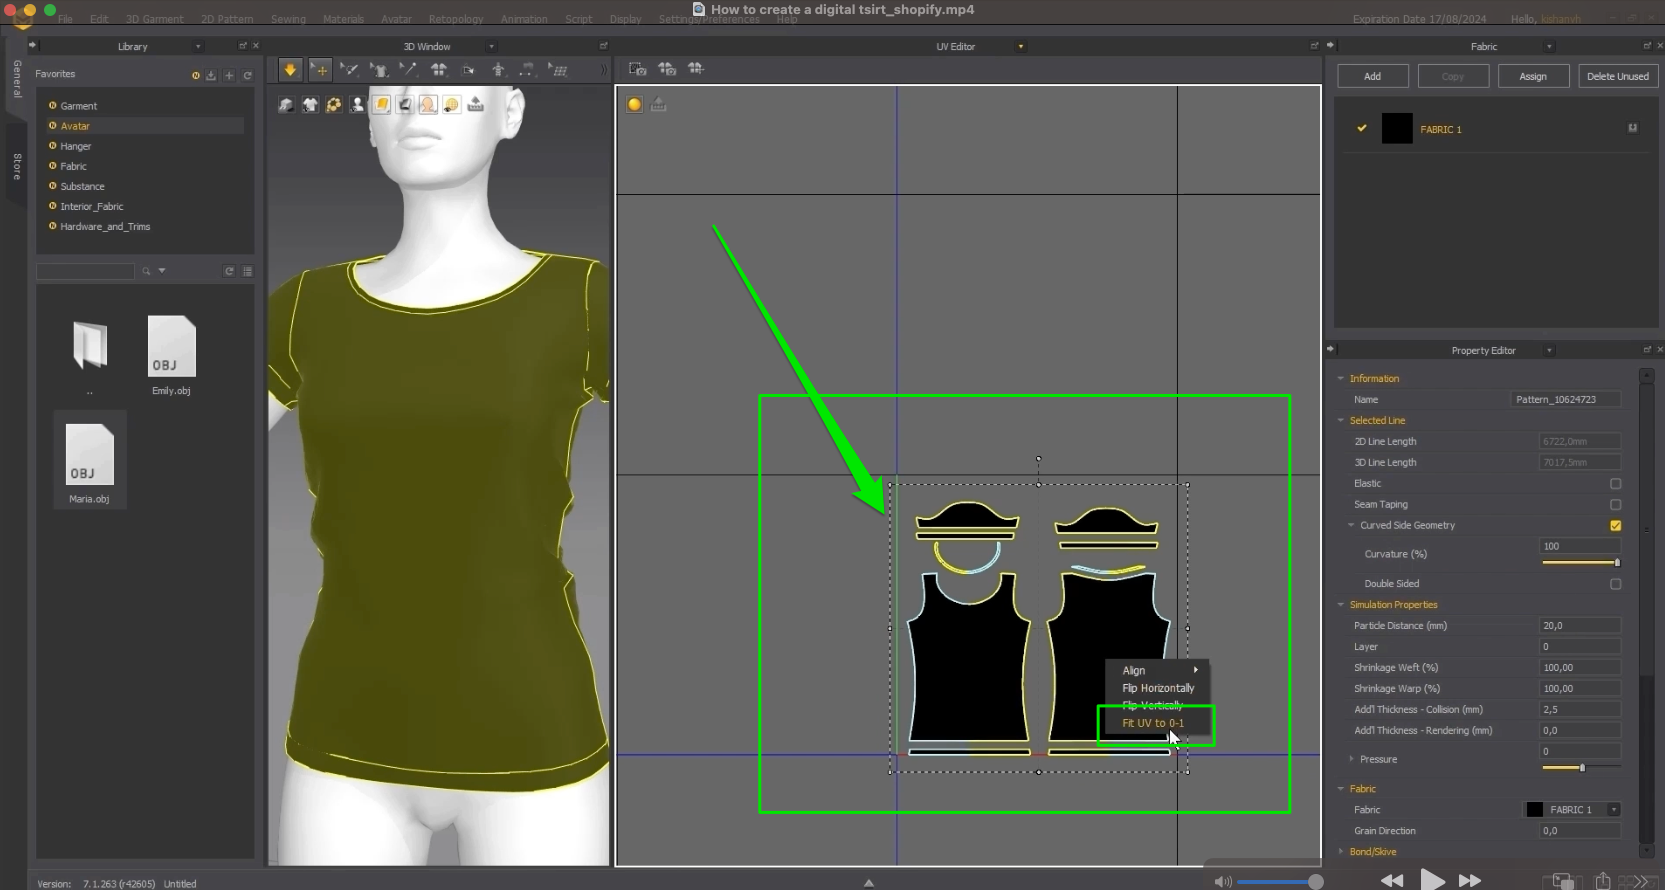
And then Ok:
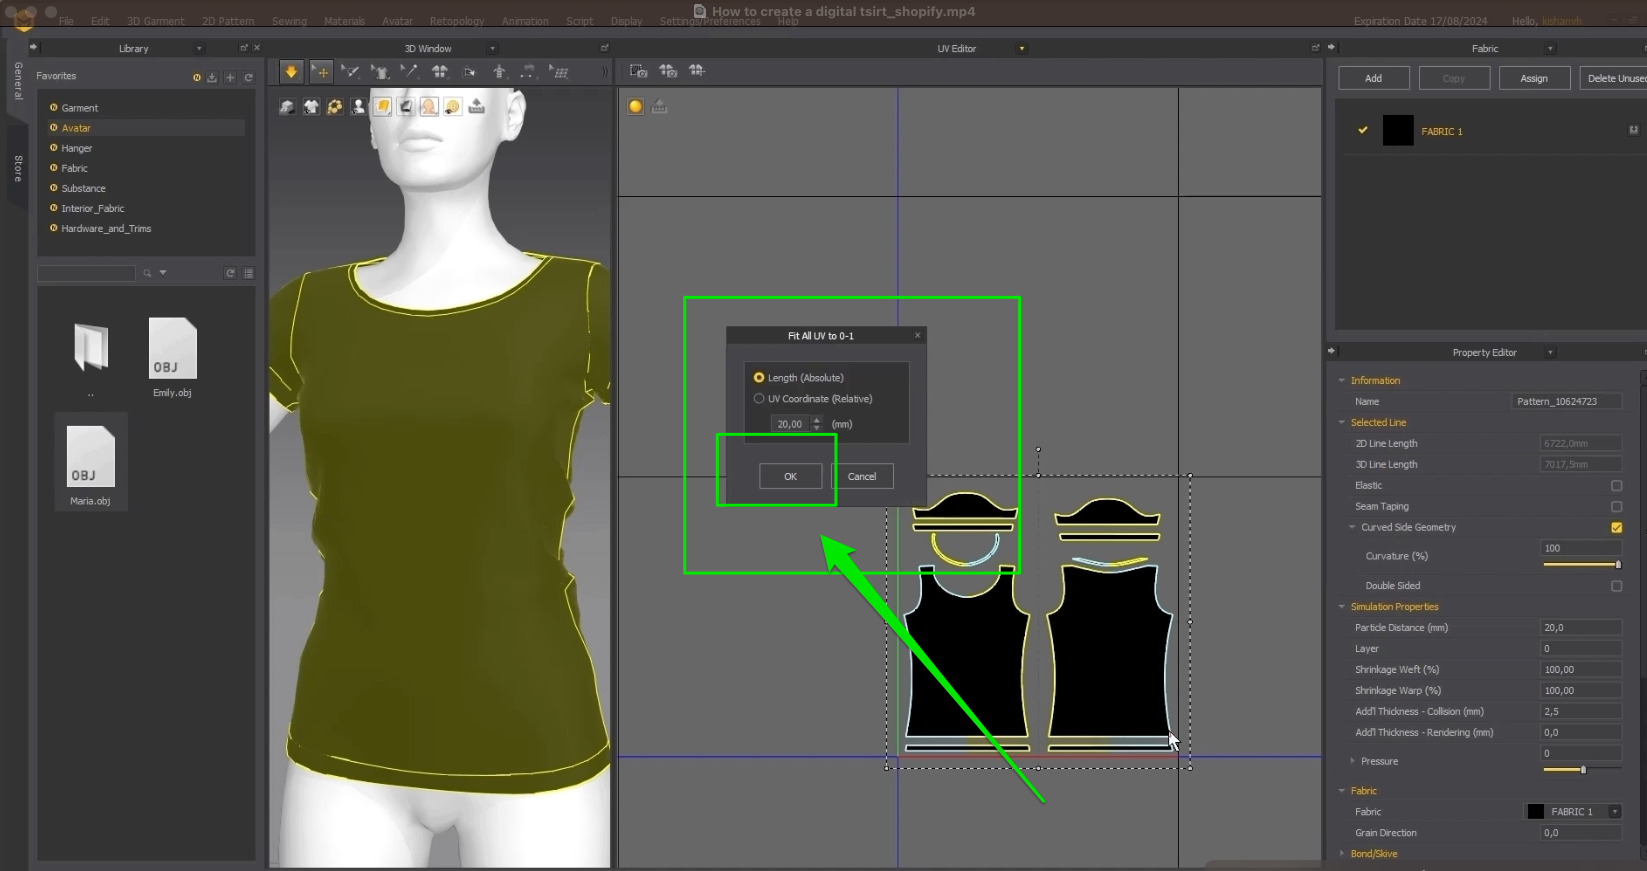
Make sure that all the UVs fit in one tile, if not repeat the procedure.
Click File->Export->OBJ. Choose a good path. Make an apart folder.
Name the file something recognizable, in this case “ShirtL_Garment”. Make sure to use the "Garment” word in the file name.
Export with the following settings:
Exporting the Patterns OBJ file:
In the UV Editor deselect all, right click and select “Reset UV to 2D Arrangement”.
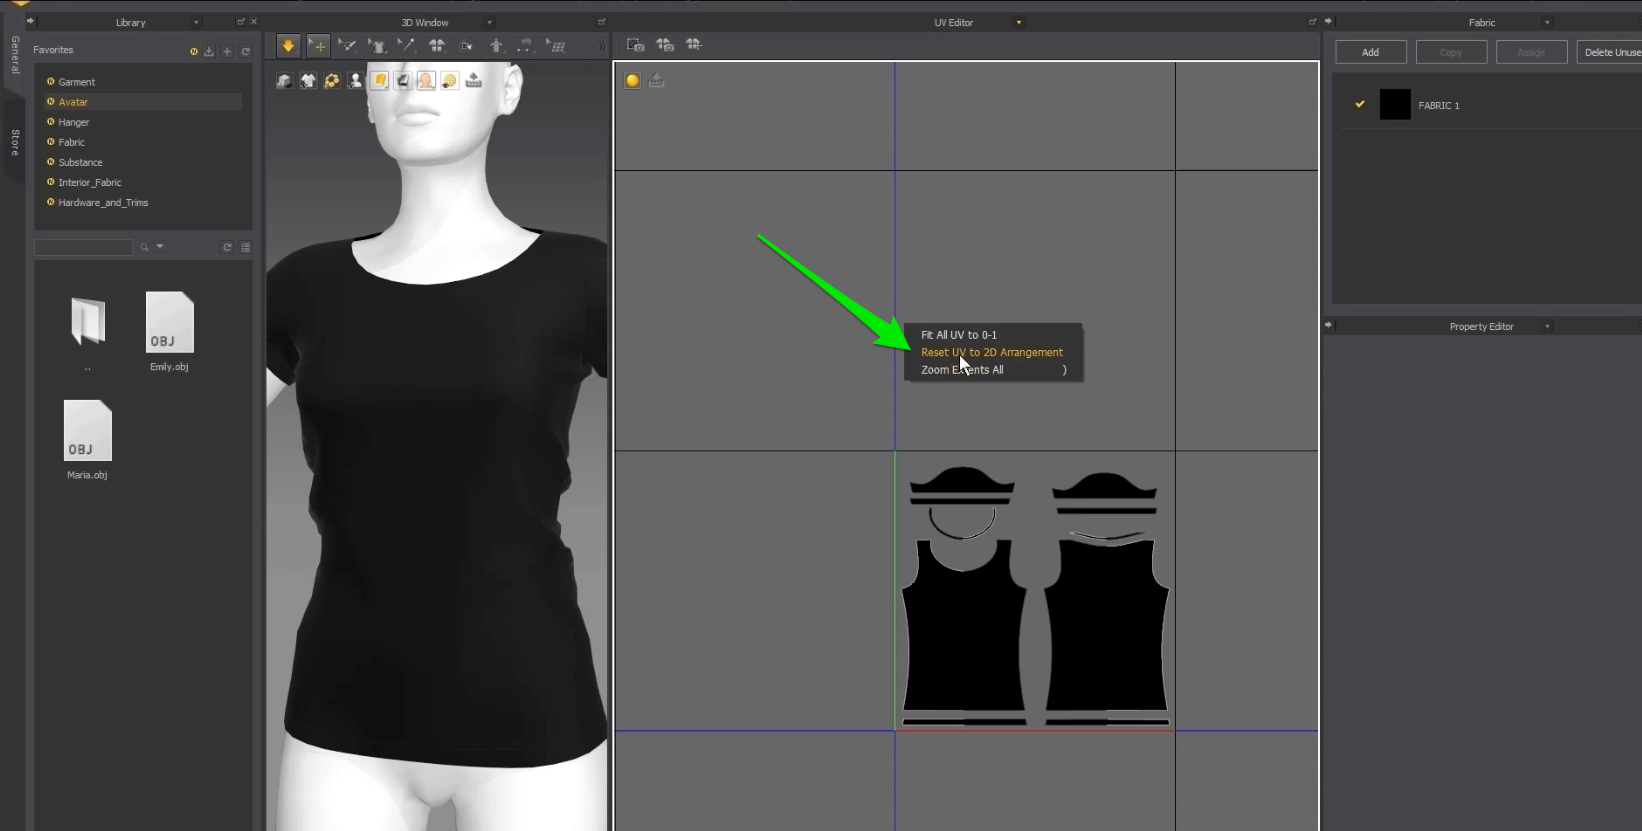
Click File->Export->OBJ. Name the file something recognizable, for instance “Shirt_Pattern”. Make sure that the name contains the word “Pattern”.
Export with the following settings (don't forget to deselect all texture maps):
Now you can see in your directory 3 files and another zip folder. Something like this:
Unzip this folder and then make another zip with all files. And name your Folder for instance “export”. This folder should be later imported in outfitXR.
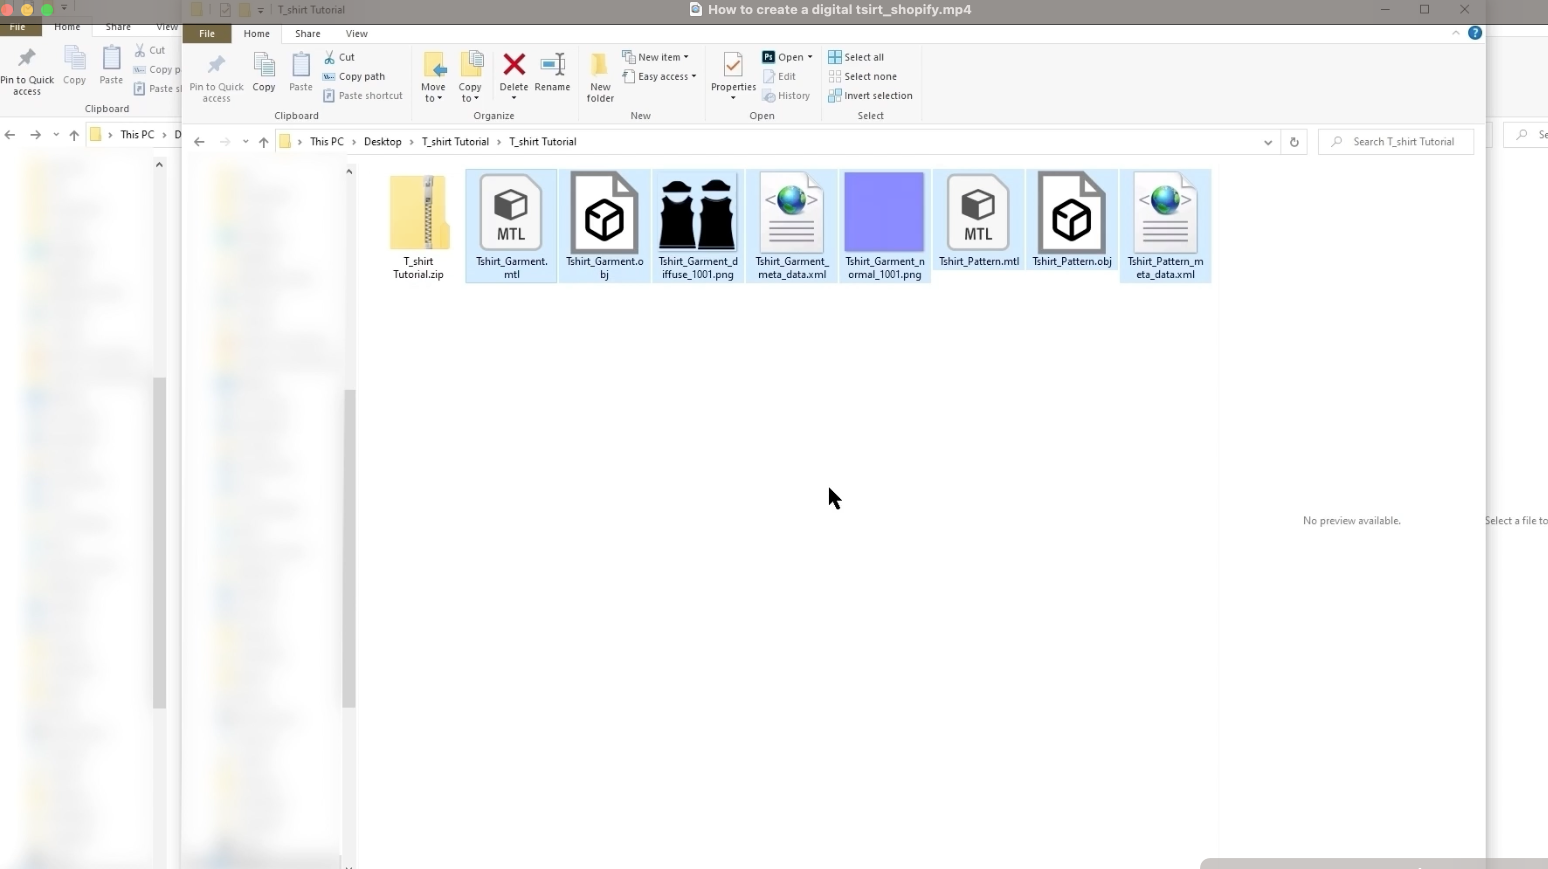
If a non-collider was used, then go further:
Exporting/Saving Avatar OBJ file.
In Marvelous Designer, access the "OXR_Avatar" folder by clicking on "Avatar" in the right menu, then copy the folder's path for quick access.
Open the folder in Finder (on macOS) or File Explorer (on Windows) using the copied path, locate your avatar's OBJ file, and copy it to your desired project folder along with other necessary files. Change the Avatar fail name from “Maria” to “Maria_Collision
Finally, create a zip archive containing all project files.
Exporting if the textures are in Marvelous design executed.
Test your garment in Shopify Fitting Room
Let's set up a Fitting Room on Shopify.
Navigate to the Shopify Partners login page, and log in. Once logged in, you'll be directed to the Homepage.
Access the Apps section and click on 'Apps' in the left-hand menu. Select 'OutfitXR - Virtual Try On' from the list of apps. Navigate to the settings and verify if you are connected.
Click on the "Connect" or "Reconnect" button.
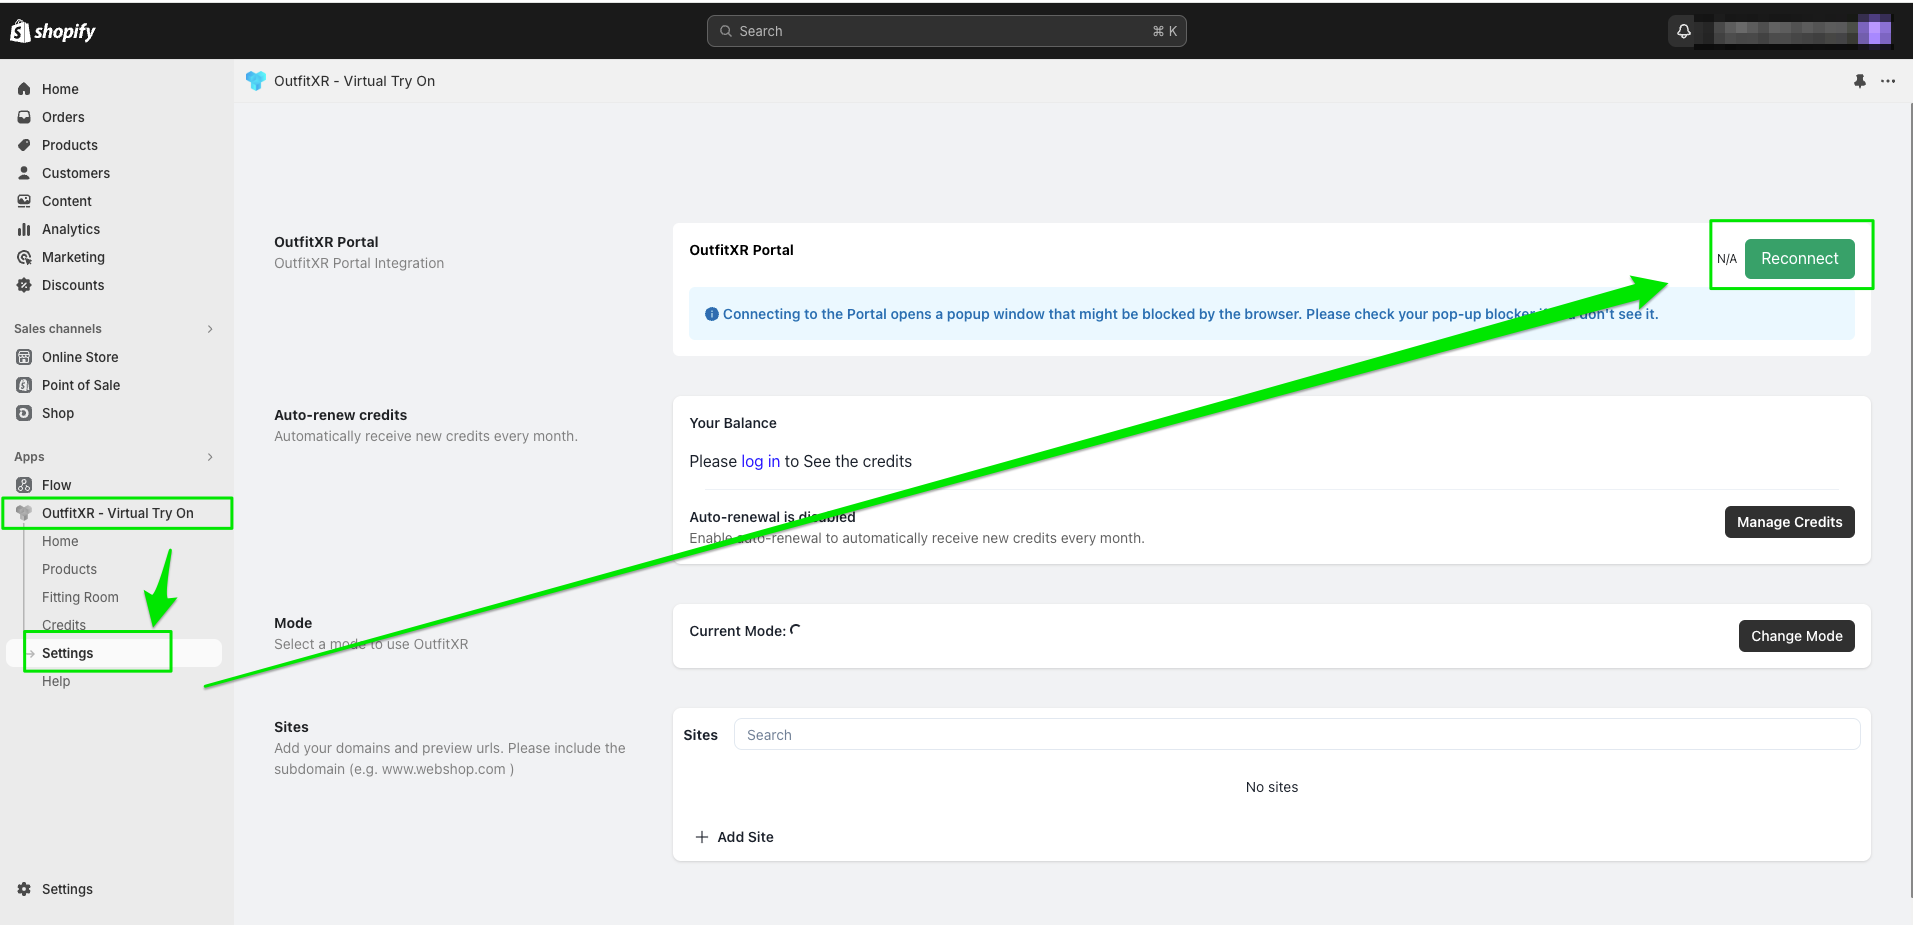
Introduce your account details and click log in.
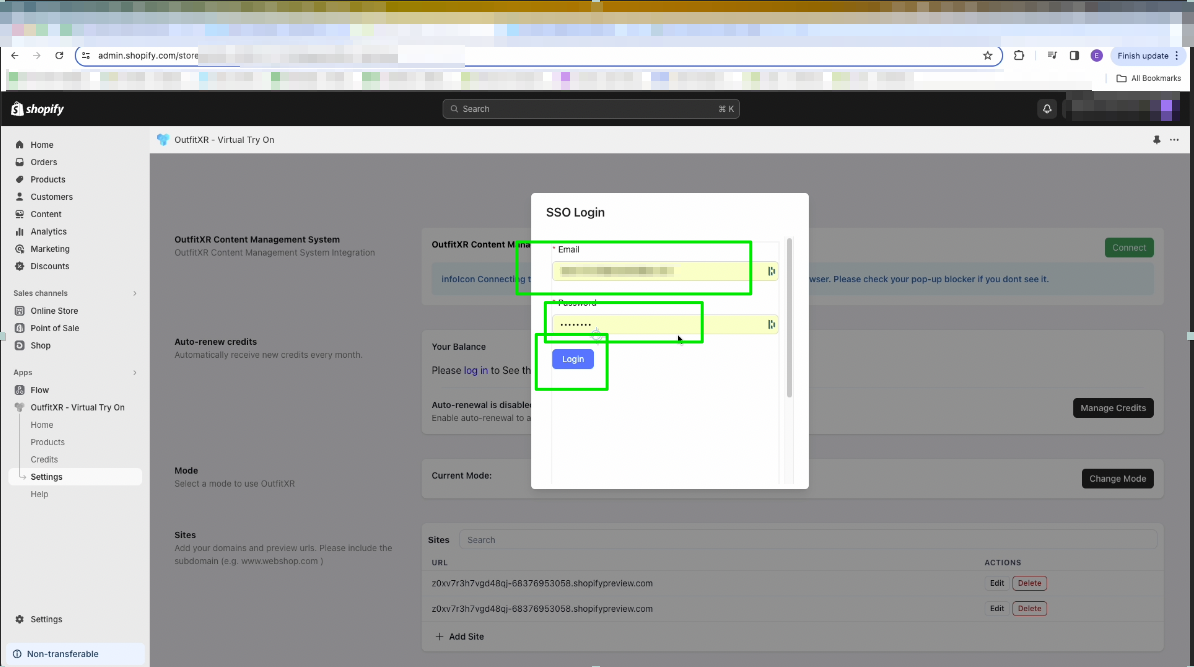
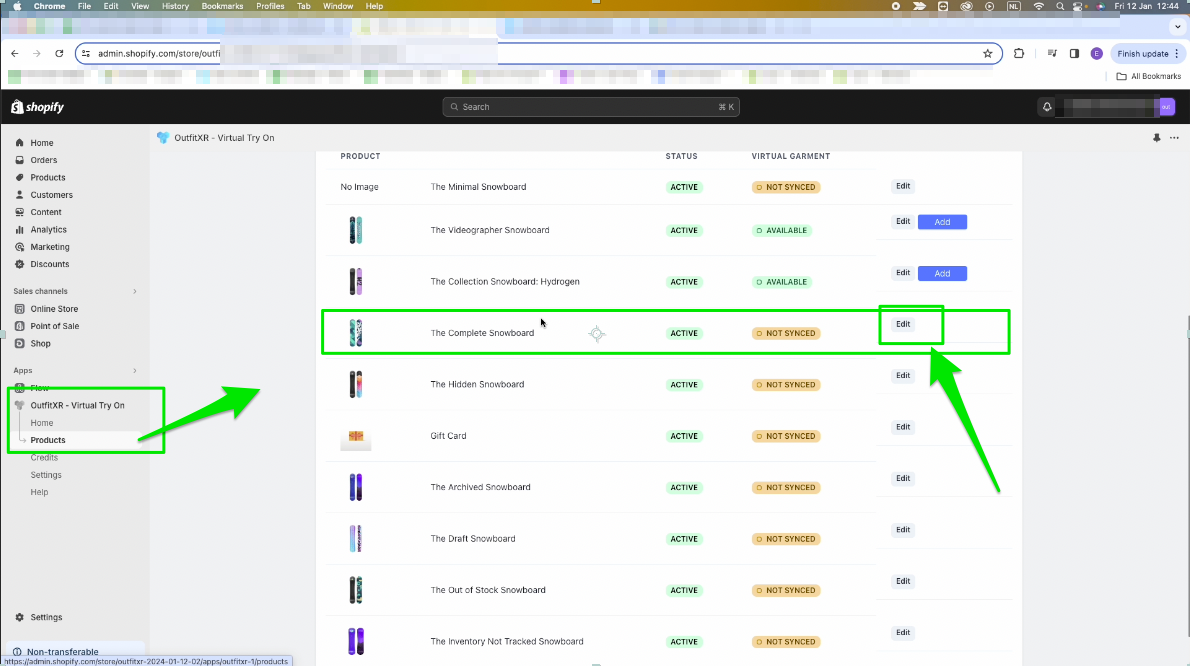
Now, you're directed to your own store. Continue by choosing 'Products' from the displayed list of the app. You will be directed to a page with a list of products. Select a product from the list that is not yet synced, and click on the 'Edit' button".
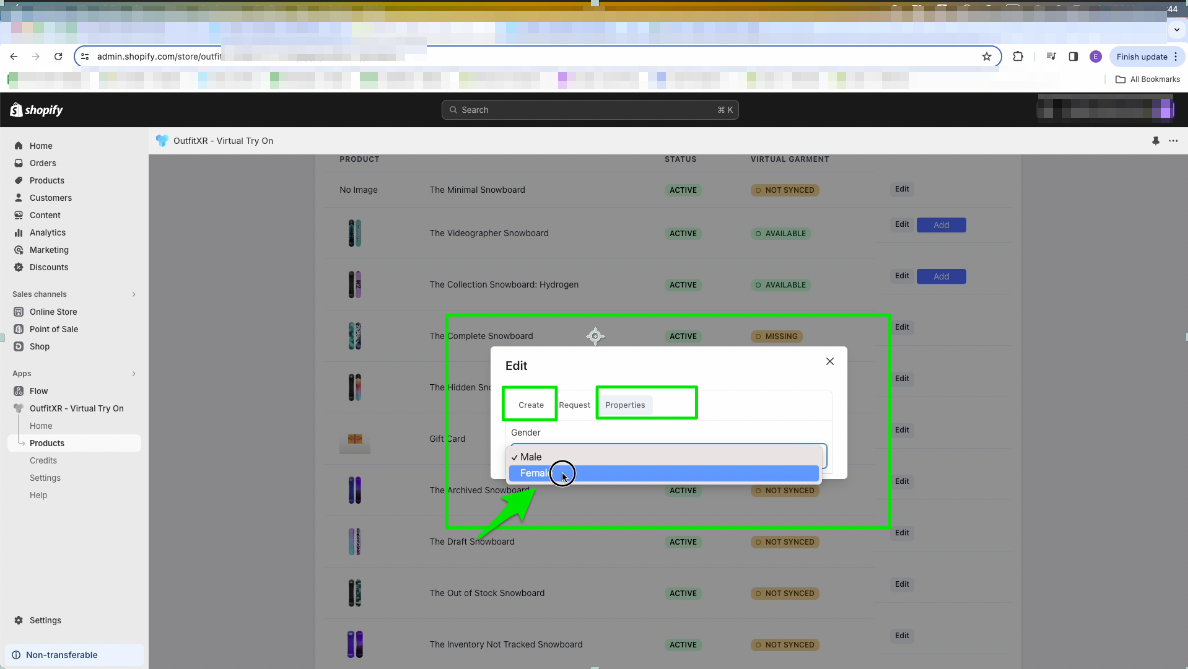
Within the pop-up window, navigate to the Properties section and make your selection for the preferred gender.
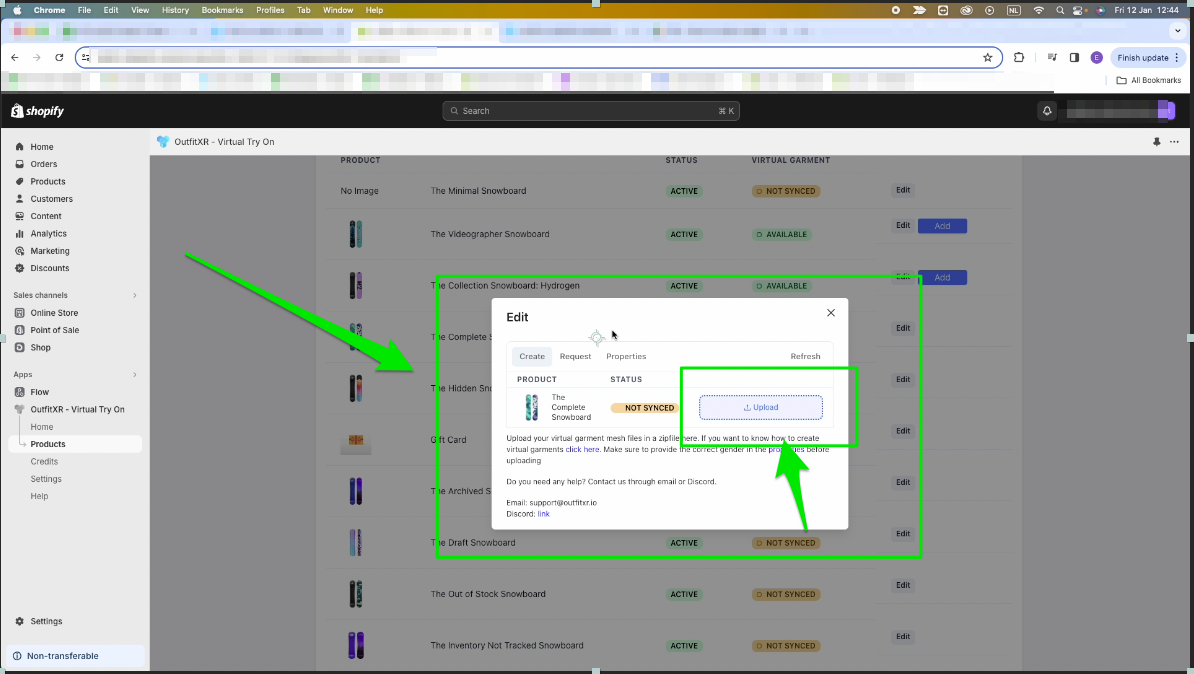
Return to the Create section, locate the zip file on your computer and drag it into the field labeled “upload” to upload it. Click on 'Refresh' to check the upload status. You can click 'Refresh' a few times; make sure the status now shows 'Available.' Once confirmed, you can close the window.
Now, to create a fitting room, access the 'Products' page from the top-left menu. Search for the recently edited product in the displayed list and click on the eye icon to access it.
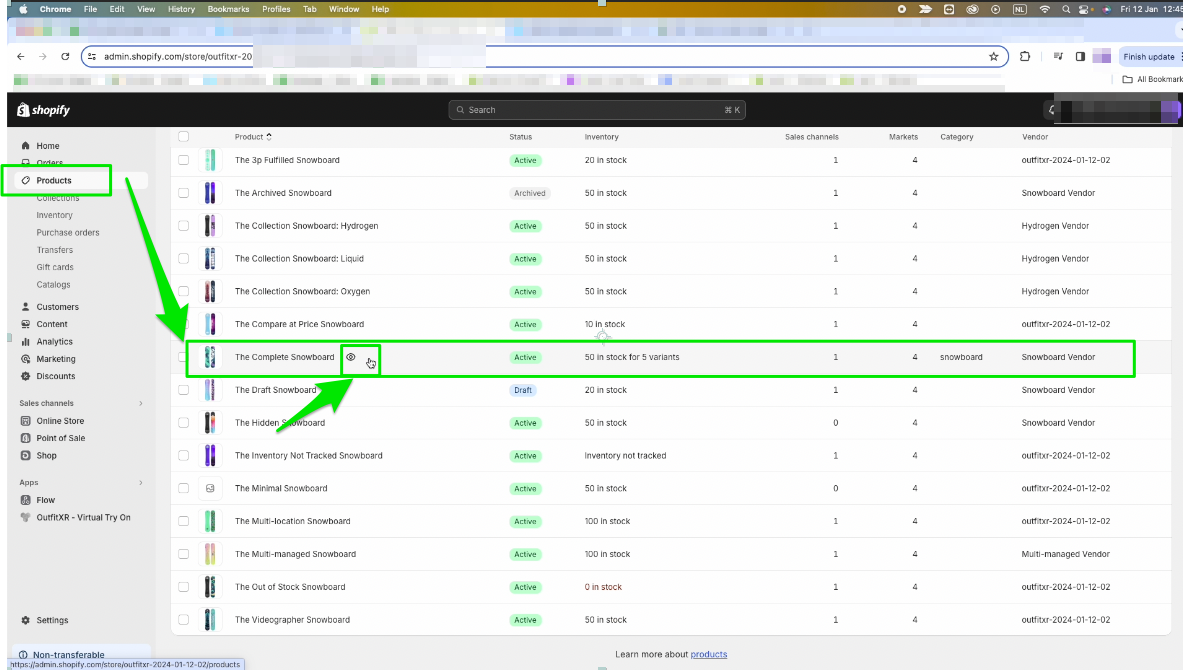
After the product has opened, you will see a 'View in Fitting Room' button on the right side of its page. Click on it.
And then Click on 'Book a new'.
Now, select an avatar and click the 'Create Fitting Room' button.
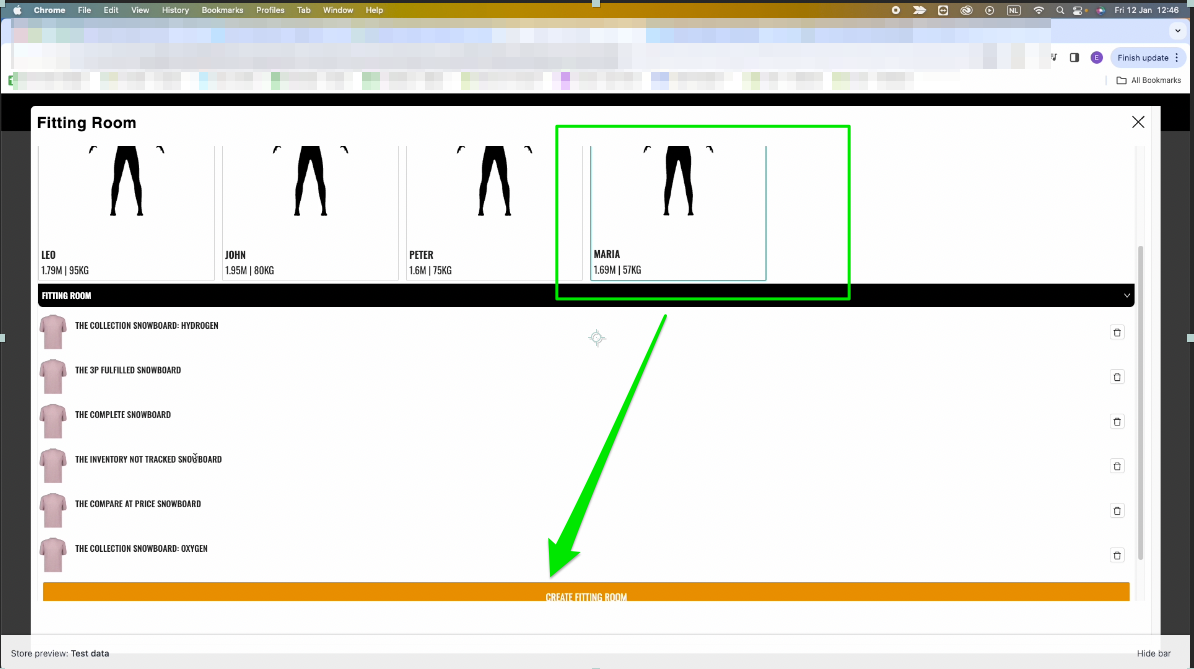
You will be automatically redirected to the Fitting Room. Wait until your personal fitting room loads to test the garment. Once the fitting room is displayed, you have the option to select an avatar and then proceed to try on clothing garments on that chosen avatar.
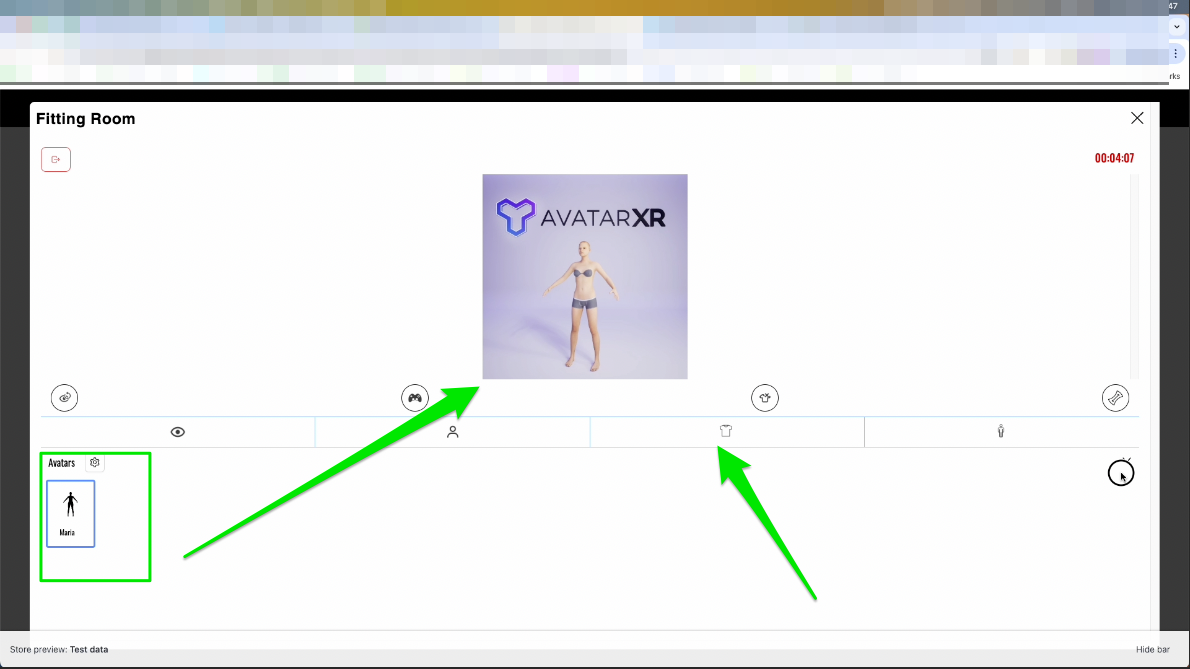
In the displayed fitting room you can see the simulation of the garment on the avatar.
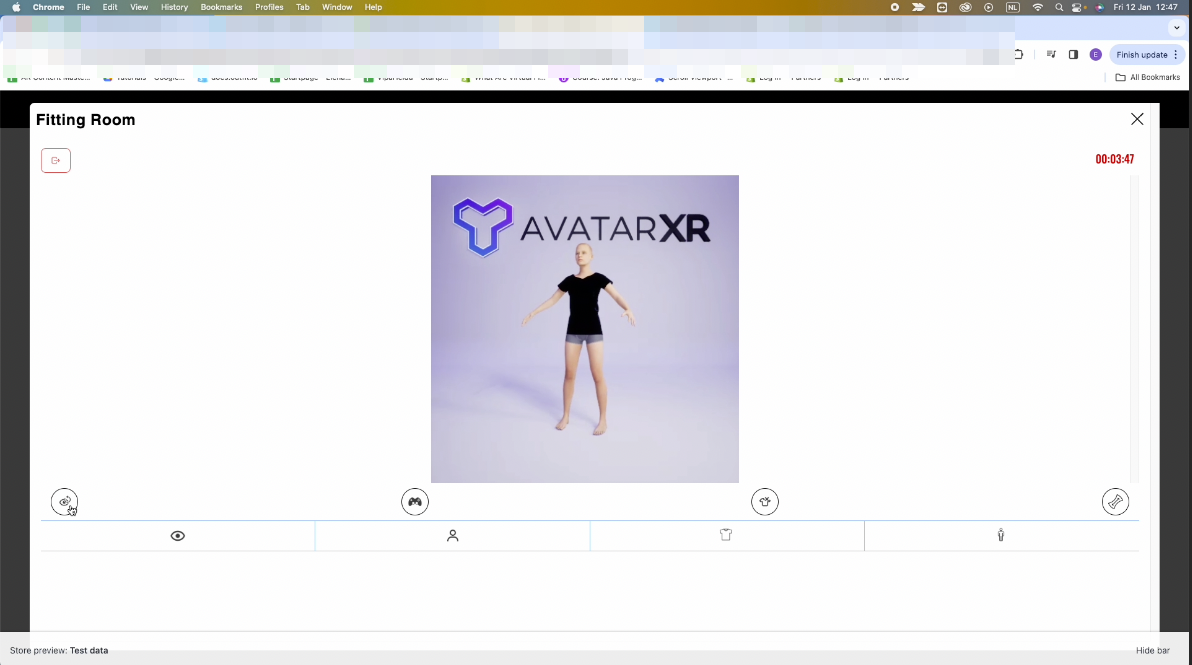
In the Fitting Room, you can implement various functionalities, such as zooming in or out. Additionally, you have the option to reset the view to return to the initial overview.
Use the 'Heat Map' option to visualize how garments of different sizes fit on the avatar. This allows you to observe whether the garments are either too loose or too tight on your selected avatar.
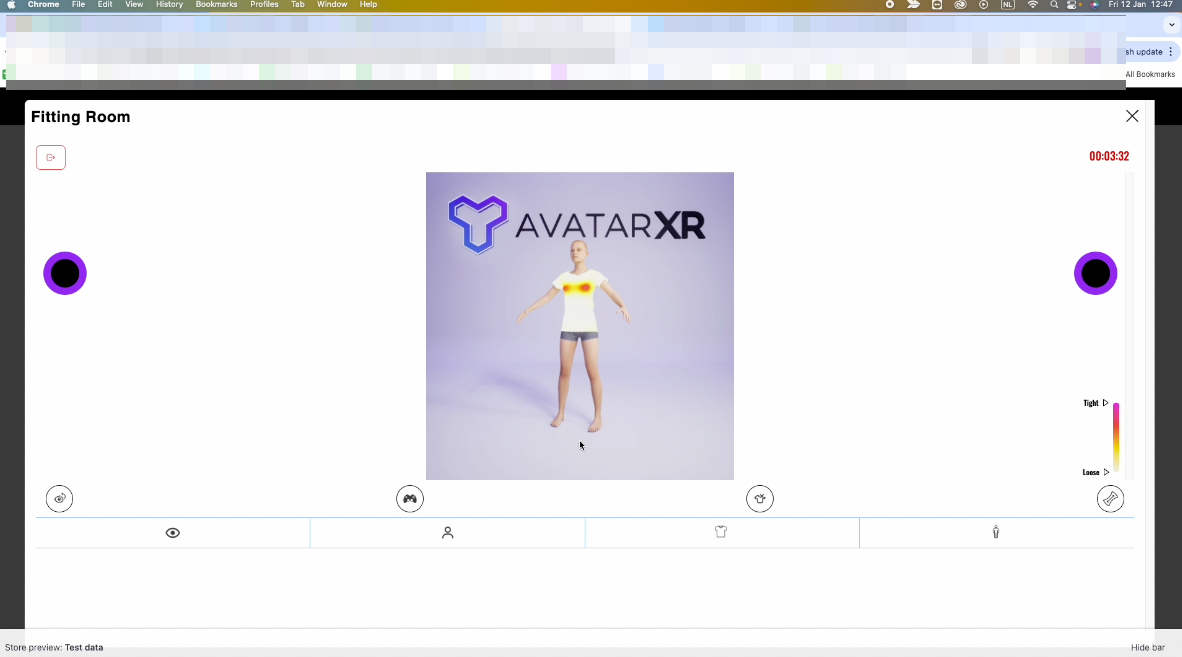
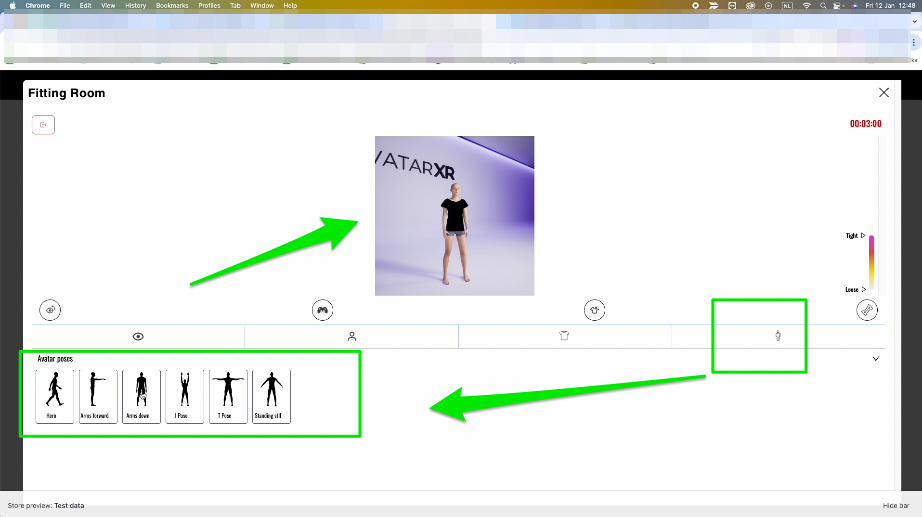
You can manage other controls, including adjusting the height, rotating the view, and zooming for a more personalized experience. Additionally, make use of the Avatar Settings where you can explore different poses for the avatar.
