How to create a digital dress
https://www.youtube.com/watch?v=lroWCru-tnA
Measure your dress garment
Let's begin by taking photos of your garment, focusing on the front, back, and some close-up details.
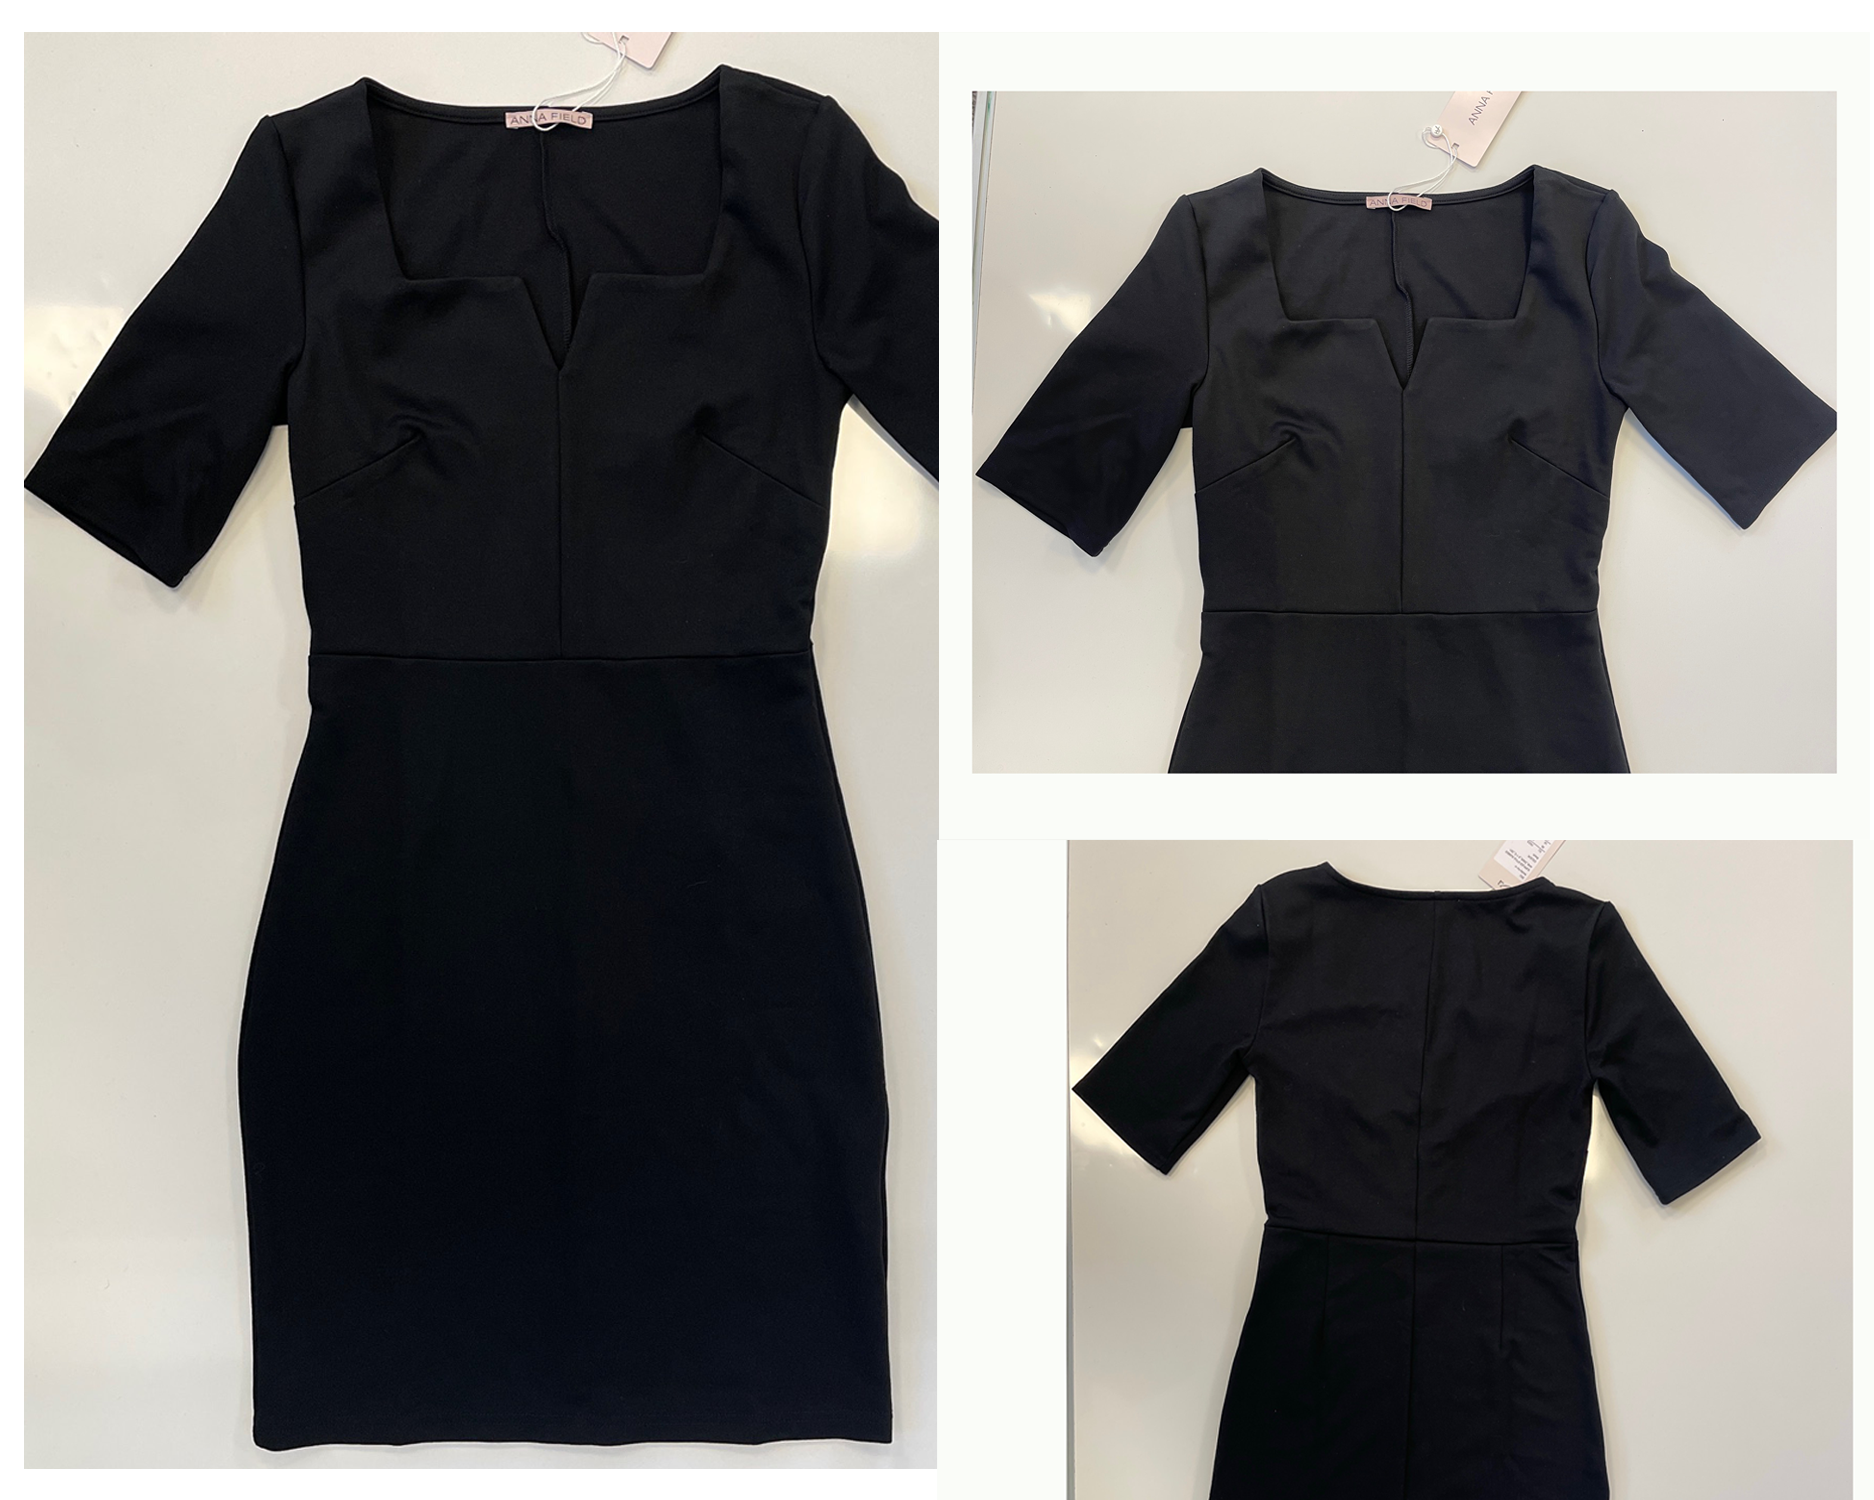
Email the photos and transfer them to your computer.
Open your editing software to crop and adjust these images to the necessary dimensions. Open each of your photos and adjust them one by one. Use the Crop Tool to resize them to 980 by 850 dimensions.
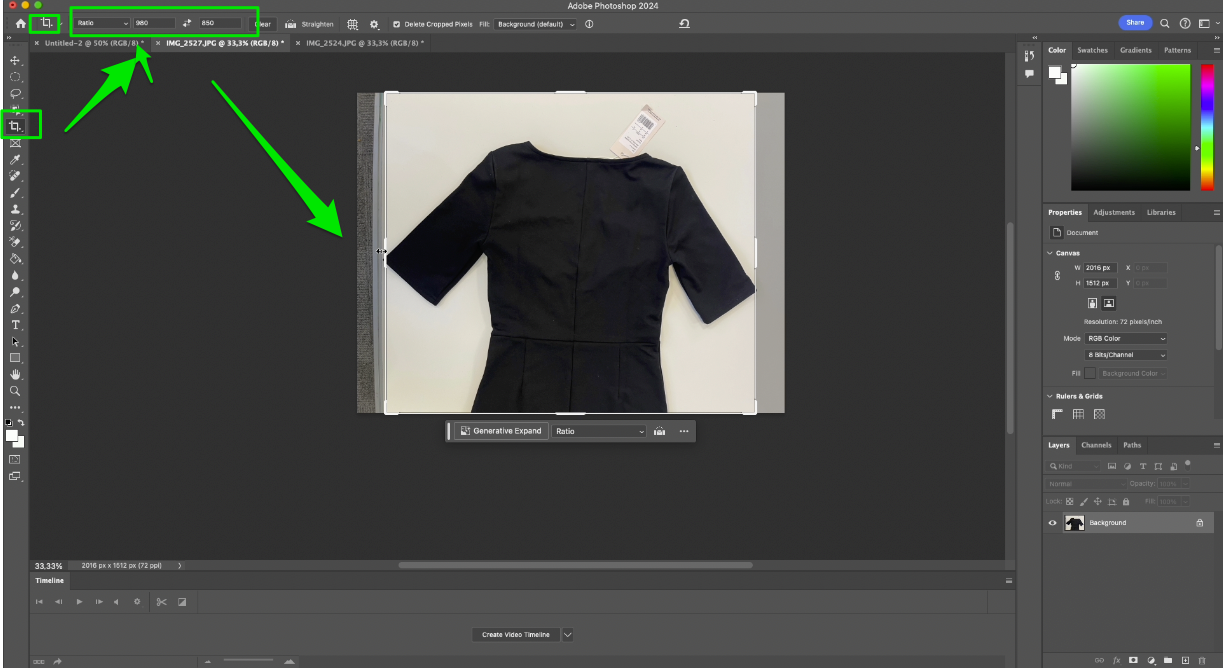
Save them as PNG files. Organise them into a folder and rename for easy identification, like 'front' or 'front_closeup'.
Go to OutfitXR, log in, and access the product overview. Select 'Add Product' and provide the product name along with its size. Add a product URL and navigate to Advanced to change the gender.
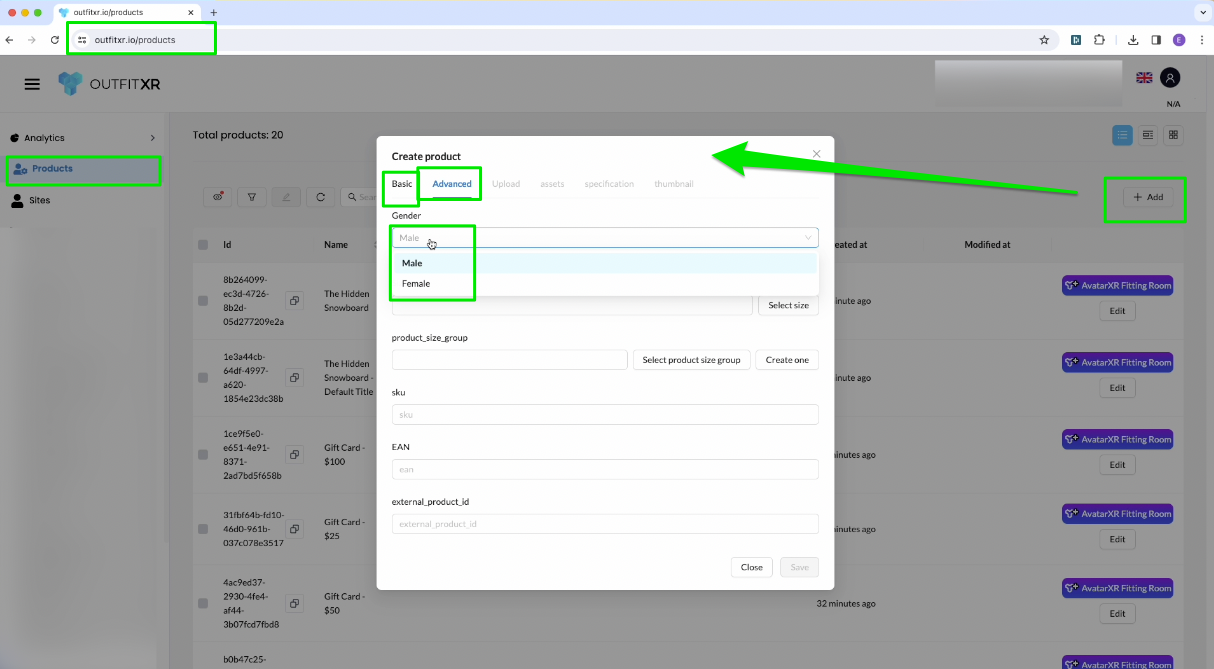
Save the new product and refresh the page. Find your product in the list, click 'Edit,' and navigate to 'Specifications' to upload PNG images. Now, drag and upload the images from your computer.
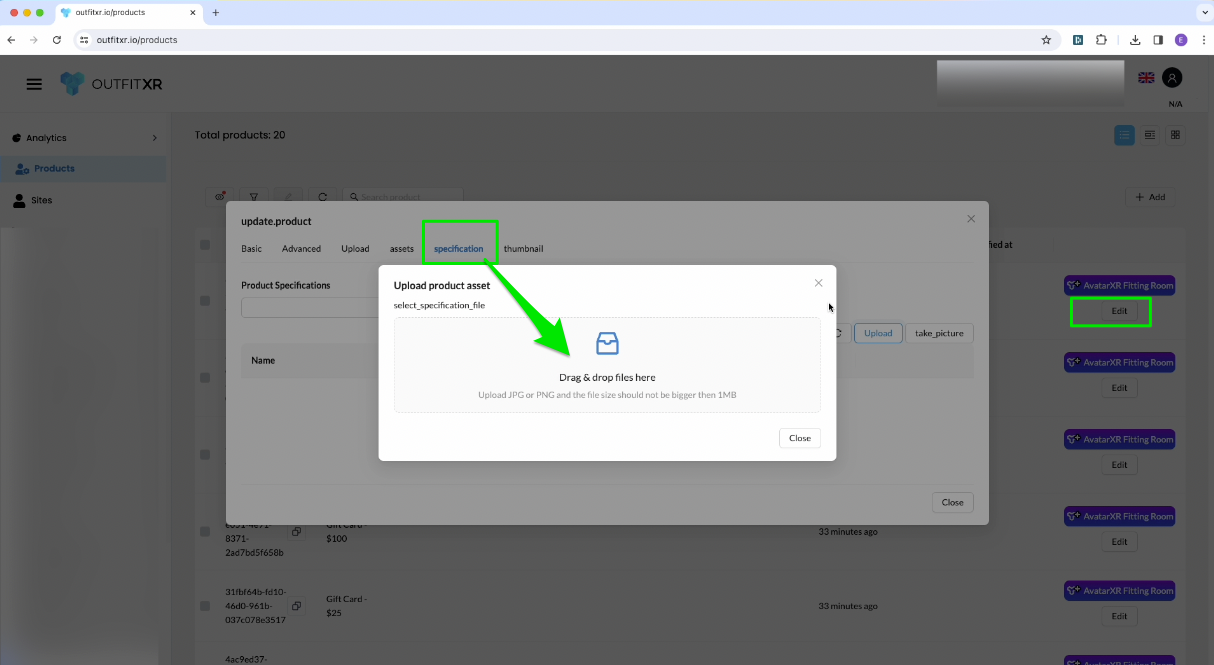
Open the relevant image and begin drawing lines with measurements. Take precise measurements of each part of the skirt and carefully annotate these measurements on the images. To draw lines, simply hold the left mouse button and drag to create lines.

Right-click on the line to manually set measurements or to delete it. If adjusting the length, make sure 'Manual measurements' is enabled and enter the length in centimeters. Change color if needed and click "Save".
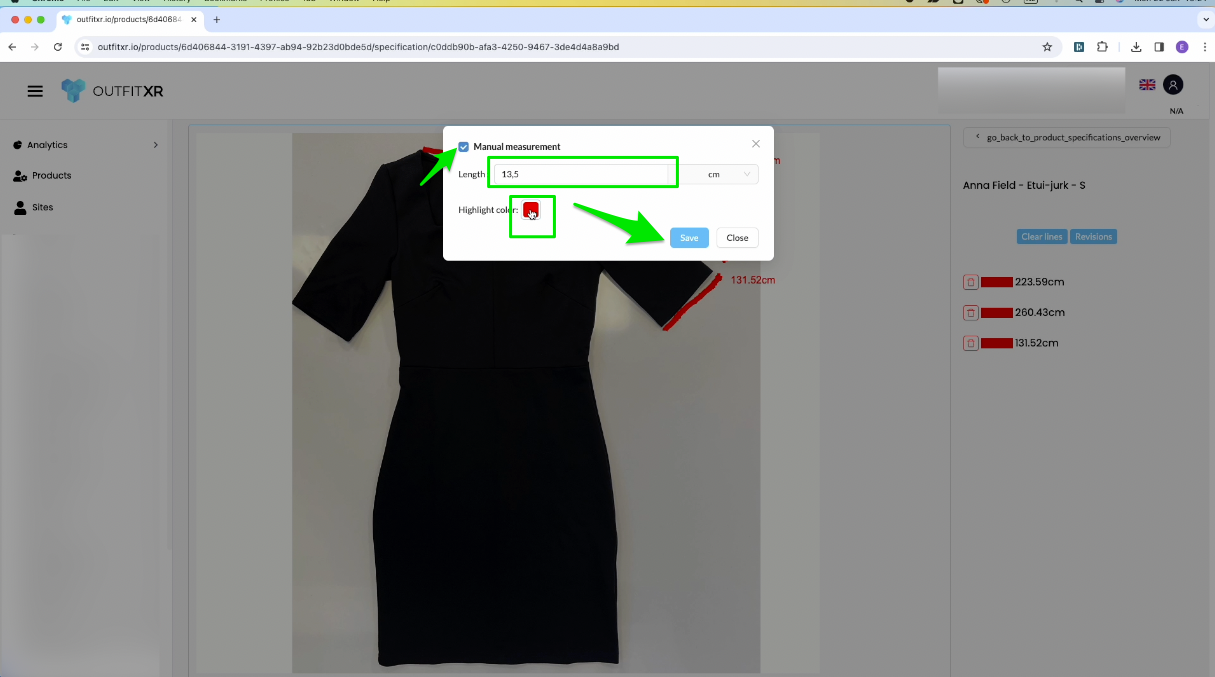
Repeat the process for other measurements. If unsatisfied, delete lines by right-clicking and selecting "Delete".
Ensure every image is uploaded correctly to proceed with the digitalisation.
Creating Dress Garment in Marvelous Designer
Open Marvelous Designer and create a new project. Go to File then New, and save your project in a desired folder.
Select a default avatar or import your own avatar, if available, from the left panel of the window. Double-click and then click 'OK'. The avatar is now displayed on the left side in the 3D view, accompanied by a 2D silhouette on the right.
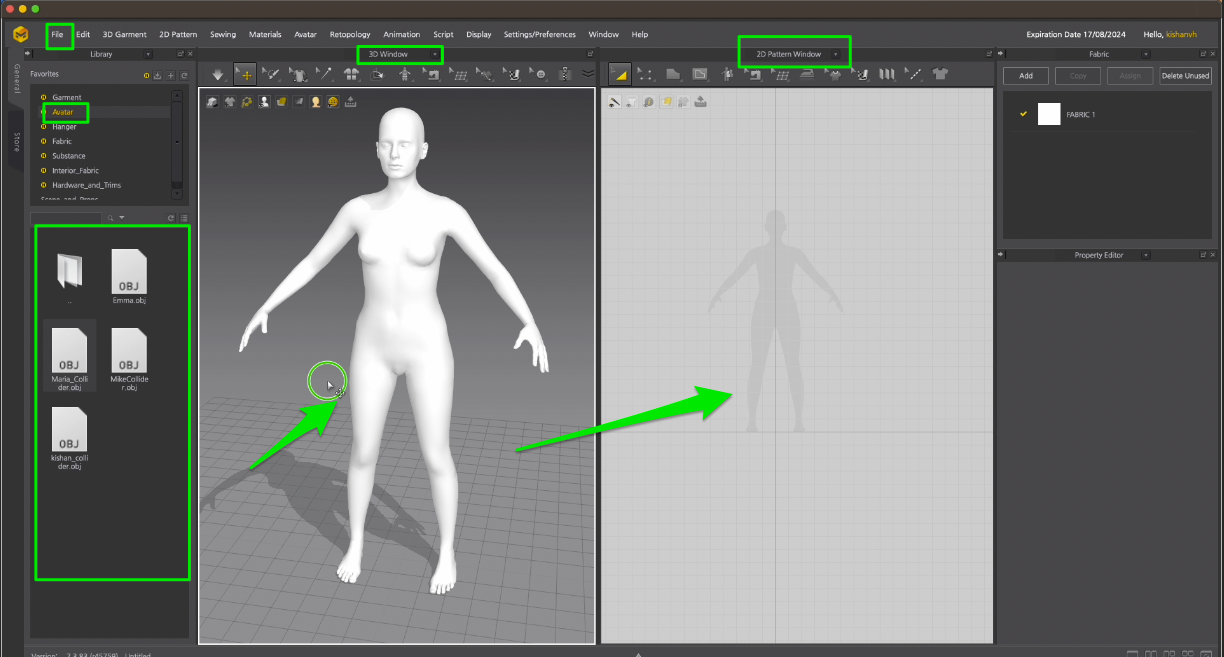
Use the mouse scroll wheel for navigation in both areas, press it to move and rotate. To zoom in, simply scroll the wheel, and for 3D space rotation, utilise the right mouse button.
Create the Dress Pattern
Ensure you have your measurements at hand.
Let's begin by creating the patterns of the dress. Navigate to the 2D Pattern Window and select the Polygon tool from the 2D toolbar to create a polygon.
Please long press the left mouse button on the tool to view a list of all the tools in the tool group.
Begin with drawing the front half pattern of the garment. Click to create vertices, connecting them to form the desired polygon. Select ‘Edit Curvature’ or press ‘C’ key to make a curvature from the line or adjust the curvature.
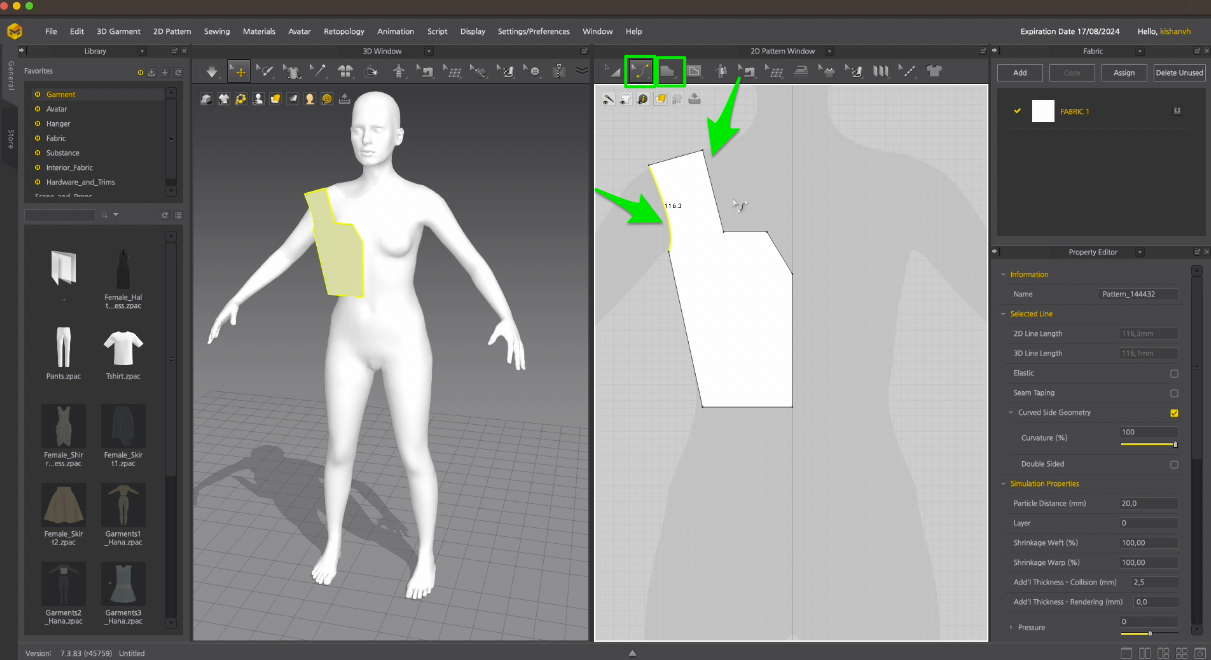
Then select the pattern and copy, right click paste with command Symmetric Pattern(with sewing),and arrange it in the 2D view. Then select the middle line and right click merge.It is very convenient because all changes and adjustments made on this side will automatically apply to the other half.
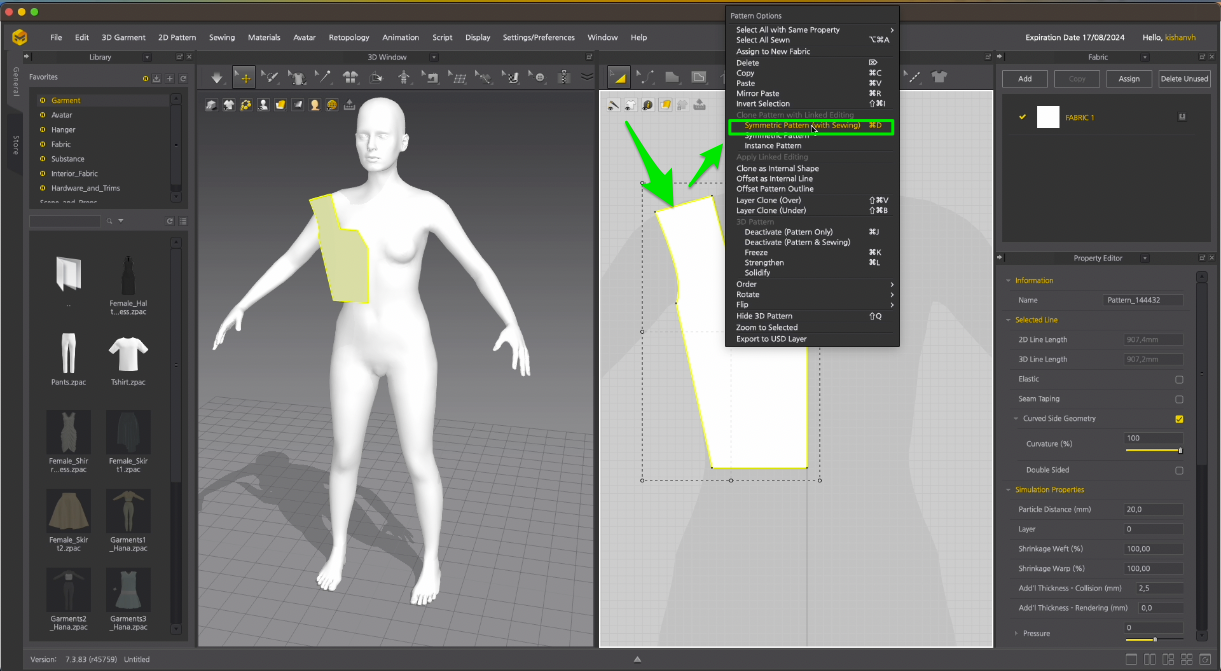
Let's continue modeling the bottom part of the dress. Select the Polygon tool from the 2D toolbar and create half of the button pattern.
Then select the pattern and copy, right click paste with command Symmetric Pattern(with sewing),and arrange it in the 2D view. Then select the middle line and right click merge.

Now, we will create internal guiding lines to manipulate the internal sizes of the garment.
Select the 'Internal Polygon/Line' from the top toolbar and start drawing lines inside the pattern.
Follow the pictures, specifications, and measurements of the actual garment.
Now, adjust the sizes of the lines. Select the line, right-click, and choose 'Change Length’.
In the pop-up window, modify the length of the line. Remember to adjust the direction as needed; you can change from the start, both, or end. Click Ok.
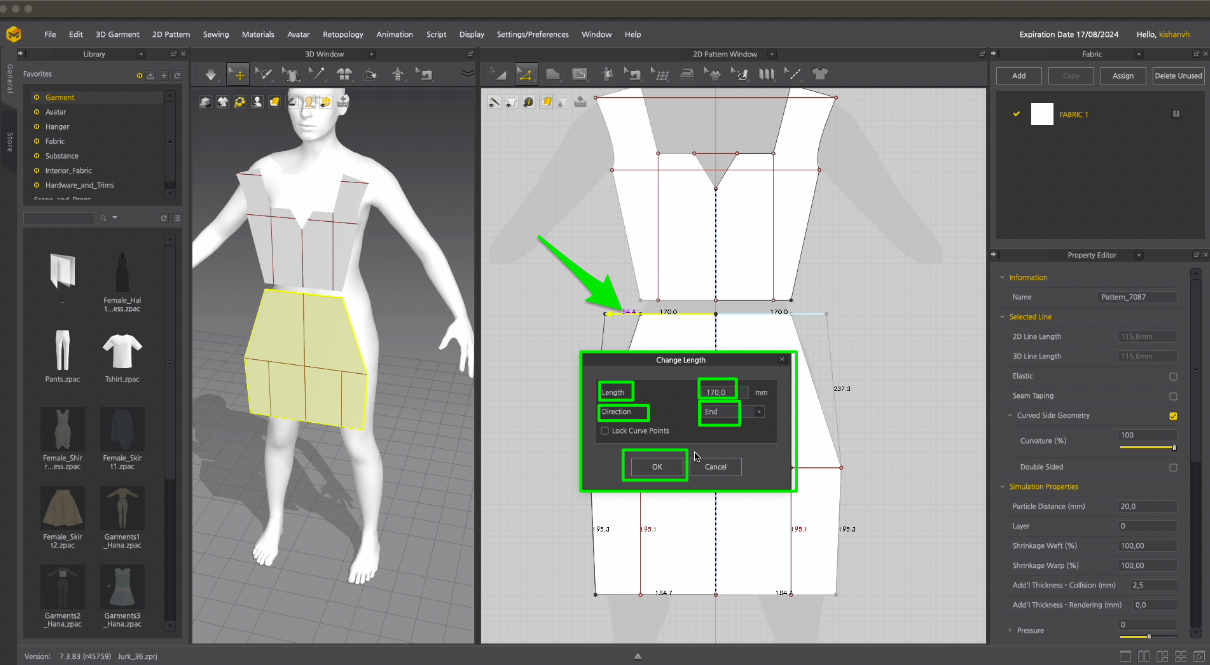
Repeat these steps for the remaining lines. Be patient and pay attention to the measurements. Refine and reposition points in accordance with your garment patterns and measurements. Press Shift+Z for a quick overview of the size lines in your design.
Adjust the pattern points and lines by clicking the Z key, or go to the Edit Pattern in the 2D View toolbar.Continue refining and enhancing the shape, paying close attention to sizes and the garment pattern. Occasionally, revisit specific dimensions, as changing one line may impact others.
Select the line, right-click, and choose 'Change Length'. In the pop-up window, modify the line's length, adjusting the direction as needed from the start, both, or end. Persist in the iterative process of refining and enhancing the shape, meticulously adjusting each element to achieve an optimal and aesthetically pleasing outcome. It takes a while and involves meticulous effort, but achieving the desired shape and measurements is essential.
The front patterns of the garment are ready. Now, we will connect them through a seam.
Use the segment sewing tool to sew the lines of the dress pattern.
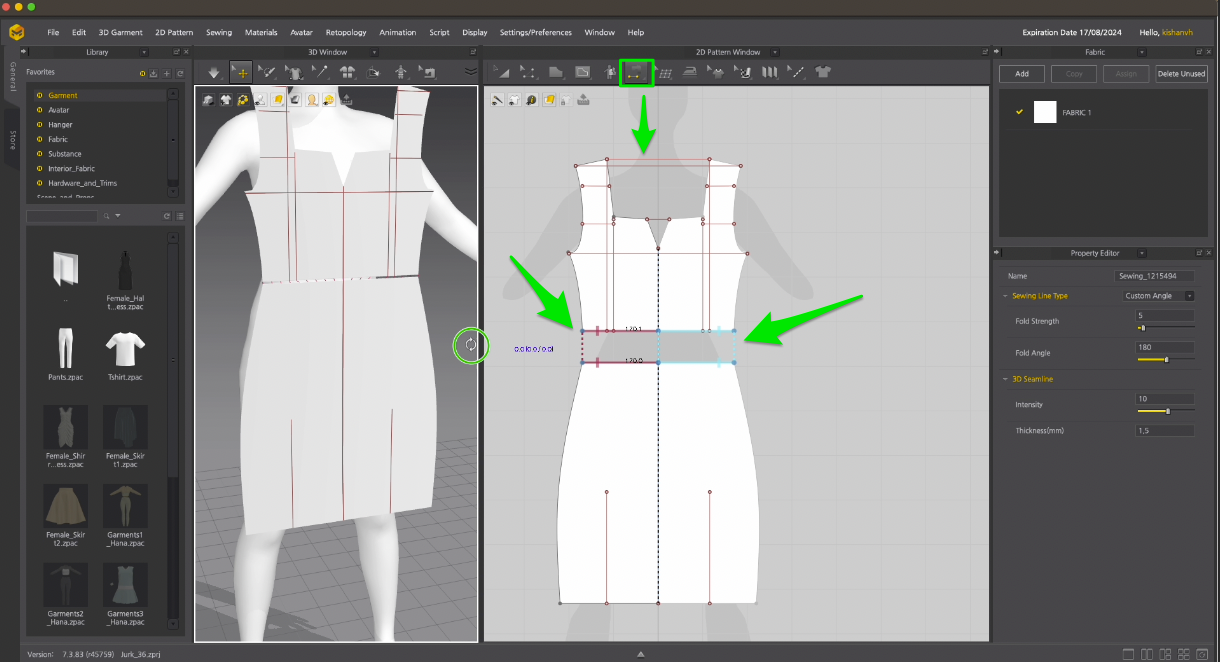
Select the” ‘Segment Sewing’ from the top toolbar. Long press the left mouse button on the tool to view a list of all the tools in the tool group. Begin by selecting one segment, then choose a second segment to get an overview of the sewing connections. Consider the logical connections between garment patterns.
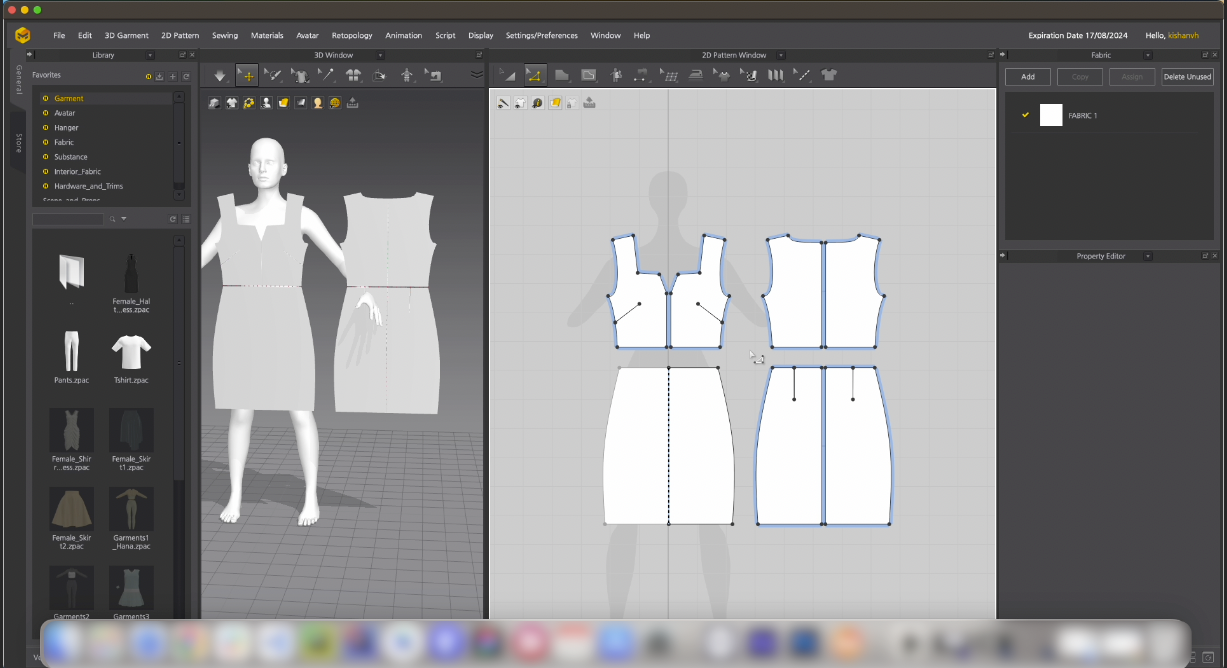
Copy the two front patterns to the back pattern. Use simple Control + C and Control + V, and arrange it in the 2D view.

Let's proceed with the back pattern. For the back bottom pattern, I've added another seam. Select the inner line, then right-click and choose 'cut and sew'. Add internal lines for other details.
Continue making adjustments to the back pattern. Delete the lines and points that are no longer needed.
The front and back patterns are ready; now, we need to proceed with drawing the sleeve patterns.
Navigate to the 2D Pattern Window and select the Polygon tool from the 2D toolbar to create a polygon. Long press the left mouse button on the tool to view a list of all the tools in the tool group and select the Polygon tool. Click to create vertices, connecting them to form the desired polygon.
Select ‘Edit Curvature’ or press ‘C’ key to make a curvature from the line or adjust the curvature.
Adjust line sizes by right-clicking, selecting 'Change Length', and modifying. Repeat for remaining lines, paying attention to measurements.
Copy the pattern, paste with 'Symmetric Pattern (with sewing)', arrange in 2D view. Select the middle line, right-click, and merge. Copy and paste the pattern for the second sleeve.
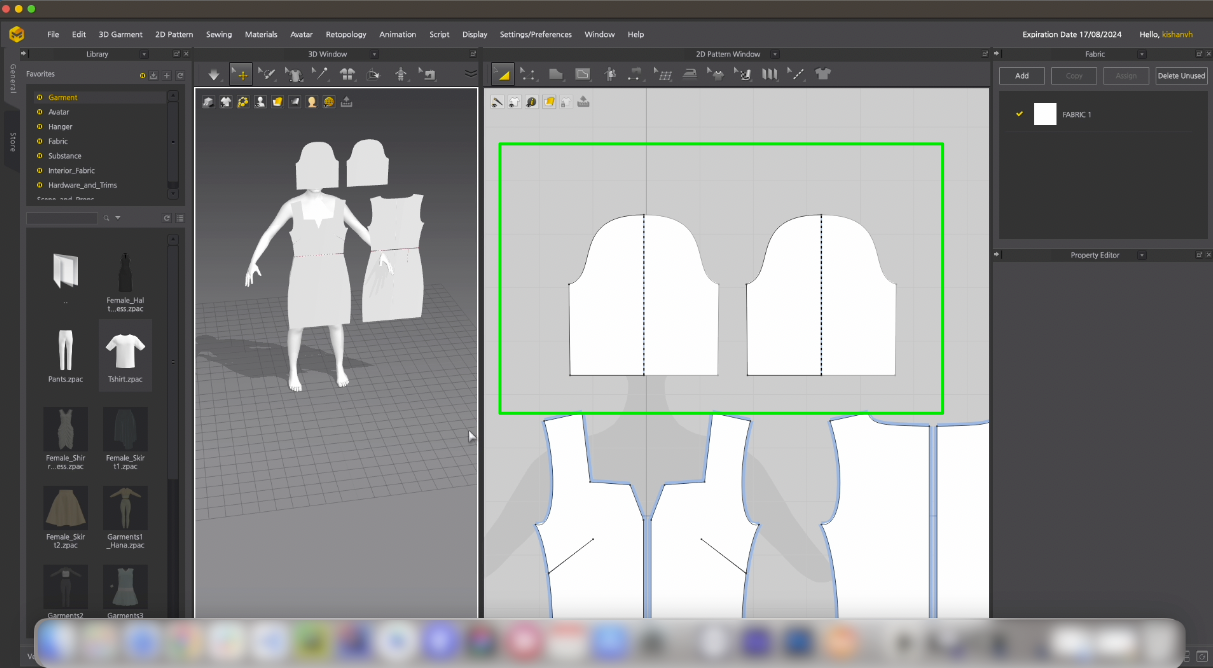
Arrange the pattern using arrangement points of the Avatar. Navigate to the 3D View and select ‘Show Arrangements Points’. Choose the pattern and hover to the arrangements points to see how it aligns with the avatar. Use placement properties from the right panel. Adjust orientation, offset, and position to set the placement position. Repeat the process for the back patterns as well.
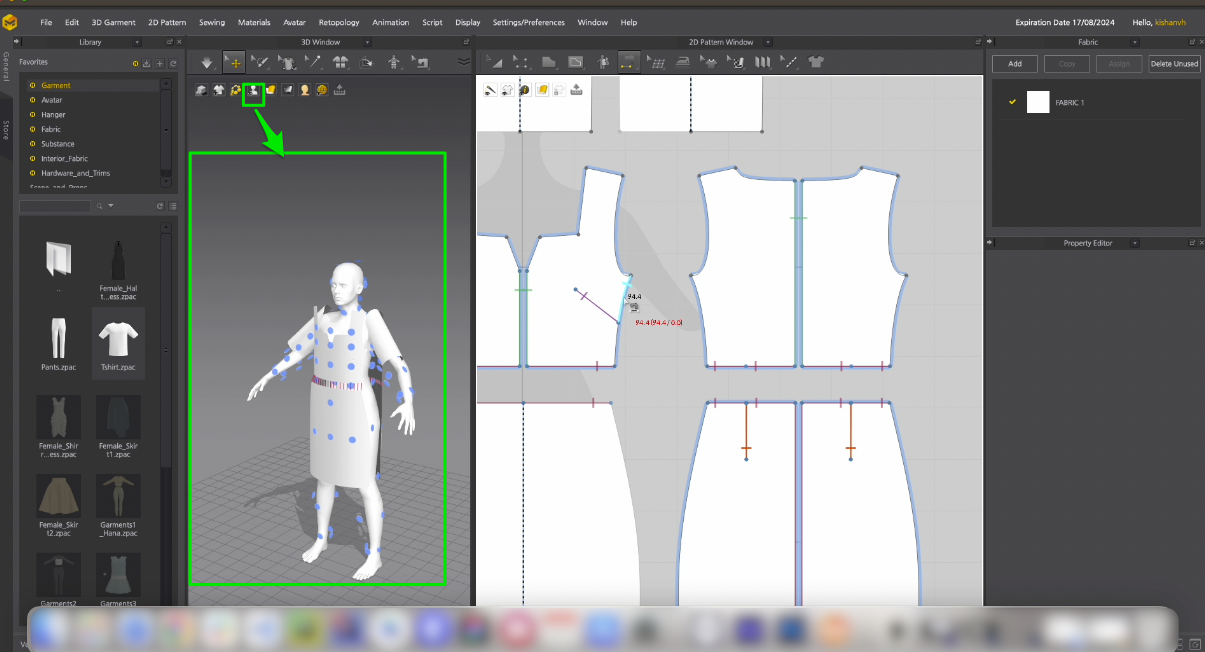
Use the segment sewing tool to sew the sides dress pattern.
In the 3D Window navigate to the Segment Sewing. Begin by selecting one segment, then choose a second segment to get an overview of the sewing connections.Then left click of the mouse.
Consider the logical connections between garment patterns; where the dress patterns would have seams. Feel free to adjust the sewings that are not well-made. Select 'Edit Sewing' from the top toolbar, choose the sewing lines, and simply remove or modify them. Apply other sewings as needed.
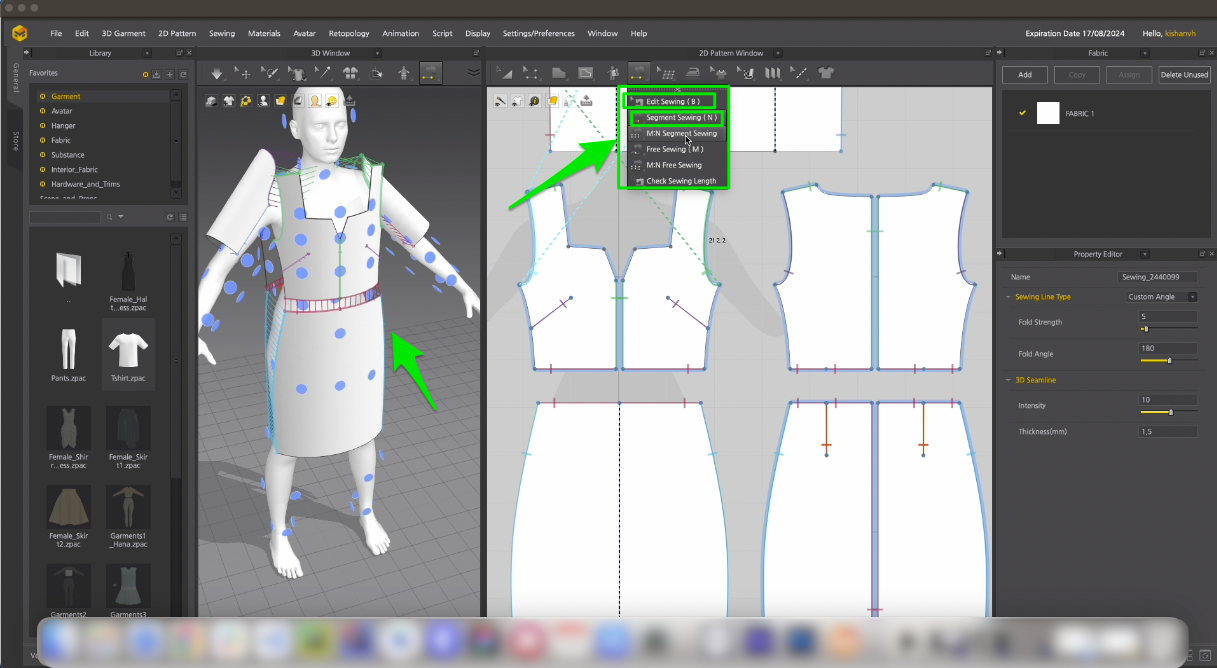
After completing all sewings proceed to simulate the garment on the Avatar. Now simulate the fitting on the avatar and observe how the dress drapes by pressing the spacebar. Adjust the garment on the avatar by selecting and dragging points. To create sewing edge lines for the dress, use internal lines. Select the line, then right-click and choose 'Offset as Internal Line.' In the pop-up window, enter the desired distance and click OK. Select the seam intern line, right-click and choose Cut and Sew. Repeat the process for the sleeves. In 3D Window Simulate the fitting again, press SpaceBar.
Texture
Apply textures and materials to the dress by navigating to the fabric overview in the left panel.
Select the desired texture from the list, and then edit it in the Property Editor on the right panel.
In the Property Editor, add or change the Normal Map and adjust the color of the fabric.
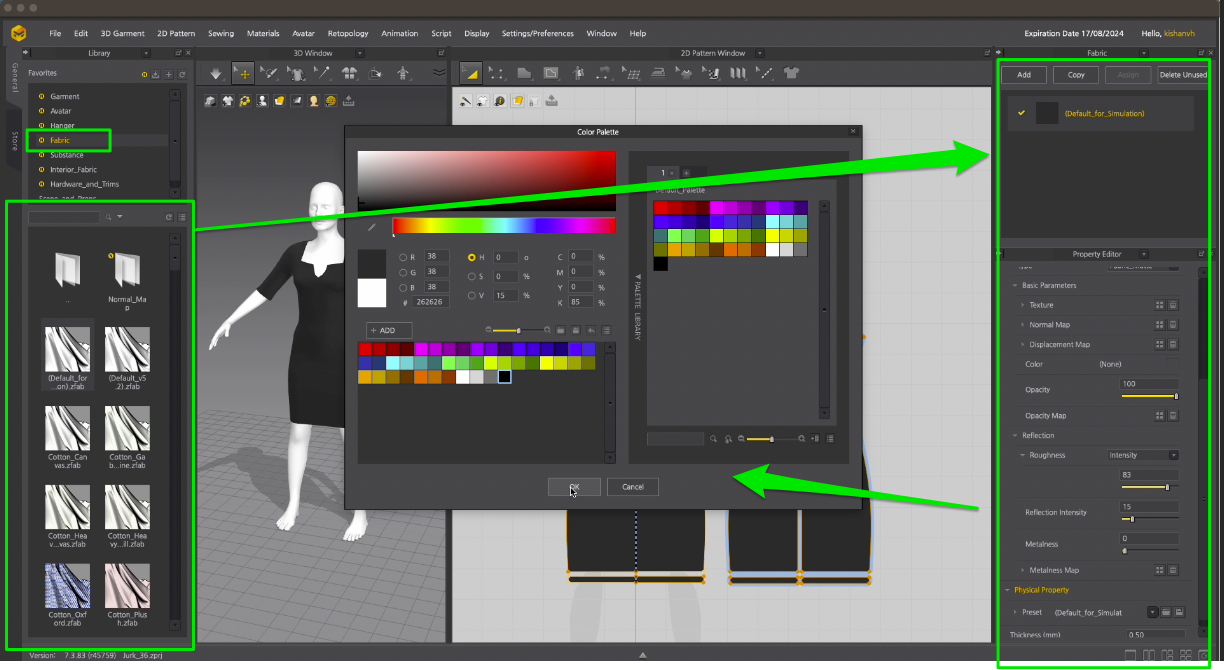
Save your project. The garment is finished. Get ready to export this.
Exporting Dress Garment
Navigate to the 2D Pattern Window and change the 2D View Window to UV Editor.
To ensure that the patterns are proportionally sized, it's correct to right-click and choose 'Reset UV to 2D Arrangement.
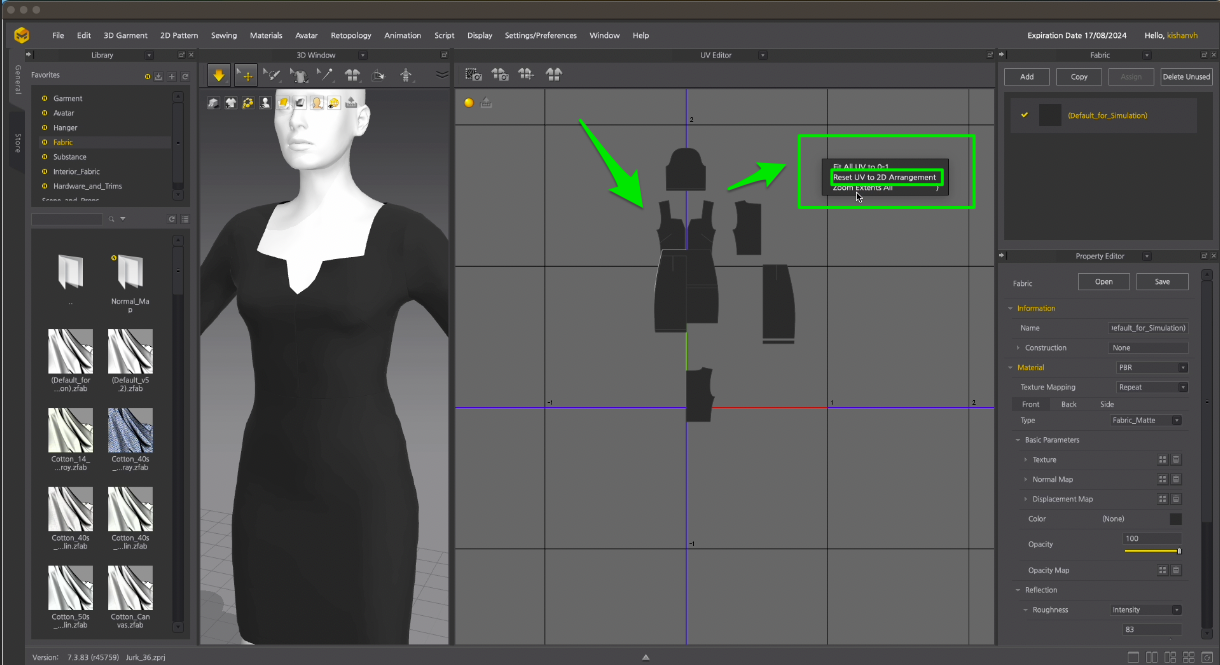
Make sure that all the UVs fit in one tile, if not repeat the procedure. Ensure that each pattern is clearly visible and does not overlap with another pattern. Select all patterns, right-click, choose 'Fit UV to 0-1', and then click OK.
Click File->Export->OBJ. Choose a good path. Make an apart folder.
Name the file something recognizable, in this case ‘Dress_Garment’. Make sure to use the ‘Garment’ word in the file name. Export with the following settings:
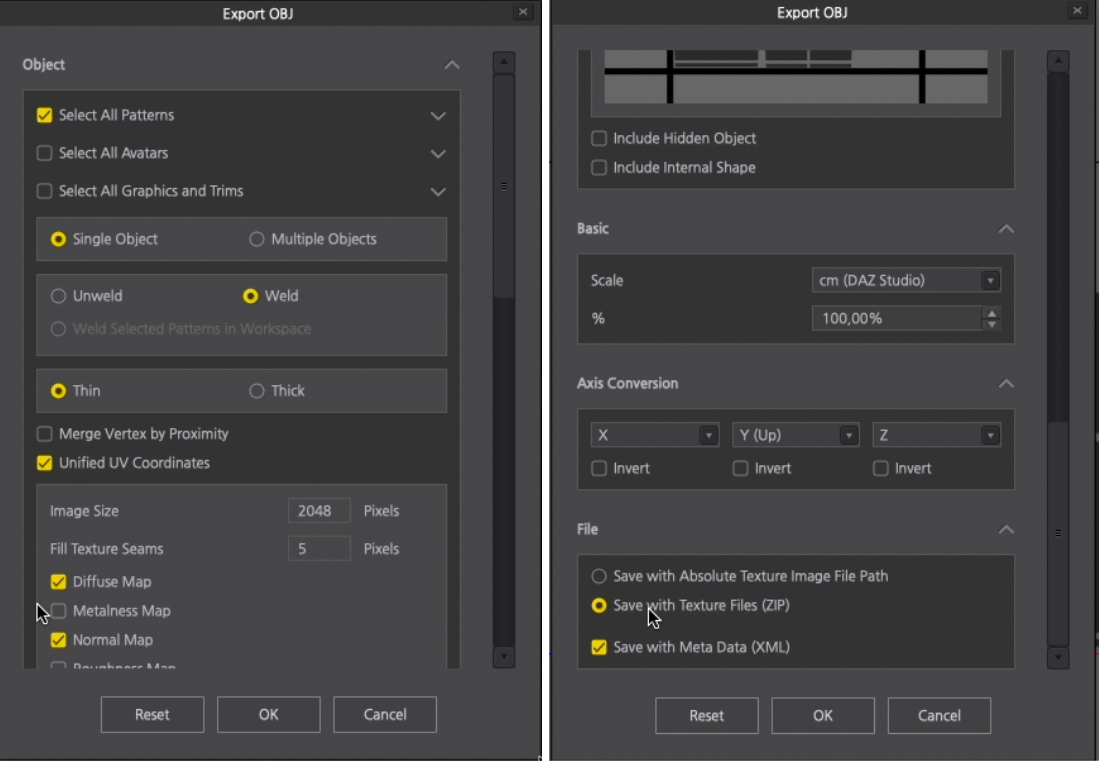
In the UV Editor deselect all, right click and select ‘Reset UV to 2D Arrangement’. Click File->Export->OBJ. Name the file something recognisable, for instance “Dress_Pattern”. Make sure that the name contains the word “Pattern”. Export with the following settings (don't forget to deselect all texture maps):

Navigate to your Files Directory and locate these files. Unzip the Garment folder. Make sure that all files are now in one folder, and then make another zip with all files. And name your Folder for instance “export”.
Your garment is now ready to be tested in the Shopify Fitting Room.
How to test your garment in Shopify Fitting Room
Let's set up a Fitting Room on Shopify. Navigate to the Shopify Partners login page, and log in. Once logged in, you'll be directed to the Homepage.
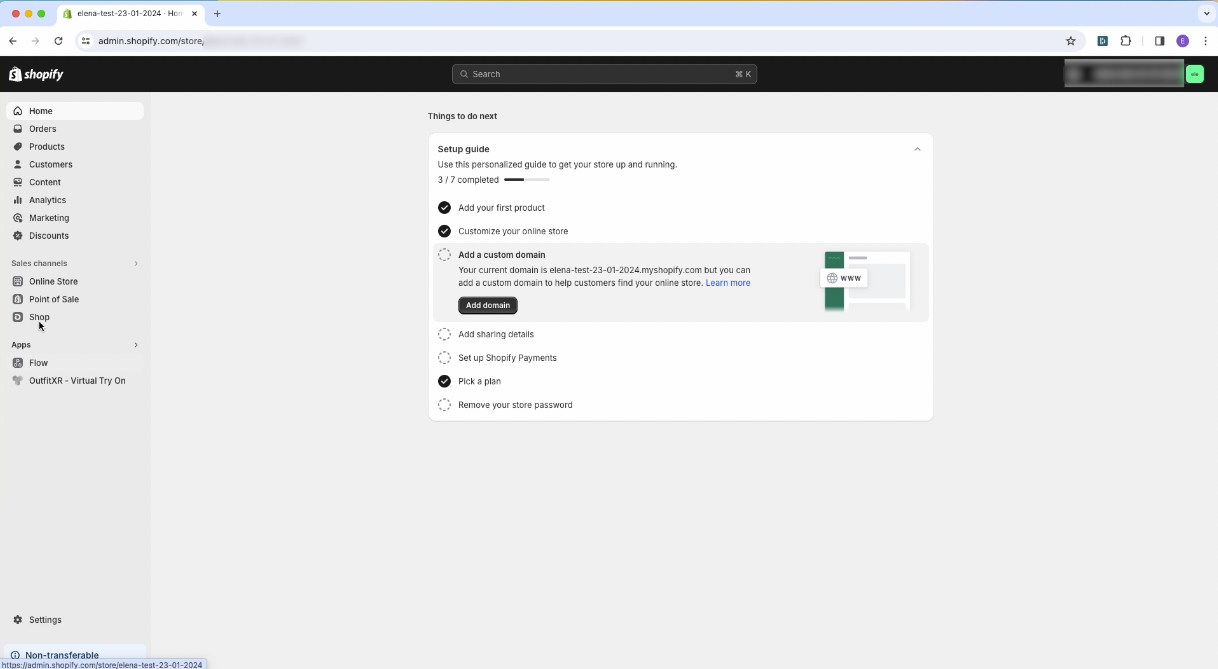
Access the Apps section and click on 'Apps' in the left-hand menu. Select 'OutfitXR - Virtual Try On' from the list of apps. Navigate to the settings and verify if you are connected. Click on the "Connect" or "Reconnect" button.
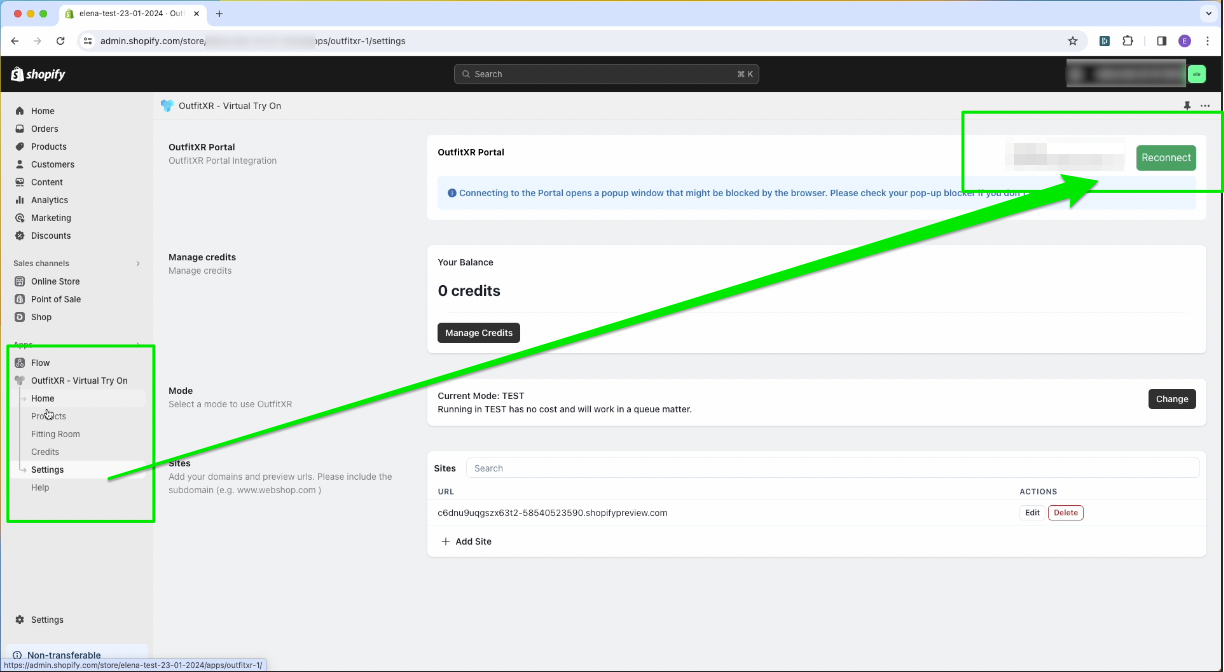
Introduce your account details and click log in. Now, you're directed to your own store.
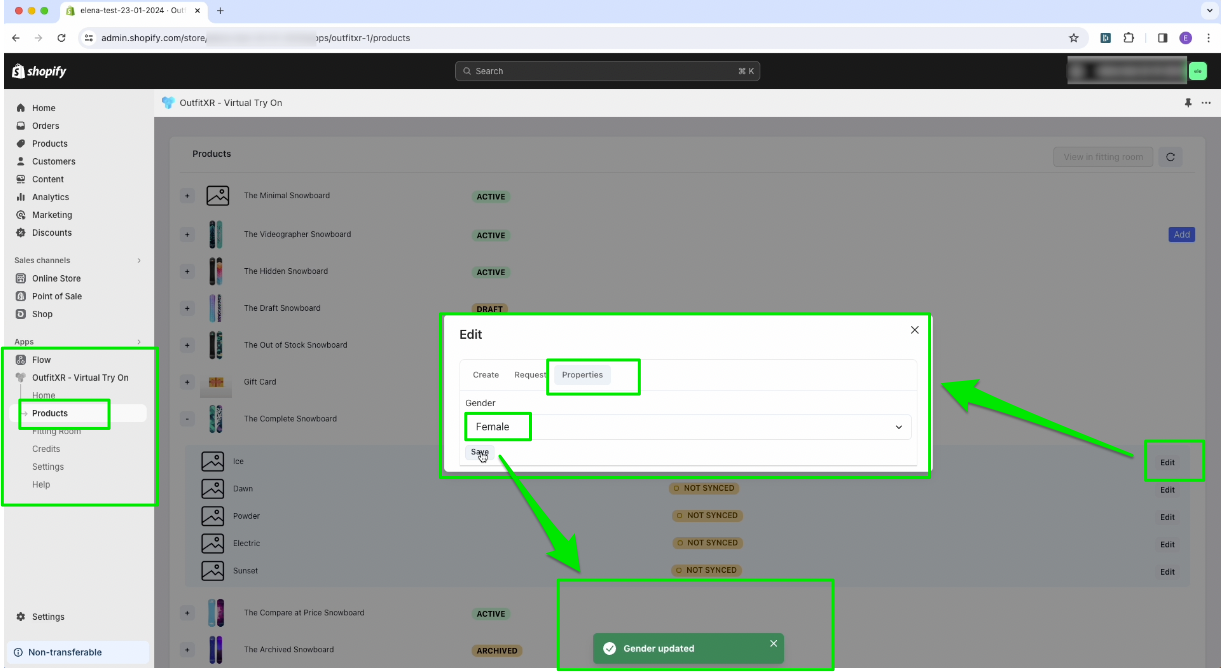
Continue by choosing 'Products' from the displayed list of the app. You will be directed to a page with a list of products. Select a product from the list that is not yet synced, and click on the 'Edit' button."
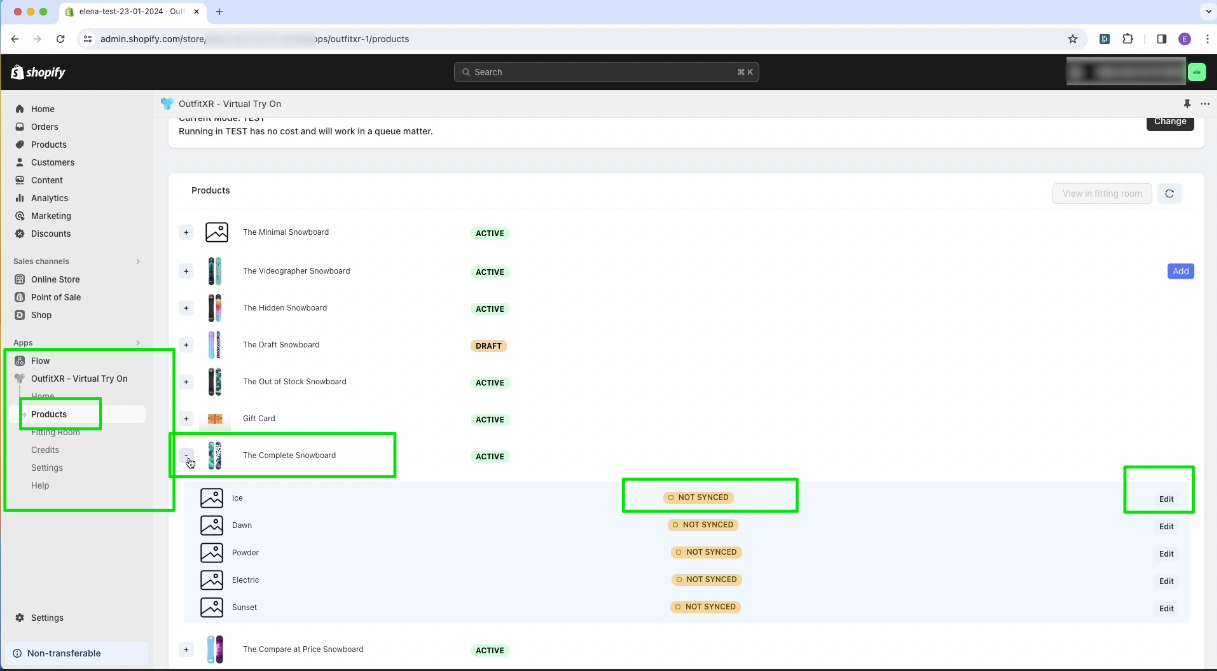
Within the pop-up window, navigate to the Properties section and make a change for your preferred gender. Make sure the change is confirmed.
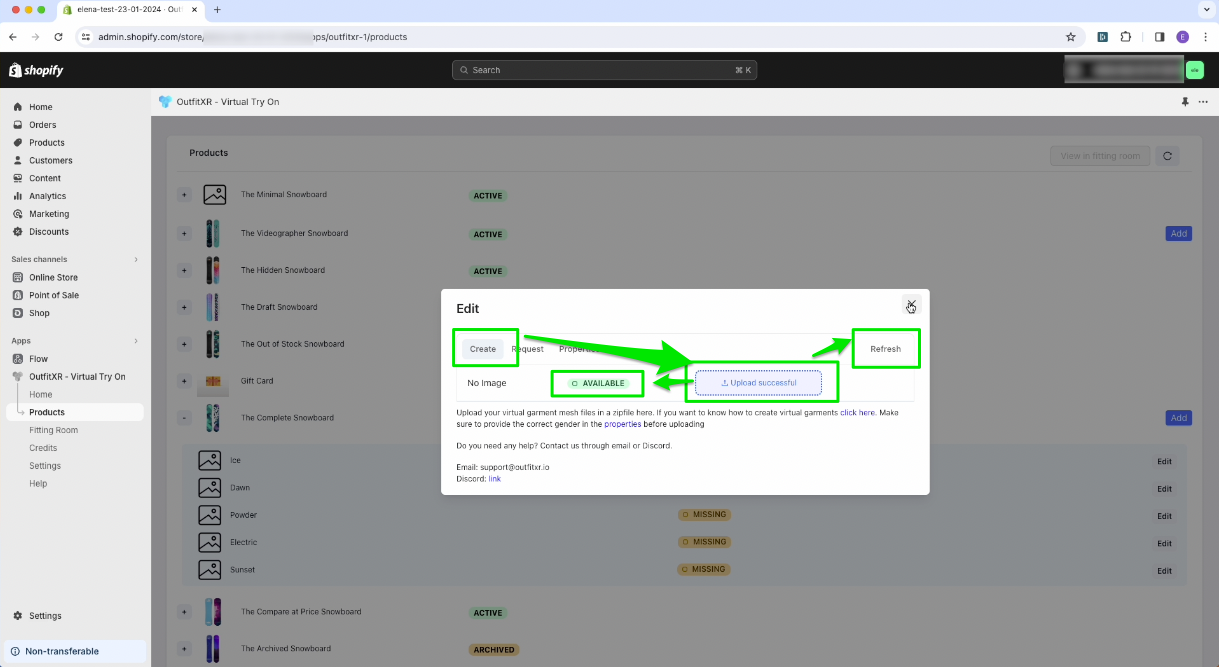
Return to the Create section, locate the zip file on your computer and drag it into the field labeled “upload” to upload it.
Click on 'Refresh' to check the upload status. You can click 'Refresh' a few times; make sure the status now shows 'Available.' Once confirmed, you can close the window.
Let's initiate a Fitting Room session. You can create a Fitting Room session directly from the current page by clicking the 'Add' button.Then access 'View in Fitting Room'. In the popup window, choose an avatar and click the 'Create Fitting Room' button. And you can continue.

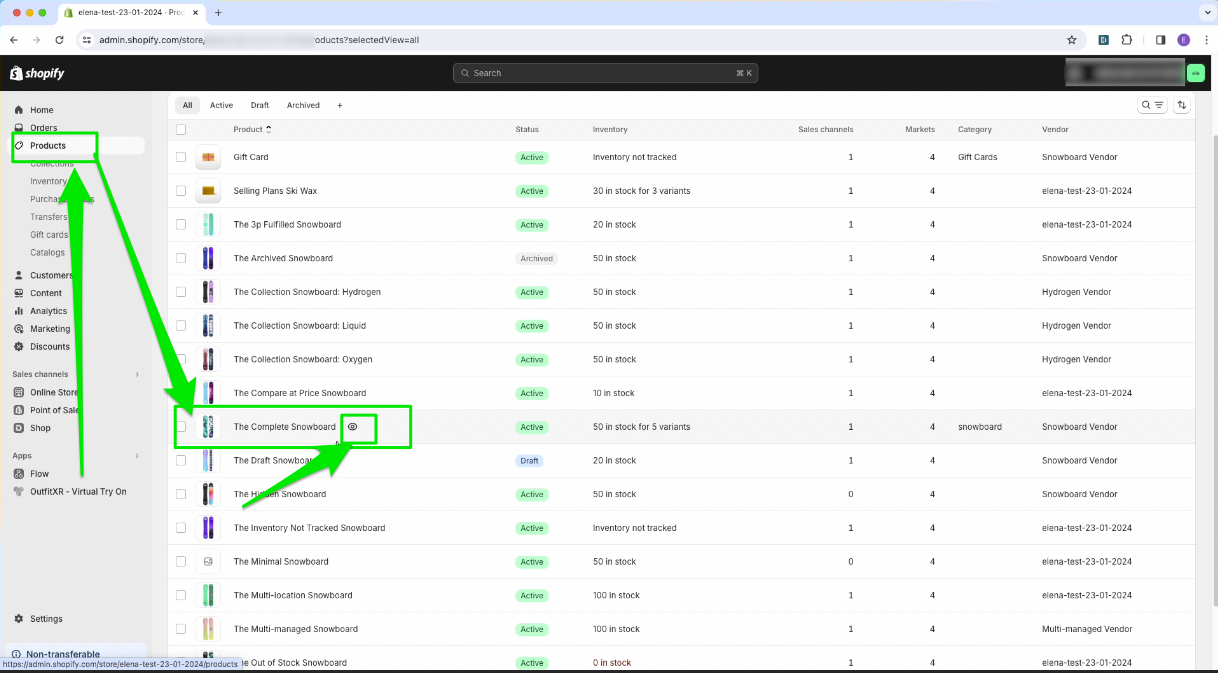
Another method is to access the 'Products' page from the top-left menu. Search for the recently edited product in the displayed list and click on the eye icon to access it.
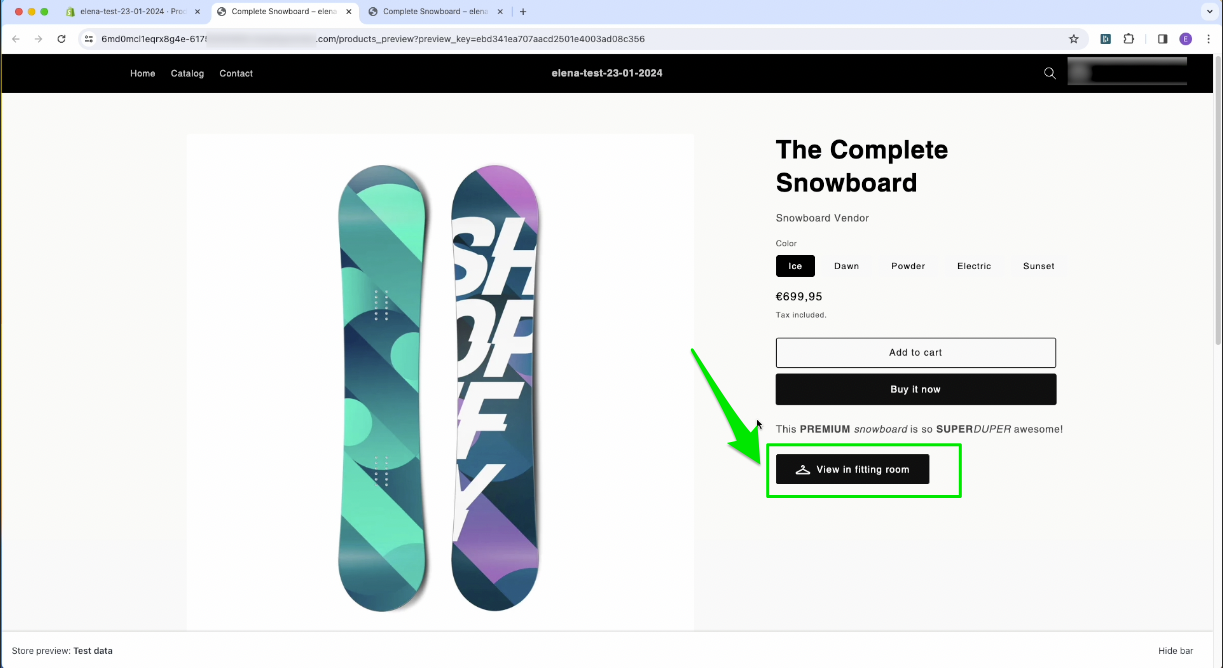
After the product has opened, you will see a 'View in Fitting Room' button on the right side of its page. Click on it.
And then Click on 'Book a new.' And select an avatar and click the 'Create Fitting Room' button.
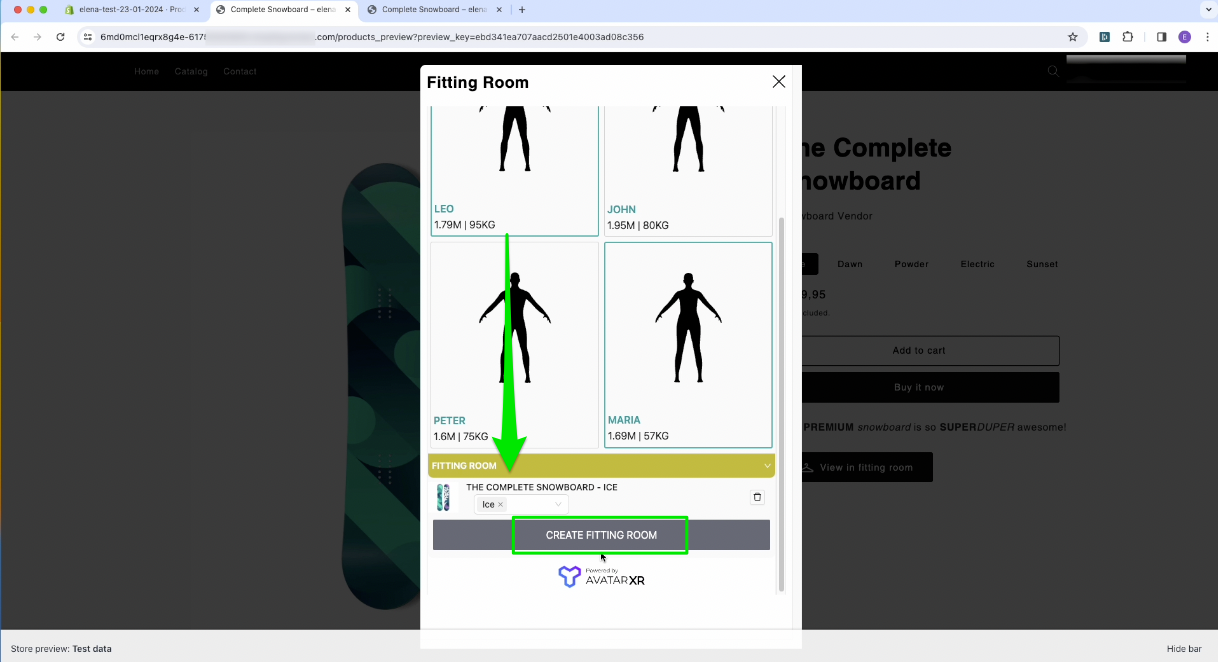
You will be automatically redirected to the Fitting Room. Wait until your personal fitting room loads to test the garment. Once the fitting room is displayed, you have the option to select an avatar and then proceed to try on clothing garments on that chosen avatar. In the displayed fitting room you can see the simulation of the garment on the avatar.
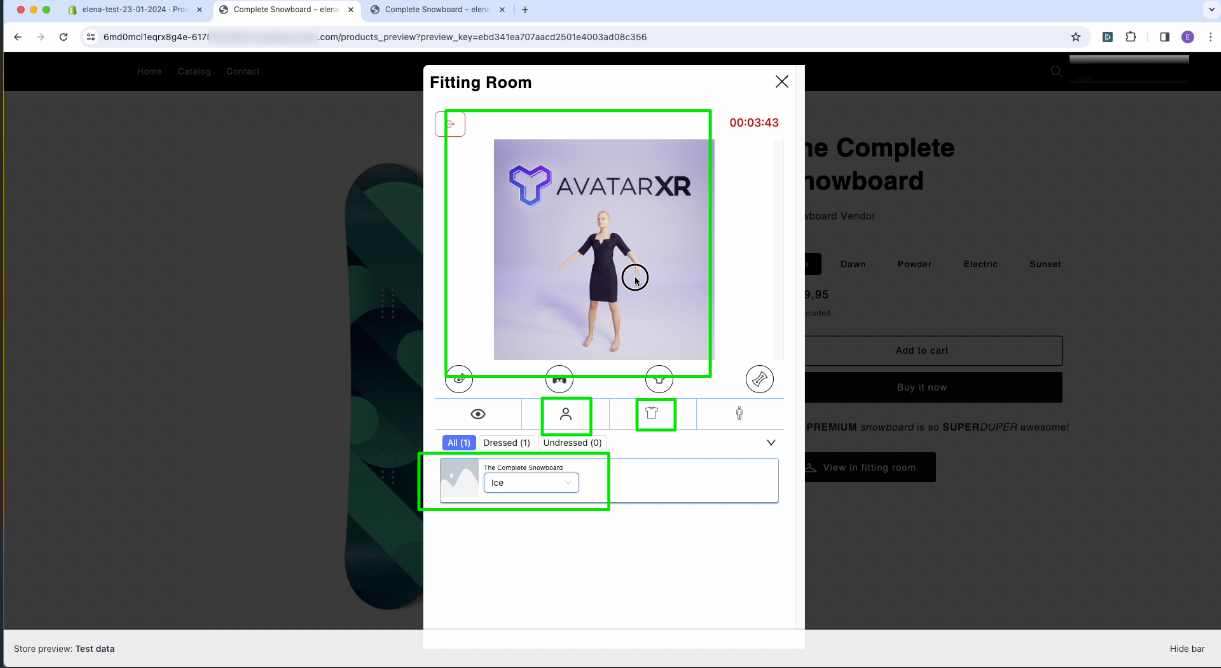
Use the 'Heat Map' option to visualise how garments of different sizes fit on the avatar. This allows you to observe whether the garments are either too loose or too tight on your selected avatar.
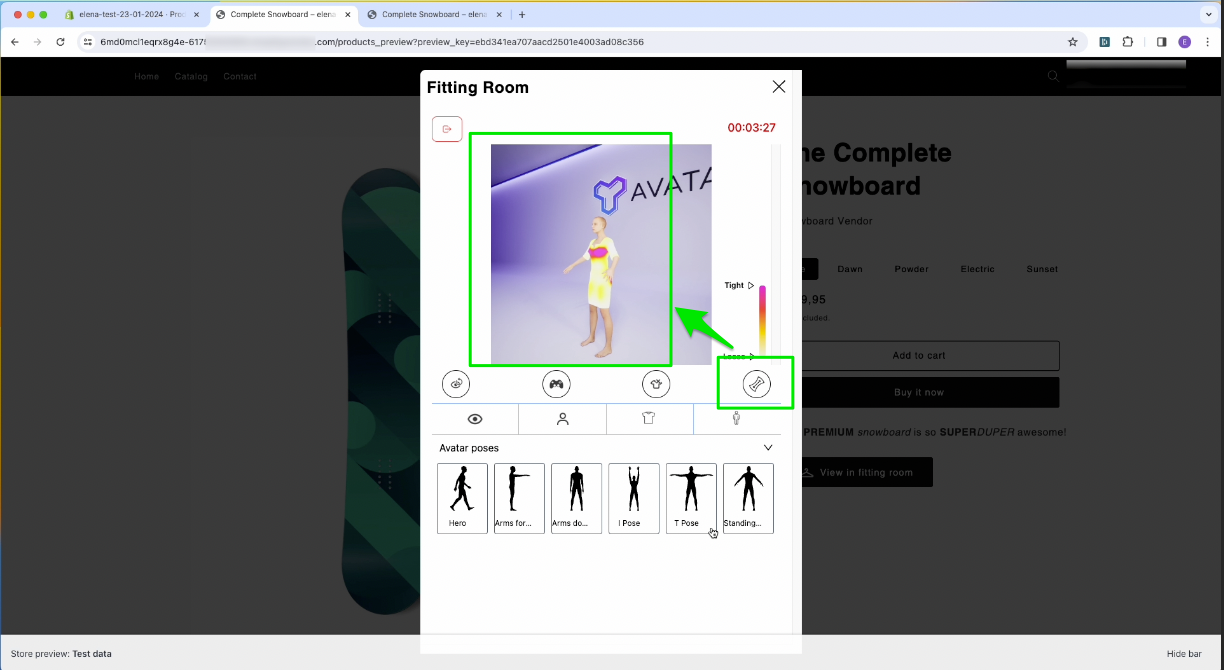
Here, you have the option to choose different poses for the avatar. You even have the option to see how the garment fits on the avatar while it moves. In the Fitting Room, you can implement various functionalities, such as zooming in or out. Additionally, you have the option to reset the view to return to the initial overview. You can manage other controls, including adjusting the height, rotating the view, and zooming for a more personalised experience.
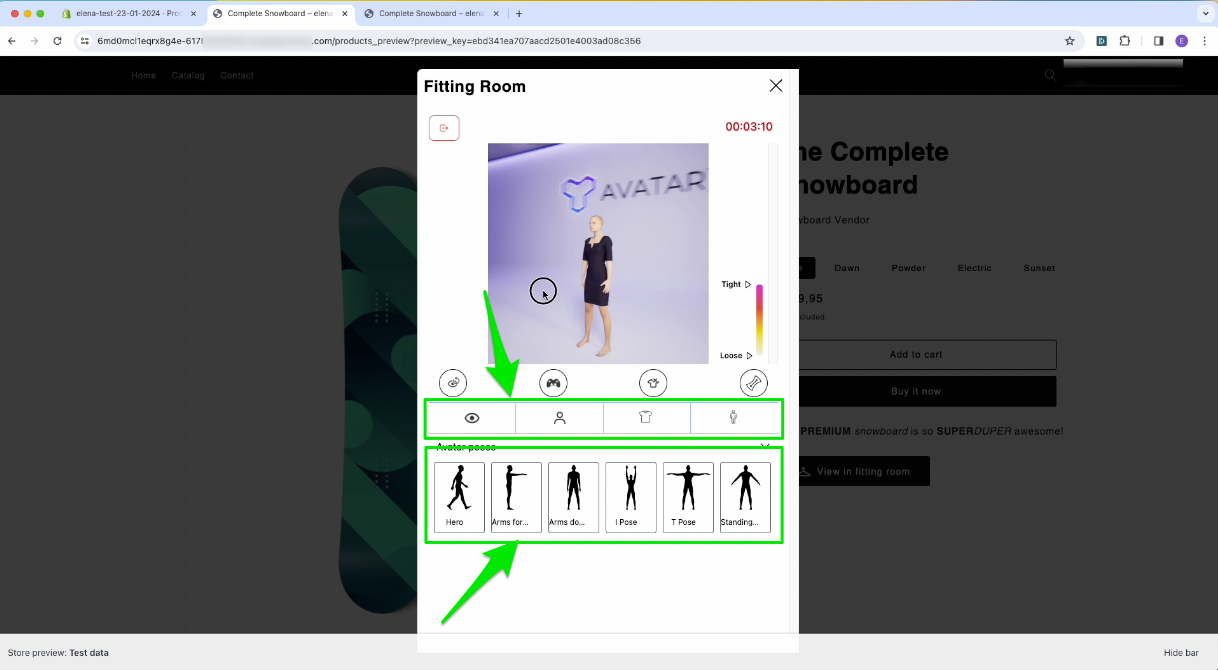
Congratulations! You have reached the end of the tutorial. Now you know how to create a digital garment and test it in a Fitting Room.
